
Mastering WordPress Caching: Plugins vs. Server-Side Solutions (2025 Guide)
TL;DR: Website speed is critical for SEO, user experience, and conversions, making caching an essential optimization. Caching operates at multiple levels—page, object, opcode, browser, and CDN—each addressing different performance bottlenecks. WordPress site owners can choose between plugin-based caching, which is easy to set up and ideal for beginners or shared hosting environments, and server-side caching, which offers higher performance and lower latency but requires technical expertise and server access. The right choice depends on your hosting setup, traffic volume, and technical comfort: plugins suit small to medium sites, while server-side solutions are best for high-traffic or enterprise websites. Emerging trends like edge caching, headless WordPress API caching, and AI-assisted optimizations continue to enhance caching strategies, ensuring faster, more efficient websites.
The Unyielding Need for Speed
The cost of a slow website is measured not in seconds, but in lost revenue, diminished trust, and plummeting search rankings. As research from Google has starkly demonstrated, the probability of a user bouncing from your site increases by 32% as page load time goes from a mere one second to three seconds (Think with Google). In an era of fleeting attention spans, three seconds is an eternity.
But why is a default WordPress installation, which powers over 43% of the web (Invedus), inherently “slow” out of the box? The answer lies in its dynamic nature. WordPress is a Content Management System (CMS) built on the PHP programming language and a MySQL database. Every time a visitor requests a page, WordPress must perform a complex sequence of tasks. Imagine a master chef in a bustling restaurant. For every single customer order, the chef must run to the pantry (the database), gather fresh ingredients (content, settings, user data), meticulously prepare and cook the dish from scratch (execute PHP scripts), and then finally serve it. This process, repeated for every visitor, consumes significant server resources—CPU cycles and memory—and takes time.
Now, introduce caching. Caching is the single most effective strategy for breaking this resource-intensive cycle. It transforms your website’s operational model. Our master chef, instead of cooking every meal to order, now intelligently pre-cooks the most popular dishes (your pages) and stores them on a warming tray, ready for instant service. When a customer orders a popular item, it’s served immediately. This is the essence of page caching: storing a fully-rendered, static HTML version of a page. When a visitor arrives, the server delivers this pre-built file instantly, bypassing the entire PHP and database workload. The result is a dramatic reduction in server response time and a lightning-fast experience for the user.
This guide is dedicated to mastering this transformative technology. We will navigate the central debate facing every WordPress site owner: the choice between two primary paths to implementation. The first is the **Plugin Path**, a world of user-friendly, powerful tools like WP Rocket, LiteSpeed Cache, and W3 Total Cache that make sophisticated optimization accessible to everyone. The second is the **Server-Side Path**, an enterprise-grade approach involving direct configuration of technologies like Nginx, Varnish, and Redis for ultimate performance and scalability.
By the end of this comprehensive analysis, you will understand not just the “why” behind caching’s critical role in SEO and Core Web Vitals, but also the “what” of its different layers—from page and object to opcode caching. Most importantly, you will be equipped with the “how”: detailed, step-by-step guides to configure both leading plugins and robust server-side solutions, enabling you to choose and implement the perfect caching strategy for your specific needs and dominate in 2025.
Why Caching is Your #1 SEO Lever: The Core Web Vitals Connection
For years, SEO professionals debated the precise weight of site speed in Google’s ranking algorithms. That debate is over. Caching is no longer an indirect or “tie-breaker” signal; it is a primary driver of the very metrics Google has explicitly confirmed as ranking factors. By mastering caching, you are not just making your site faster for users—you are directly optimizing for Google’s definition of a quality user experience, providing a tangible and measurable lift to your search visibility.
Google’s Mandate: The Page Experience Update
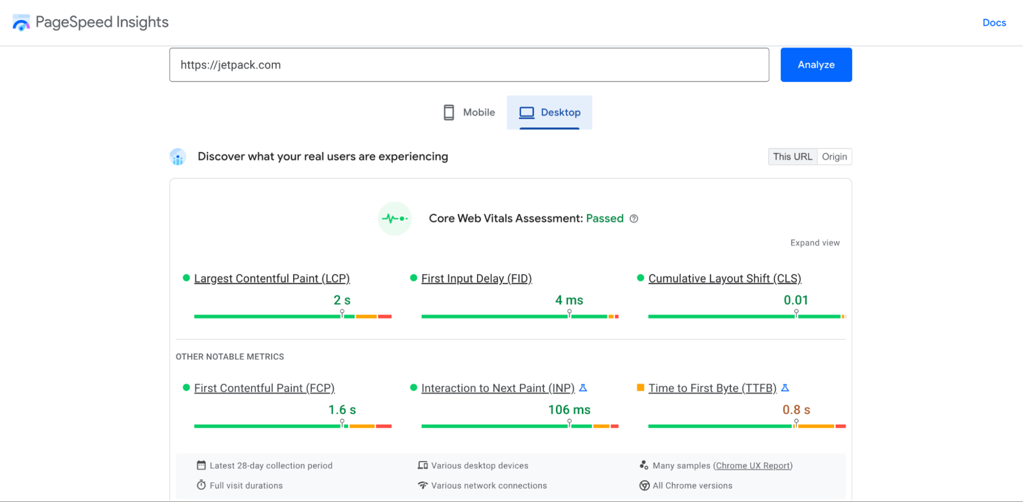
With the full rollout and continued emphasis on the Page Experience signals, Google has made its criteria clear: it will reward websites that offer a superior user experience. At the heart of this initiative are the **Core Web Vitals (CWV)**, a set of three specific, user-centric metrics designed to measure real-world experience (Google Search Central). These are not abstract lab scores; they are measurements of how real users interact with your pages.
The three Core Web Vitals are:
- Largest Contentful Paint (LCP): This measures **loading performance**. Specifically, it marks the point in the page load timeline when the main content—the largest image or text block within the viewport—has likely loaded. A fast LCP helps reassure the user that the page is actually useful. A good score is 2.5 seconds or less.
- Interaction to Next Paint (INP): This measures **responsiveness**. INP assesses the latency of all user interactions with a page, reporting a single value that all (or nearly all) interactions were below. It reflects how quickly a page reacts to user input, like a click or a tap. A good score is 200 milliseconds or less.
- Cumulative Layout Shift (CLS): This measures **visual stability**. It quantifies how much unexpected layout shift occurs during the entire lifespan of the page. A low CLS ensures that the page is delightful and users don’t accidentally click on the wrong element because something moved unexpectedly. A good score is 0.1 or less.
Passing the Core Web Vitals assessment is not just a recommendation; it’s a competitive advantage. Google uses these signals as a factor in ranking, and for highly competitive keywords, a better page experience can be the deciding factor that places your content above a competitor’s (DebugBear).
Caching’s Direct Impact on Core Web Vitals
Caching is not a peripheral optimization; it is the foundational technology that directly and dramatically improves all three Core Web Vitals. Here’s the mechanical link:
- Improving LCP: The most significant factor influencing LCP is server response time, also known as Time to First Byte (TTFB). Without caching, the server must execute PHP, query the database, and build the HTML page before sending the first byte. This can take hundreds of milliseconds or even seconds. With page caching, the server grabs a pre-built static HTML file and sends it almost instantly. This drastically reduces TTFB, giving the browser a massive head start on rendering the page and its largest contentful element.
- Improving INP: Poor responsiveness is often caused by a browser’s main thread being blocked by long tasks, most commonly heavy JavaScript execution. Advanced caching plugins (like WP Rocket or FlyingPress) and server-side configurations address this in two ways. First, by serving a cached page, they reduce the initial server-side processing, freeing up server resources. Second, their file optimization features can defer or delay the loading and execution of non-critical JavaScript. This clears the main thread, allowing it to respond immediately to user interactions like clicks and taps, thus lowering INP.
- Improving CLS: Layout shifts often occur when resources like images, ads, or web fonts load late, causing content that is already visible to move around. Modern caching solutions help mitigate this. They can implement “critical CSS,” which inlines the styles needed for above-the-fold content, ensuring the initial layout is stable. They also work in tandem with optimizations like specifying image dimensions and preloading key fonts, which are best practices for preventing CLS. By ensuring assets are loaded efficiently and predictably, caching contributes to a stable and visually pleasant loading experience.
Evidence & Case Studies: The Business Impact of Speed
The link between caching, site speed, and business metrics is well-documented by major industry players. These are not theoretical gains; they are proven results that directly affect revenue and user engagement.
Key Performance Case Studies:
- Vodafone discovered that optimizing their LCP by 31% on a landing page led to an **8% increase in sales**. This demonstrates a direct correlation between loading performance and conversion rates (web.dev).
- Akamai, a leading CDN provider, analyzed billions of user visits and found that a mere **100-millisecond delay** in load time could hurt conversion rates by as much as 7%. This highlights the sensitivity of users to even minor performance degradations (Akamai).
- Ebay initiated a project to improve performance and found that for every 100ms improvement in search page load time, the “Add to Cart” count increased by 0.5%, a significant metric at their scale (Ebay Engineering).
These examples underscore a universal truth: a faster website, primarily achieved through effective caching, is perceived as more professional, trustworthy, and reliable. This improved user perception reduces bounce rates, increases engagement, and directly drives conversions, making caching the most powerful performance optimization and SEO lever at your disposal.
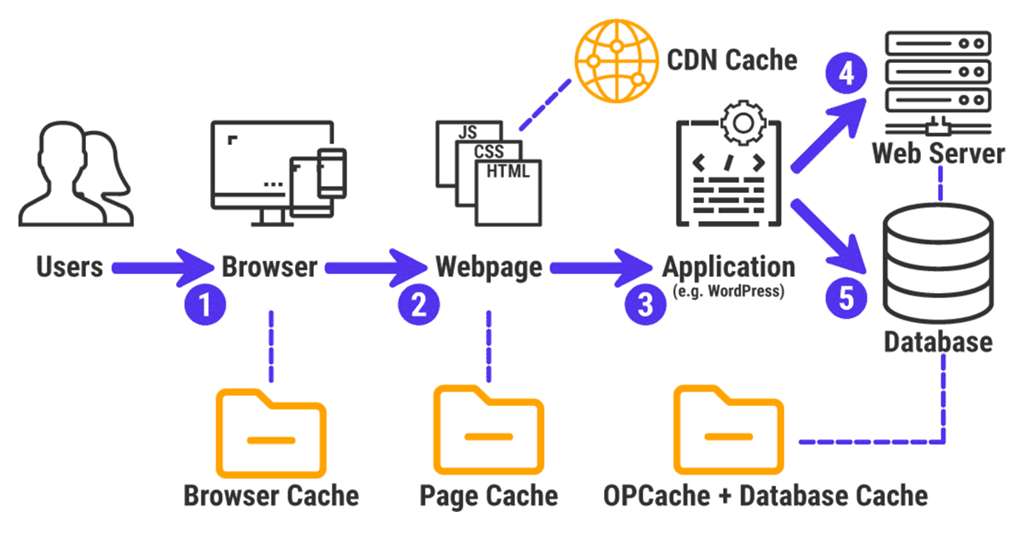
Deconstructing the Cache: A Multi-Layered Approach
To effectively implement a caching strategy, it’s essential to understand that “caching” is not a single action but a multi-layered system. Different types of caches operate at different stages of a request’s lifecycle, from the user’s browser all the way to the server’s database. Understanding these layers allows you to build a comprehensive performance strategy that addresses bottlenecks at every point.
1. Page Caching (The Heavy Lifter)
What it is: Page caching is the most impactful and widely understood form of caching. It involves storing the complete, static HTML output of a page after it has been generated by WordPress for the first time. This static file is then served to subsequent visitors, completely bypassing the resource-intensive WordPress backend (WPBeginner).
How it works:
- The first visitor requests a page (e.g., `yoursite.com/about-us`).
- The web server passes the request to WordPress. PHP executes, queries the MySQL database, and assembles the final HTML page.
- The server sends this HTML to the visitor’s browser.
- Simultaneously, the caching engine (either a plugin or a server module) saves a copy of this final HTML file to a temporary storage location (the cache), often on the server’s disk or in memory.
- The next visitor requests the same page.
- The server detects a valid cached version exists and serves the static HTML file directly, without ever needing to load WordPress.
This process can make a site feel 2-5 times faster for visitors, as the server’s response time drops from seconds to milliseconds (WPBeginner).
Who it’s for: Page caching is essential for virtually all WordPress websites. It provides the most significant performance gains for sites with content that doesn’t change on a per-user basis, such as blogs, corporate websites, news portals, and portfolios. For dynamic sites like e-commerce stores, page caching is still crucial, but it requires careful configuration to exclude pages like the cart, checkout, and my-account areas (RunCloud).
2. Object Caching (The Database Accelerator)
What it is: While page caching stores the final HTML, object caching targets a different bottleneck: the database. It stores the results of complex or frequently repeated database queries in a fast, in-memory storage system. This prevents WordPress from having to run the same SQL queries over and over again (WP Rocket).
How it works: WordPress has a built-in object cache (`WP_Object_Cache`) but, by default, it is **non-persistent**. This means it only stores query results for the duration of a single page load to avoid redundant queries within that one request. At the end of the request, the cache is discarded (Pressidium).
**Persistent object caching** is where the real power lies. By integrating an external in-memory caching system like **Redis** or **Memcached**, the query results are stored across multiple page loads and for all users. When a function in WordPress requests data that requires a database query, it first checks the persistent object cache. If the result is found (a “cache hit”), it’s returned instantly from memory, avoiding a slow database call.
Who it’s for: Persistent object caching is crucial for dynamic, database-heavy websites. This includes:
- WooCommerce Stores: Speeds up product filtering, inventory checks, and user session data.
- Membership Sites & Forums: Accelerates the retrieval of user data, permissions, and discussion threads.
- Sites with Complex Queries: Any site using plugins or themes that make numerous, complex calls to the database will see a significant reduction in server load and an increase in backend responsiveness.
For a simple blog, the benefits might be minimal, but for a complex application, it can be the difference between a snappy user experience and a sluggish, overloaded database (SpinupWP).
3. Opcode Caching (The PHP Optimizer)
What it is: This is a server-level optimization that focuses on speeding up PHP execution itself. PHP is an “interpreted” language, meaning that every time a PHP script runs, the human-readable code must be compiled into machine-readable instructions called “opcodes.” This compilation step takes time and CPU resources.
How it works: An opcode cache, such as the widely used **OPcache** (which is bundled with modern PHP versions), stores the pre-compiled bytecode in shared memory. The first time a PHP script is executed, it’s compiled and the opcodes are cached. On all subsequent requests for that script, the server skips the compilation step and executes the cached opcodes directly. This significantly reduces the CPU load and speeds up the execution of all PHP code, including WordPress core, themes, and plugins (RapidLoad).
Who it’s for: Opcode caching benefits **every single WordPress site** because WordPress is built on PHP. It is not something you typically manage with a plugin. Most quality WordPress hosting providers enable and configure OPcache by default as part of their standard server stack. If you manage your own server, ensuring OPcache is enabled and properly configured is a fundamental step for performance optimization.
4. Other Essential Caches: Browser and CDN
While page, object, and opcode caching are server-side, two other types are critical for a holistic strategy:
- Browser Caching: This is a client-side cache. The server instructs a visitor’s web browser to store static files—such as CSS stylesheets, JavaScript files, images, and fonts—locally on their computer. When the visitor navigates to another page on your site or returns later, the browser loads these files from its local cache instead of re-downloading them from your server. This dramatically speeds up repeat visits and navigation between pages (WPSpeedMatters). This is typically configured via HTTP headers like `Cache-Control` and `Expires`.
- CDN Caching: A Content Delivery Network (CDN) is a global network of servers (known as edge locations or PoPs). A CDN caches copies of your site’s static assets (and sometimes dynamic HTML) on these servers around the world. When a user visits your site, the content is delivered from the edge server geographically closest to them, reducing network latency. This is especially crucial for websites with a global audience, as it significantly shortens the physical distance data has to travel (Kinsta).
The Plugin Path: Top WordPress Caching Plugins in 2025
For the vast majority of WordPress users, from bloggers to small businesses and even many agencies, a caching plugin is the most practical, efficient, and powerful way to implement a comprehensive caching strategy. Modern plugins have evolved from simple page caching tools into all-in-one performance suites, tackling file optimization, media handling, and Core Web Vitals improvements with user-friendly interfaces. They democratize high-end performance, making it accessible without needing command-line expertise.
In 2025, the market has consolidated around a few key players who consistently deliver results. We will focus on the three leading contenders: WP Rocket, the gold standard for ease of use and effectiveness; LiteSpeed Cache, the unbeatable choice for sites on LiteSpeed servers; and W3 Total Cache, the veteran toolkit for developers demanding granular control.
Feature Comparison: WP Rocket vs. LiteSpeed Cache vs. W3 Total Cache
Choosing the right plugin depends on your hosting environment, technical skill, and specific performance goals. This table provides a high-level comparison of the top three plugins.
| Feature | WP Rocket | LiteSpeed Cache | W3 Total Cache |
|---|---|---|---|
| Price | Premium (Starts at $59/year) | Free | Free (Pro version available) |
| Ease of Use | ★★★★★ (Extremely Beginner-Friendly) | ★★★☆☆ (Many options, presets help) | ★☆☆☆☆ (Very complex, for advanced users) |
| Page Caching | Excellent, automatic on activation | Excellent (Server-Level) | Excellent, multiple methods |
| Server-Level Caching | No (Integrates with Rocket-Nginx) | Yes (Requires LiteSpeed Server) | No |
| Object Cache Support | No (Compatible with external plugins) | Yes (Built-in Redis/Memcached UI) | Yes (Built-in configuration) |
| Database Caching | No (Offers database cleanup) | No | Yes |
| CDN Integration | Easy integration, offers RocketCDN | Deep integration with QUIC.cloud | Extensive options for any CDN |
| Core Web Vitals Features | Remove Unused CSS, Defer/Delay JS, LazyLoad | UCSS, Defer/Delay JS, LQIP, Guest Mode | Minification, Defer JS (Limited in free) |
| Ideal User | Beginners, business owners, agencies wanting fast results with minimal fuss. | Users on LiteSpeed or OpenLiteSpeed hosting. | Developers and technical users who require maximum control and customization. |
Data compiled from sources including Bloggingnote, WPBeginner, and official plugin documentation.
Deep Dive: WP Rocket (The Premium All-in-One)
Review: WP Rocket has earned its reputation as the best premium caching plugin for one simple reason: it just works. It is designed for users who value their time and want immediate, impactful performance gains without navigating a labyrinth of technical settings. Upon activation, it applies about 80% of web performance best practices automatically. Its interface is the cleanest and most intuitive on the market, making it the top recommendation for beginners, business owners, and agencies who need a reliable, “set it and forget it” solution (WPBeginner).
Key Features: Beyond its excellent page caching, WP Rocket’s strength lies in its comprehensive suite of optimization tools. This includes top-tier minification and combination of CSS and JavaScript files, powerful options to “Delay JavaScript Execution” and “Remove Unused CSS” (critical for Core Web Vitals), advanced media optimization with LazyLoad for images and iframes, and database cleanup tools. It also seamlessly integrates with most CDNs and offers its own Varnish add-on for hosts that use it.
Step-by-Step Setup:
Configuring WP Rocket is famously straightforward. Here are the essential steps after installation:
-
- Installation and Activation: After purchasing and uploading the plugin, activate it. You’ll immediately see a confirmation on the dashboard that WP Rocket is active and has already started caching your site. Page caching is enabled by default.
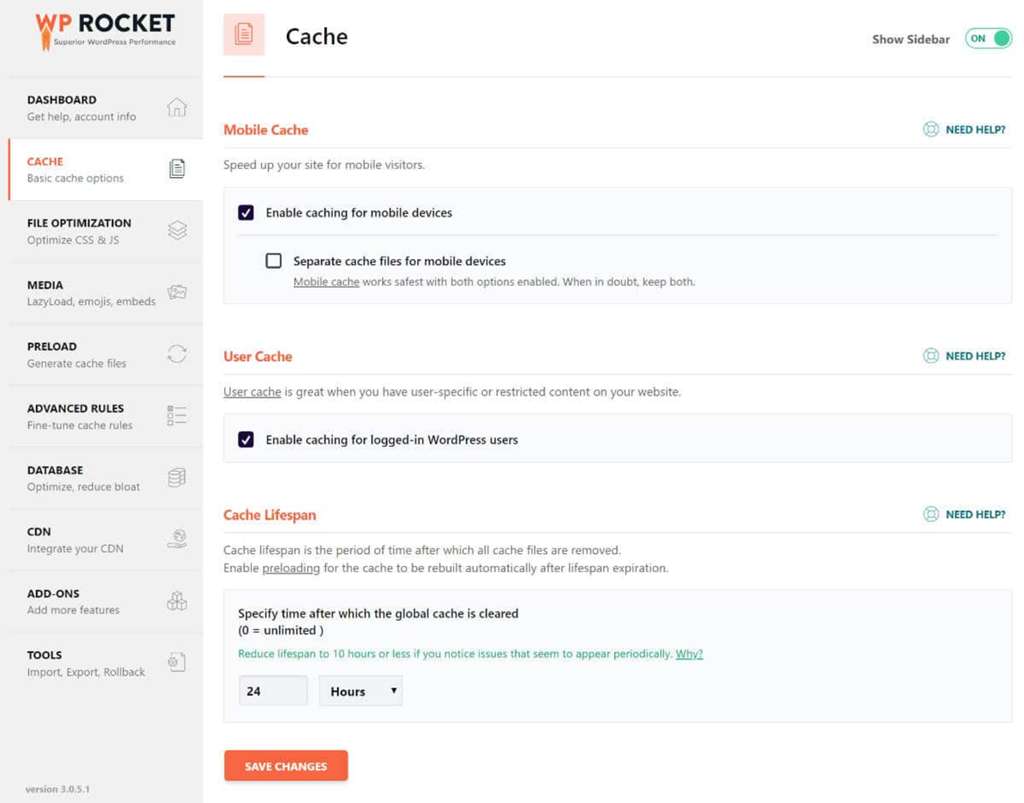
- Configure Basic Cache Settings (Cache Tab): Navigate to `Settings > WP Rocket > Cache`.
- Mobile Cache: Ensure “Enable caching for mobile devices” is checked. The “Separate cache files for mobile devices” option is only needed if you have a separate mobile theme or dynamic mobile-specific content. For most responsive sites, it’s not required.
- User Cache: Only enable “Enable caching for logged-in WordPress users” if you have user-specific content (e.g., a membership site). For most sites, this should remain off.
- Optimize Files (File Optimization Tab): This is where WP Rocket works its magic on Core Web Vitals.
- CSS Files: Enable “Minify CSS files”. Then, the most powerful option is “Optimize CSS delivery”. Choose the “Remove Unused CSS” method. This will generate critical CSS for each page and load the rest asynchronously, dramatically improving LCP and CLS.
- JavaScript Files: Enable “Minify JavaScript files”. Then, enable “Load JavaScript deferred” and, most importantly, “Delay JavaScript execution”. This will postpone the loading of all JS files until the first user interaction (e.g., scroll, click), which is one of the most effective ways to improve LCP and INP.
- Optimize Media (Media Tab):
- Enable “LazyLoad for images”, “LazyLoad for iframes and videos”, and “Add missing image dimensions”. These are crucial for fast initial page loads and preventing CLS.
After saving these settings, WP Rocket will automatically clear the cache and start regenerating it with the new optimizations. That’s it. In just a few clicks, you’ve implemented some of the most advanced performance optimizations available.
Deep Dive: LiteSpeed Cache (The Server-Integrated Powerhouse)
Review: The LiteSpeed Cache (LSC) plugin is in a class of its own, but with one major condition: **your website must be hosted on a server running LiteSpeed or OpenLiteSpeed web server software**. If this condition is met, LSC is arguably the most powerful caching plugin available, and it’s completely free (Online Media Masters). Its key advantage is the deep, direct integration with the web server, allowing it to perform server-level full-page caching that is inherently faster than the PHP-level caching of other plugins.
Key Features: LSC’s feature set is exhaustive. It includes server-level page caching, private caching for logged-in users, a built-in crawler to keep the cache warm, and seamless UI for enabling persistent object caching (Redis or Memcached). It also offers advanced features like “Guest Mode” and “Guest Optimization” for an ultra-fast first-time visit, extensive image optimization services via its QUIC.cloud CDN (including WebP conversion and Low-Quality Image Placeholders – LQIP), and its own highly effective “Remove Unused CSS” (UCSS) implementation.
Step-by-Step Setup:
LSC’s interface is packed with options, which can be intimidating. Using the presets is a good start, but for optimal results, a manual configuration is best.
-
- Verify LiteSpeed Server: First, confirm with your hosting provider that you are on a LiteSpeed server. If not, this plugin’s page caching will not work.
- General Settings & Presets: Navigate to `LiteSpeed Cache > Dashboard`. You can apply a preset (e.g., “Advanced”) as a starting point.
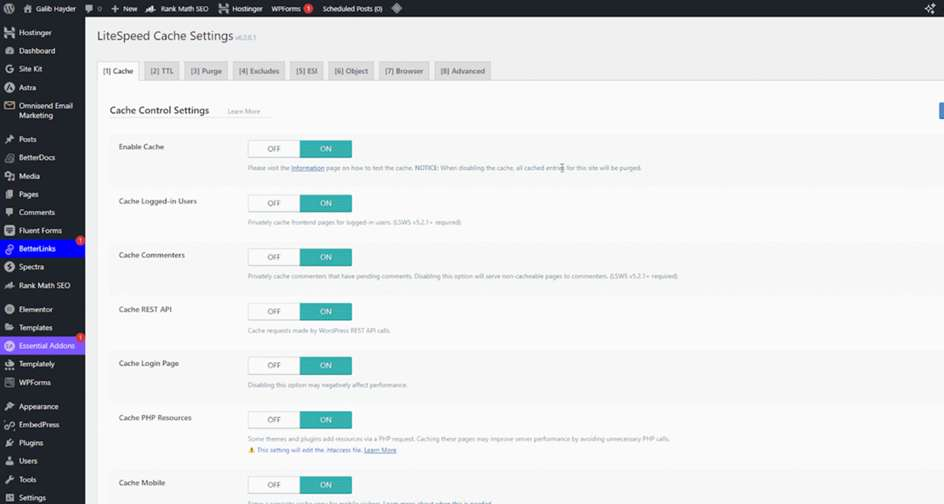
- Configure Page Caching (Cache Tab): Go to the `Cache` tab.
- Ensure `Enable Cache` is ON.
- `Cache Logged-in Users` should be ON for membership sites, OFF for static sites.
- `Cache Mobile` should be ON if you have different content for mobile, but it’s often not needed for modern responsive themes.
- Enable Object Caching (Object Tab): This is a key advantage of LSC.
- Navigate to the `Cache > Object` tab.
- Set `Object Cache` to ON.
- For the `Method`, select `Redis` or `Memcached`. Your host should provide the correct Host (usually `127.0.0.1`) and Port.
- Set `Persistent Connection` to ON and save. You have now enabled persistent object caching without needing a separate plugin.
- Optimize Files (Page Optimization Tab):
- In the `CSS Settings` sub-tab, enable `CSS Minify`, `CSS Combine`, and set `CSS-HTTP/2 Push` to OFF (it’s a deprecated technique). Enable `Load CSS Asynchronously` and configure `Generate UCSS` via QUIC.cloud for a “remove unused CSS” effect.
- In the `JS Settings` sub-tab, enable `JS Minify`, `JS Combine`, and set `Load JS Deferred` to the “Deferred” option.
The combination of server-level page caching and integrated object caching makes LSC an unbeatable performance solution for any site fortunate enough to be on a LiteSpeed server.
Deep Dive: W3 Total Cache (The Developer’s Toolkit)
Review: W3 Total Cache (W3TC) is one of the oldest and most feature-packed caching plugins in the WordPress ecosystem. Its defining characteristic is control. It offers an unparalleled number of settings and methods for every type of caching, making it a powerful tool in the hands of a developer or system administrator who understands the underlying technologies. However, this same complexity makes its interface overwhelming and potentially dangerous for beginners. A misconfiguration in W3TC can easily slow down or break a site (Authority Hacker).
Key Features: W3TC’s main draw is its comprehensive support for multiple caching layers and methods, all configurable from its settings panels. It supports Page Caching (with methods like Disk: Enhanced), Database Caching, Object Caching (Redis/Memcached), and Fragment Caching. It also provides detailed controls for minification and extensive integration options for various CDNs. It is a true toolkit for performance tuning.
Step-by-Step Setup:
Setting up W3TC requires patience. The following is a basic setup guide focusing on the most impactful features.
-
- General Settings Dashboard: After installation, navigate to `Performance > General Settings`. This is your master control panel.
- Enable `Page Cache` and select the `Disk: Enhanced` method for best performance on most shared hosts.
- Enable `Minify` but leave it on “Auto” initially to avoid breaking your site’s styling. Manual configuration can be done later.
- Enable `Object Cache` and select `Redis` or `Memcached` if your server supports it.
- Enable `Browser Cache`.
- Save all settings.
- General Settings Dashboard: After installation, navigate to `Performance > General Settings`. This is your master control panel.
-
- Configure Page Cache: Navigate to `Performance > Page Cache`.
- Here you can configure advanced rules, such as enabling “Cache SSL (https) requests” and ensuring “Don’t cache pages for logged in users” is checked for security and functionality.
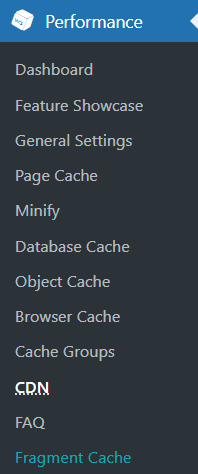
- Configure Page Cache: Navigate to `Performance > Page Cache`.
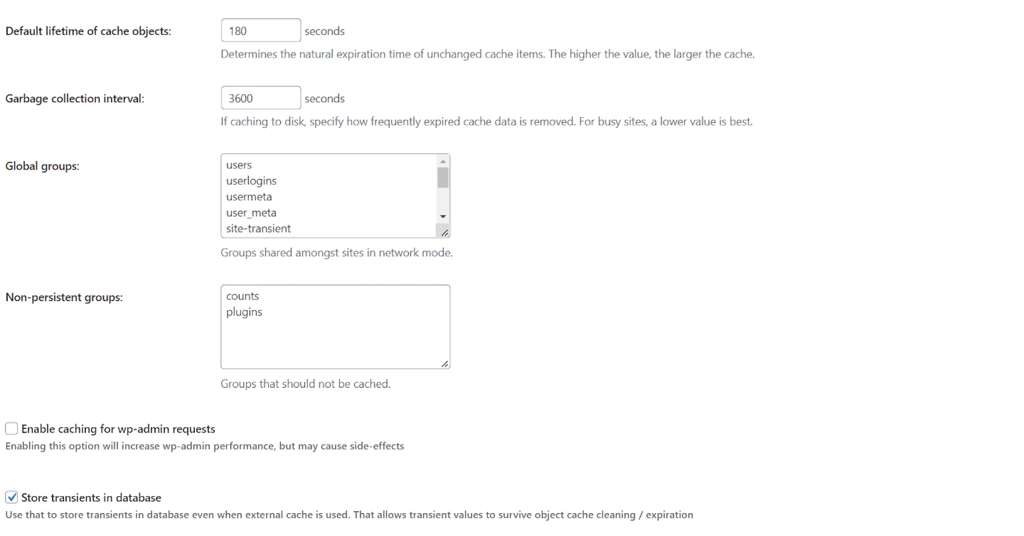
- Configure Object Cache: Navigate to `Performance > Object Cache`.
- If you enabled Redis or Memcached in the General Settings, you will need to enter your server details here (e.g., `127.0.0.1:6379` for Redis).
- You can adjust settings like the “Default lifetime of cache objects” to control how long queries are stored.
W3TC is for the user who is not afraid to experiment and test. While its free version is powerful, its complexity is its biggest drawback compared to the streamlined experience of WP Rocket or the server-level power of LiteSpeed Cache.
The Server-Side Path: Ultimate Performance with Nginx, Varnish & Redis
While plugins offer a fantastic balance of power and convenience, the pinnacle of WordPress performance is achieved at the server level. Server-side caching solutions handle requests before they even reach PHP or the WordPress application, resulting in the lowest possible response times and the highest capacity for handling concurrent traffic. This path requires command-line access (root or sudo privileges) and a solid understanding of server administration, making it the domain of developers, agencies, and businesses managing their own VPS or dedicated servers.
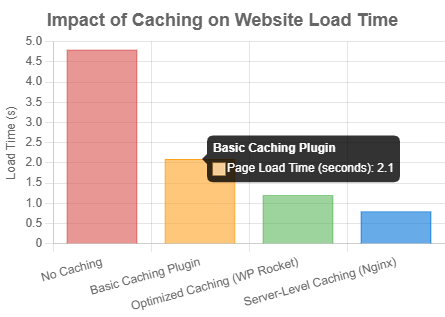
The performance difference is not trivial. By serving a cached page directly from the web server (like Nginx) or a reverse proxy (like Varnish), you eliminate the entire PHP processing overhead that even the fastest caching plugin still incurs. Benchmarks consistently show that server-level caching solutions can handle more requests per second and deliver lower average response times than plugin-based methods.
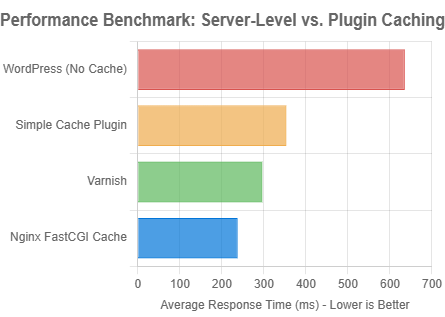
Benchmark data shows server-level solutions like Nginx FastCGI Cache and Varnish consistently outperform plugin-based caching. Data adapted from SpinupWP.
1. Nginx FastCGI Cache: The Lean Machine
What it is: Nginx is a high-performance web server that has grown immensely popular for its efficiency in handling high-traffic sites. The FastCGI cache (`fastcgi_cache`) is a built-in Nginx module that stores the responses generated by the PHP-FPM process (which runs WordPress). It is widely considered one of the best caching solutions for WordPress due to its speed and direct integration with the web server (RunCloud).
How to Configure (Step-by-Step):
Setting up Nginx FastCGI cache involves editing Nginx configuration files directly on your server.
- Prerequisites: You need `sudo` or `root` access to a server running a LEMP stack (Linux, Nginx, MySQL, PHP).
- Define the Cache Path in `nginx.conf`: First, you need to tell Nginx where to store the cache files and define its parameters. Open your main Nginx configuration file (`/etc/nginx/nginx.conf`) and add the following line inside the `http` block.
http { # ... other http settings ... fastcgi_cache_path /var/run/nginx-cache levels=1:2 keys_zone=WORDPRESS:100m inactive=60m; fastcgi_cache_key "$scheme$request_method$host$request_uri"; add_header X-FastCGI-Cache $upstream_cache_status; # Optional: for debugging }- `fastcgi_cache_path`: Specifies the directory for cache files.
- `levels`: Creates a tiered directory structure to avoid having too many files in one directory.
- `keys_zone=WORDPRESS:100m`: Creates a shared memory zone named `WORDPRESS` with a size of 100MB to store cache keys.
- `inactive=60m`: Specifies that any cached data not accessed for 60 minutes will be removed.
- `fastcgi_cache_key`: Defines how the cache key is generated.
- `add_header`: Adds a response header (`HIT`, `MISS`, `BYPASS`) to see if a request was served from the cache.
- Edit Your Site’s Server Block: Now, open your site’s specific configuration file (e.g., `/etc/nginx/sites-available/yoursite.com`). You need to add logic to bypass the cache under certain conditions and then enable the cache for your PHP location block.
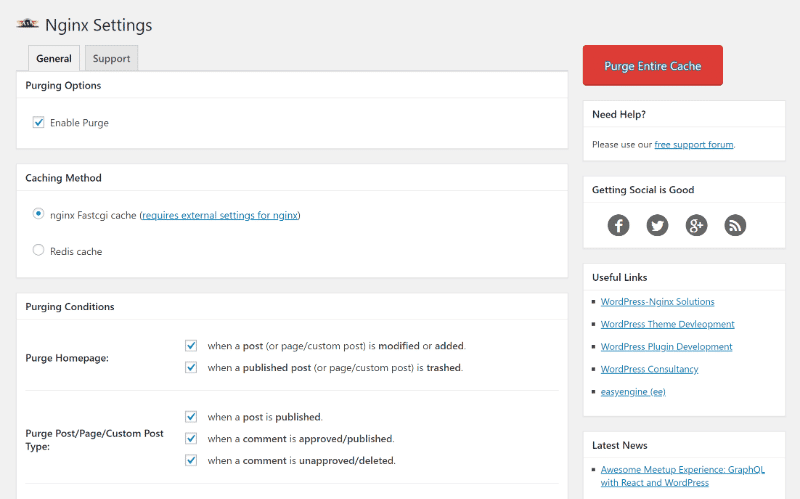
server { # ... server_name, root, etc. ... # Set conditions to bypass cache set $skip_cache 0; # POST requests and URLs with a query string should not be cached if ($request_method = POST) { set $skip_cache 1; } if ($query_string != "") { set $skip_cache 1; } # Don't cache URIs containing the following segments if ($request_uri ~* "/wp-admin/|/xmlrpc.php|wp-.*.php|/feed/|index.php|sitemap(_index)?.xml") { set $skip_cache 1; } # Don't use the cache for logged in users or recent commenters if ($http_cookie ~* "comment_author|wordpress_[a-f0-9]+|wp-postpass|wordpress_logged_in") { set $skip_cache 1; } location ~ \.php$ { # ... fastcgi_pass, etc. ... # Enable FastCGI Cache fastcgi_cache WORDPRESS; # Must match the keys_zone name fastcgi_cache_valid 200 60m; # Cache 200 responses for 60 minutes fastcgi_cache_bypass $skip_cache; fastcgi_no_cache $skip_cache; } } - Integration with WordPress for Purging: Nginx doesn’t know when you update a post in WordPress, so the cache can become stale. You need a way for WordPress to tell Nginx to purge the cache. The free Nginx Cache plugin by Till Krüss is an excellent solution. Install it, and it will automatically purge the cache when content is modified.

The Nginx Helper plugin allows you to configure automatic cache purging conditions from the WordPress dashboard
After configuring, restart Nginx (`sudo service nginx restart`) and use your browser’s developer tools to check for the `X-FastCGI-Cache` header. The first visit to a page should show `MISS`, and a refresh should show `HIT`.
2. Varnish Cache: The HTTP Accelerator
What it is: Varnish is not a web server but a **reverse proxy cache**. It sits *in front* of your web server (like Nginx or Apache) and intercepts all incoming HTTP requests. If it has a cached version of the requested page, it delivers it directly without ever bothering the web server. Varnish is incredibly fast and flexible, thanks to its Varnish Configuration Language (VCL), but it is also significantly more complex to set up than Nginx’s FastCGI cache, especially with HTTPS (GetPageSpeed).
How to Configure (Step-by-Step):
- Architecture Change: The fundamental change is that Varnish must listen on the public HTTP port (80). Your web server (Nginx/Apache) must be reconfigured to listen on a different port, such as 8080. Varnish will then forward any requests it can’t serve from its cache to the web server on this new port.
- Install Varnish: Use your server’s package manager to install Varnish (e.g., `sudo apt install varnish`).
- Configure VCL (Varnish Configuration Language): This is the heart of Varnish. You must edit the `default.vcl` file (usually at `/etc/varnish/default.vcl`) to tell Varnish how to handle WordPress traffic.
vcl 4.1;

import std;

# Define the backend server (your web server)
backend default {
    .host = "127.0.0.1";
    .port = "8080"; # The new port for your web server
}

# Define IPs allowed to send PURGE requests
acl purge {
    "localhost";
    "127.0.0.1";
}

sub vcl_recv {
    # Logic to handle PURGE requests from WordPress
    if (req.method == "PURGE") {
        if (!client.ip ~ purge) {
            return(synth(405, "Not allowed."));
        }
        return (hash);
    }

    # Don't cache for logged-in users or for the backend
    if (req.url ~ "wp-admin|wp-login" || req.http.Cookie ~ "wordpress_logged_in") {
        return (pass);
    }

    # Remove cookies for static assets
    if (req.url ~ "\.(css|js|jpg|jpeg|png|gif)$") {
        unset req.http.Cookie;
    }

    return (hash);
}

sub vcl_backend_response {
    # Set a cache TTL (Time To Live)
    set beresp.ttl = 1h;
    return (deliver);
}

sub vcl_hit {
    if (obj.hits > 0) {
        # A cache hit
    }
    if (req.method == "PURGE") {
        purge;
        return(synth(200, "Purged"));
    }
    return (deliver);
}
This is a simplified VCL. A production VCL would have more complex logic for handling cookies, query strings, and specific URL patterns (Varnish Software).
- Integration with WordPress: Like Nginx, Varnish needs to be told when to purge its cache. The Proxy Cache Purge plugin is a popular choice. Alternatively, many premium caching plugins, like WP Rocket, have a dedicated Varnish add-on that automatically syncs purging actions (WP Rocket Docs).
3. Persistent Object Caching with Redis & Memcached
What it is: As discussed earlier, this complements page caching by accelerating database queries. It is not a replacement for Nginx or Varnish. For a high-performance server stack, you would use Nginx FastCGI Cache (or Varnish) for page caching *and* Redis (or Memcached) for object caching.
Redis vs. Memcached:
- Memcached: Simpler, purely an in-memory cache. It’s extremely fast for basic key-value storage. Its main drawback is that if the service restarts, the entire cache is lost (Pressidium).
- Redis: More of a multi-tool data structure server. It supports more complex data types and offers persistence, meaning it can save its data to disk. If Redis restarts, it can reload the cache, preventing a massive load spike on the database as the cache is rebuilt. For this reason, Redis is generally the preferred choice for most modern, complex applications (Kinsta).
How to Configure (Step-by-Step with Redis):
- Install Redis Server: On your server, install the Redis package.
sudo apt update sudo apt install redis-server -y sudo systemctl enable redis-server # Ensure it starts on boot - Install PHP Extension: WordPress needs a PHP extension to communicate with Redis.
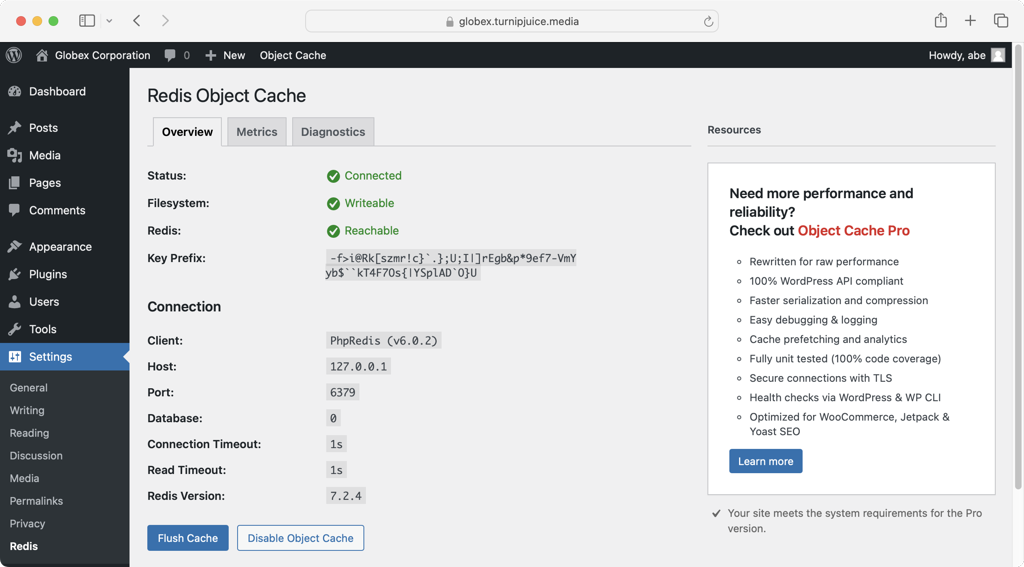
sudo apt install php-redis -y sudo service php8.x-fpm restart # Replace 8.x with your PHP version - Integrate with WordPress: The easiest way is with a plugin. The Redis Object Cache plugin by Till Krüss is the community standard.
- Install and activate the plugin from the WordPress repository.
- Navigate to `Settings > Redis`.
- Click the “Enable Object Cache” button. The plugin will automatically detect the local Redis server and establish a connection.
By combining a server-level page cache like Nginx FastCGI with a persistent object cache like Redis, you create a formidable, multi-layered caching stack capable of handling immense traffic with exceptional speed and efficiency.
Decision Framework: Which Caching Strategy is Right for You?
With a clear understanding of the different caching layers and implementation paths, the final question is: which strategy is the best fit for *your* website? The answer depends on a combination of your hosting environment, technical proficiency, budget, and the specific needs of your site. This framework will guide you to the most logical and effective solution.
Decision Tree: Find Your Caching Path
- What web server is your site on?
- LiteSpeed/OpenLiteSpeed: Your choice is made. Go to Scenario 2 and use the LiteSpeed Cache plugin.
- Apache, Nginx, or Unsure: Continue to question 2.
- What is your technical comfort level and server access?
- I’m not technical and/or I’m on shared hosting with no command-line access: Go to Scenario 1. A plugin is your best and only viable path.
- I’m a developer/agency with `sudo` access on a VPS/dedicated server: You have a choice. Go to Scenario 3 for the optimal self-managed stack.
- I represent an enterprise with massive traffic and/or have a high-end managed host: Go to Scenario 4.
Scenario 1: The Beginner / Small Business Owner
- Profile: You are a blogger, a small business owner, or a non-technical user. Your site is likely on an affordable shared hosting plan (e.g., Bluehost, Hostinger). Your primary goal is a significant speed boost with minimal complexity and cost. You are not comfortable using the command line.
- Primary Recommendation: WP Rocket. The investment is easily justified by the immediate and substantial performance gains, coupled with its unparalleled ease of use. It’s a “set it and forget it” solution that handles page caching, file optimization, and lazy loading in one package, directly improving Core Web Vitals with a few clicks.
- Budget Alternative: WP Super Cache. If your budget is zero, WP Super Cache is a solid, reliable choice from Automattic (the company behind WordPress.com). It provides effective page caching for free. While its interface is more technical than WP Rocket’s and it lacks advanced file optimization features, it is a huge step up from no caching at all.
Scenario 2: The Performance-Oriented User on LiteSpeed
- Profile: You have specifically chosen (or find yourself on) a hosting provider that uses LiteSpeed or OpenLiteSpeed as its web server (e.g., Hostinger, A2 Hosting’s Turbo plans).
- Recommendation: LiteSpeed Cache plugin. This is a non-negotiable, clear-cut decision. No other plugin can match the performance of LSC on its native server environment. The plugin’s ability to communicate directly with the server for page caching, object caching (Redis/Memcached), and its integrated QUIC.cloud CDN services provides a level of synergy and power that third-party plugins on other servers cannot replicate. Using any other caching plugin on a LiteSpeed server would be a significant performance downgrade.
Scenario 3: The Developer / Agency on a VPS
- Profile: You are technically proficient, manage your own server on a provider like DigitalOcean, Vultr, Linode, or AWS, and are comfortable with the Linux command line. You are building high-traffic sites, e-commerce stores, or custom applications and demand maximum performance and control.
- Recommendation: Nginx FastCGI Cache + Redis Object Cache. This stack offers elite, server-level performance.
- Page Caching: Implement Nginx FastCGI cache as detailed in the previous section. It’s leaner and often faster than Varnish for most WordPress use cases.
- Object Caching: Install Redis and the `php-redis` extension, then use the Redis Object Cache plugin to enable persistent object caching. This is critical for offloading the database on dynamic sites.
- WordPress Integration: Use the Nginx Cache plugin to handle automatic cache purging from the WordPress dashboard.
This combination provides a robust, scalable, and incredibly fast foundation that you control completely. Tools like SpinupWP can automate the setup of this exact stack, offering a middle ground between full manual configuration and managed hosting.
Scenario 4: The Enterprise / High-Traffic Publisher
- Profile: You manage a website that requires extreme scalability, redundancy, and the ability to handle massive, unpredictable traffic spikes (e.g., a major news outlet, a viral marketing campaign, a very large e-commerce platform).
- Recommendation: Varnish + Nginx + Redis or a High-Performance Managed Host.
- Self-Managed Stack: A Varnish setup offers more advanced caching logic (via VCL) and can provide a layer of resilience by serving stale content if the backend server goes down. This is a complex stack typically managed by a dedicated DevOps team.
- Managed Hosting Solution: More practically, this is the profile for a top-tier managed WordPress host like WP Engine, Kinsta, or Pantheon. These hosts have built their entire business on providing proprietary, highly-optimized versions of this enterprise-grade stack (often using Nginx, Varnish, and Redis/Memcached behind the scenes) as a service. They handle the complexity of configuration, security, and scalability, allowing your team to focus on content and development. Their platforms are engineered for the exact challenges this scenario presents.
A Note on Hybrid Approaches
These paths are not always mutually exclusive. For example, a user on a VPS with Nginx FastCGI cache might still choose to use the paid version of **WP Rocket**. Why? While letting Nginx handle the page caching, they might use WP Rocket solely for its excellent and easy-to-use file optimization features (Remove Unused CSS, Delay JS), which are often simpler to manage than manual solutions. WP Rocket is compatible with this setup and will automatically disable its own page caching when it detects a server-level cache, allowing you to get the best of both worlds.
The Future of WordPress Performance: 2025 and Beyond
The world of web performance is in constant flux, and while the principles of caching remain timeless, the technologies and strategies are continually evolving. As we look beyond 2025, several key trends are shaping the future of how we make WordPress sites faster, moving intelligence closer to the user and abstracting complexity away from the developer.
Headless WordPress & API Caching
The rise of “headless” or “decoupled” architecture is a significant trend in the WordPress space. In a headless setup, WordPress is used exclusively as a backend content management system, while the frontend (what the user sees) is built with a modern JavaScript framework like React, Vue, or Svelte (Verpex). Content is delivered from WordPress to the frontend via its REST API or GraphQL.
In this paradigm, traditional page caching becomes irrelevant. The focus shifts to **API caching**. Caching the responses from the REST API or GraphQL endpoints becomes critical to prevent the frontend from overwhelming the WordPress backend with requests on every visit. This can be done at multiple levels: using transient-based caching within WordPress, implementing a persistent object cache like Redis to store API responses, or even caching API results at a CDN/edge layer.
AI-Powered Optimization
Artificial intelligence is beginning to permeate the WordPress ecosystem, and performance optimization is no exception. We are seeing the emergence of plugins and services that use AI and machine learning to automate complex tuning tasks (WP Event Manager). For example, an AI-powered tool could analyze real user traffic to automatically determine which JavaScript files are safe to delay, which images are most critical to preload, or how to generate the most effective critical CSS for different page templates. This trend promises to make high-end optimizations, which currently require expert manual configuration, more accessible and adaptive.
Edge Caching Evolution: Caching Dynamic Content Globally
Perhaps the most transformative trend is the evolution of CDNs. Traditionally, CDNs were excellent for caching static assets like images and CSS files. However, the HTML of a WordPress site was still generated at the origin server. Modern CDNs are changing this with advanced **edge caching** capabilities.
Services like Cloudflare’s Automatic Platform Optimization (APO) or the CDN services integrated with plugins like FlyingPress (FlyingCDN) and LiteSpeed Cache (QUIC.cloud) can now cache the dynamic HTML of your WordPress site directly on their global edge servers (Kinsta). When a user visits your site, the entire page is served from a server just miles away from them, resulting in near-instantaneous load times and a dramatically reduced TTFB. This blurs the line between traditional server-side caching and CDN caching, effectively distributing your entire site’s cache across the globe and offering a massive performance boost, especially for international audiences.
Frequently Asked Questions (People Also Ask)
Navigating the complexities of WordPress caching can lead to many questions. Here are answers to some of the most common queries, based on community discussions and expert recommendations.
What is WordPress caching in simple terms?
It’s like your website taking a snapshot of a finished page. Instead of rebuilding the page from scratch for every visitor by running PHP code and querying the database, it serves the pre-made snapshot, which is much faster. Think of a barista making a complex latte: the first time, it takes a few minutes. Caching is like having that exact latte already made and ready to hand over instantly for the next ten customers who order it (Codeable).
Do I really need a caching plugin for my WordPress site?
Yes, absolutely. For the vast majority of WordPress sites, implementing caching is the single most effective way to dramatically speed up your site, improve user experience, and boost your SEO rankings by improving Core Web Vitals. Unless you are on a high-end managed host that provides finely-tuned, server-level caching, a caching plugin is not optional—it’s essential (WordPress.org Advanced Administration Handbook).
Can I use two caching plugins at the same time?
No, you should never use two plugins for **page caching** (e.g., WP Rocket and WP Super Cache together). They will conflict with each other as they both try to write cache files and modify your server configuration, which will likely break your site or cause unpredictable behavior (Astra). However, it is common and recommended to use a page caching solution alongside a specialized **object caching** plugin (like the Redis Object Cache plugin) on dynamic websites. They perform different functions and do not conflict.
My hosting provider says they have caching. Do I still need a plugin?
It depends on the quality of your host.
- High-quality managed WordPress hosts (like Kinsta, WP Engine, Pantheon) have excellent, fine-tuned server-level caching that often makes a separate page caching plugin unnecessary or even redundant. Their systems are often superior to what a plugin can do.
- Standard shared hosting providers (like Bluehost) may offer a “caching” feature, but it is often very basic. In this case, a premium plugin like WP Rocket will almost certainly provide far superior results and more comprehensive optimization features. Always check your host’s documentation, but avoid running two systems that perform the same function (Codeable).
How do I clear the cache in WordPress?
Most caching plugins and many managed hosts add a “Purge Cache” or “Clear Cache” button to the WordPress admin bar at the top of the screen. This is the quickest way to clear all cached files. You can also find more granular clearing options within the plugin’s main settings page in your WordPress dashboard. For example, WP Rocket adds a “WP Rocket” menu to the admin bar with a “Clear cache” option (WPBeginner).
Why is my site still slow after installing a caching plugin?
Caching is powerful but not a magic bullet for all performance issues. If your site is still slow, other factors are likely at play. These can include:
- Slow Web Hosting: A slow server is a slow server. Caching helps, but it can’t overcome a fundamentally underpowered or overloaded shared hosting environment.
- Unoptimized Images: Large, high-resolution images are a common cause of slow load times. Ensure your images are compressed and correctly sized.
- Bloated Theme/Plugins: A poorly coded theme or too many plugins loading unnecessary scripts and styles can bog down your site.
- Lack of a CDN: If you have a global audience, a Content Delivery Network (CDN) is crucial for reducing latency for visitors far from your origin server.
- Misconfigured Cache: An incorrectly configured plugin can sometimes fail to cache pages properly or cause conflicts. Double-check your settings.
Conclusion: From Speed to Success
We have journeyed from the fundamental “why” of website performance—its undeniable link to SEO, Core Web Vitals, and revenue—to the intricate “how” of implementation. We’ve deconstructed the multi-layered nature of caching and navigated the two primary paths to mastery: the accessible power of plugins and the ultimate control of server-side solutions. The evidence is overwhelming, and the mandate from both users and search engines is clear: in 2025, a fast website is a successful website, and caching is the non-negotiable cornerstone of that speed.
The core message to take away is that there is a caching solution for every WordPress site owner, regardless of technical skill or budget. The choice is not about finding a single “best” answer, but about identifying the right strategy for your unique context. Whether it’s the one-click simplicity of WP Rocket, the server-integrated might of LiteSpeed Cache, or the granular control of a self-managed Nginx and Redis stack, the path to a faster website is well-defined and achievable.
The perfect setup is not the most complex one, but the one that you can implement correctly and maintain effectively. Don’t let analysis paralysis hold you back. Start with the solution that best fits your profile today, measure the results, and iterate. Every millisecond you shave off your load time is an investment in user trust, a step up in search rankings, and a direct contribution to your bottom line.
Your Next Step to a Faster Website
Ready to stop losing visitors and revenue to a slow website? **Choose your caching path today.**
For the 90% of users seeking immediate, powerful results with minimal effort, the clear starting point is **WP Rocket**. It provides the best balance of power and simplicity on the market.
For developers and agencies seeking ultimate control, our guide to **Nginx FastCGI caching** provides the blueprint for elite performance. If this feels overwhelming, consider partnering with a performance-focused managed host or a **WordPress optimization expert** to build your high-speed foundation.

With over 27 years of hands-on SEO expertise, starting from my early days as a CFO. Quitting that job to build a top-ranked web hosting business in 1995, I’ve mastered WordPress optimization as a precise engineering discipline. Through extensive research, high-level consulting, and developing a WordPress site that achieved over a thousand organic Google rankings—culminating in a six-figure sale—I’ve decoded Google’s algorithm over 27 years to develop wordpress engineering that transforms underperforming WordPress sites into authoritative powerhouses. Business owners frustrated by stagnant traffic, low visibility, and missed opportunities find relief as I help them deliver measurable ROI through higher rankings, increased leads, and sustainable growth. As owner of dominant city-based SEO platforms in major U.S. markets, I outperform industry gurus, empowering entrepreneurs, local businesses, agencies, and marketers via my WordPress Optimization services at wordpressoptimization.com to unlock their site’s full potential.