
2025 WordPress Core Web Vitals: The Definitive Guide to LCP, INP & CLS
TL;DR: This guide breaks down everything you need to know in 2025 about optimizing your WordPress site by improving its Core Web Vitals — LCP (Largest Contentful Paint), INP (Interaction to Next Paint) and CLS (Cumulative Layout Shift). It takes you through diagnosing performance issues (both lab and field data), then into hands-on playbooks for fixing LCP, INP, and CLS problems. You’ll also learn how choosing the right hosting, theme, and plugins lay the foundation for great performance, plus how to validate fixes and maintain fast, stable experiences over time. It’s a roadmap from slow, frustrating user experience → smooth, fast, reliable site that helps with both SEO & conversions.
Table of Contents
- Introduction: Why Core Web Vitals Are Your WordPress Site’s Most Critical Health Check in 2025
- Part 1: The Diagnosis – How to Accurately Test and Understand Your WordPress CWV Scores
- Part 2: The LCP Playbook – Conquering Largest Contentful Paint on WordPress
- Part 3: The INP Playbook – Mastering Interaction to Next Paint on WordPress
- Part 4: The CLS Playbook – Eliminating Layout Shifts on WordPress
- Part 5: The Foundation – Choosing the Right WordPress Hosting, Theme, and Plugins
- Part 6: Validation and Long-Term Maintenance
- Conclusion: From Technical Metrics to Business Growth
- Appendix
What is Optimizing Core Web Vitals on WordPress?
In today’s hyper-competitive online landscape, the speed, responsiveness, and visual stability of your WordPress site are no longer optional extras — they’re essential. Core Web Vitals (CWV) — namely LCP (Largest Contentful Paint), INP (Interaction to Next Paint), and CLS (Cumulative Layout Shift) — are Google’s way of measuring what your users actually experience. If those scores are poor, users will bounce, rankings will suffer, and trust with your audience erodes. Optimizing your WordPress site for Core Web Vitals isn’t just about chasing green metrics; it’s about providing a fast, stable, and satisfying experience that turns visitors into customers.
Choosing the best WordPress hosting provider plays a pivotal role in this optimization journey. The right host provides not only raw performance through server speed, resources, and caching, but also reliable support when issues arise. Below are some of the key benefits of selecting top-tier hosting that emphasizes both performance and support:
-
Faster Time to First Byte (TTFB) – Good WordPress hosts reduce server response times significantly, which helps your LCP metric right from the start.
-
Built-in caching & content delivery network (CDN) integrations – These help deliver assets quickly to users around the world, minimizing latency and improving both load times and interactivity.
-
Optimized server stack – Hosts that use modern infrastructure (fast CPUs, SSD storage, optimized web servers) ensure that dynamic pages, plugins, and scripts run smoothly, helping with INP and preventing performance bottlenecks.
-
Automatic updates, security, and backups – Minimizes downtime or performance degradation due to outdated software or plugin conflicts, preserving your site’s stability and user experience.
-
Expert support when performance issues occur – Having seasoned WordPress-performance specialists available means quicker diagnosis and resolution of issues that could harm your CWV scores.
-
Scalability for traffic peaks – When you suddenly get more visitors (or run promotions), a high quality host will handle the load without crashing or slowing down, keeping your scores strong during high demand.
Why Core Web Vitals Are Your WordPress Site’s Most Critical Health Check in 2025
In the digital economy, speed is currency. We’ve all felt that flash of frustration when a webpage loads at a snail’s pace, or a button moves just as we try to click it. These are not minor annoyances; they are significant barriers that directly impact user perception, engagement, and ultimately, your bottom line. The financial costs of poor performance are severe. Marketing spend is wasted when ads send users to a site that loads too slowly, causing them to abandon the page in frustration. Conversions decline, as users are less likely to complete purchases or sign-ups on a sluggish site .
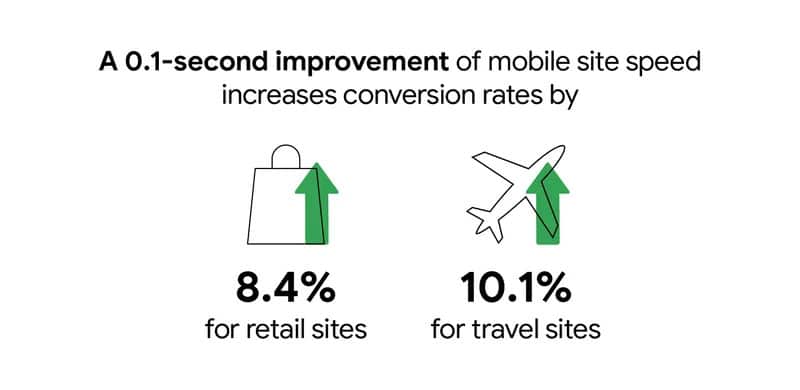
The data is unequivocal. Studies have consistently shown the high cost of a slow site. A mere one-second delay in page load time can trigger an 11% drop in page views and a staggering 7% loss in conversions . For mobile sites, the impact is even more pronounced. A 0.1-second improvement in mobile site speed can increase conversion rates by 8.4% for retail sites and 10.1% for travel sites . This isn’t just about user patience; it’s about brand perception. A laggy site is often perceived as outdated, unprofessional, and untrustworthy, driving potential customers away before they even have a chance to engage with your content or products.
This is where Google’;s Core Web Vitals (CWV) enter the picture. Introduced in 2020, they have evolved into the definitive framework for measuring and improving the real-world user experience of a webpage. They are not just another set of abstract performance metrics; they are a direct reflection of how users perceive your site’s speed, responsiveness, and stability.
A Quick Refresher on the Three Pillars of Core Web Vitals
As of 2025, Core Web Vitals are built on three key metrics that Google explicitly highlights as most indicative of a page’;s overall user experience . These metrics are part of Google’s broader page experience signals, which are a confirmed ranking factor in its core ranking systems .
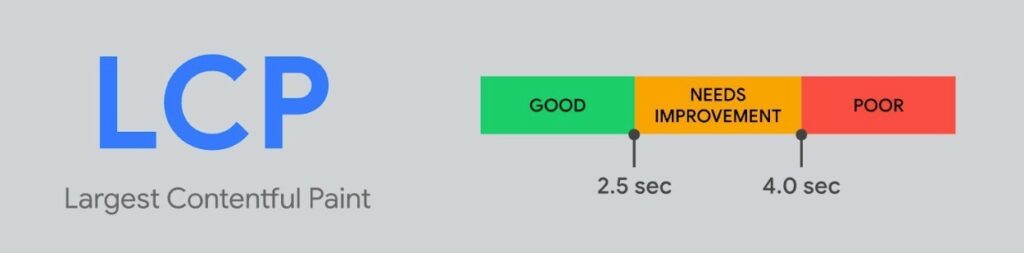
- Largest Contentful Paint (LCP): Measures loading performance. It marks the point in the page load timeline when the main content—typically the largest image or text block within the viewport—has likely loaded. A good LCP score is 2.5 seconds or less.
- Interaction to Next Paint (INP): Measures interactivity. It assesses a page’s overall responsiveness to user interactions by observing the latency of all clicks, taps, and keyboard interactions that occur throughout the lifespan of a user’s visit to a page. A good INP score is 200 milliseconds or less.
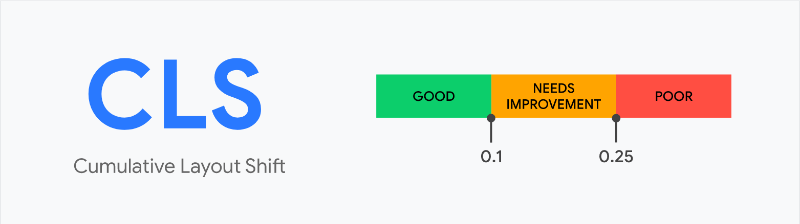
- Cumulative Layout Shift (CLS): Measures visual stability. It quantifies how much unexpected layout shift occurs during the entire lifespan of the page. A good CLS score is 0.1 or less.
Important Update on INP: As of March 12, 2024, Interaction to Next Paint (INP) has officially replaced First Input Delay (FID) as the Core Web Vital for responsiveness. While FID only measured the delay of the *first* interaction, INP provides a more comprehensive assessment by considering *all* interactions throughout the user’s session, focusing on the worst interaction latency . This change underscores Google’s commitment to measuring the complete user journey, not just the first impression.
The Unique WordPress Challenge
WordPress powers over 43% of the web, a testament to its flexibility and power. However, this very flexibility is what presents unique challenges for Core Web Vitals optimization. The vast ecosystem of themes, plugins, and page builders like Elementor and Divi can easily introduce performance bottlenecks. A bloated, multi-purpose theme might load dozens of unnecessary CSS and JavaScript files. A poorly coded plugin can create long-running tasks that block the main thread, leading to poor INP. A page builder might generate a complex, deeply nested DOM structure, making rendering slower and optimization harder . Enterprise and media-rich WordPress sites face even greater hurdles, struggling with heavy content, complex ad setups, and high traffic demands that strain all three CWV metrics .
The good news is that you don’t need a computer science degree to achieve excellent scores. The WordPress ecosystem also provides a wealth of powerful tools and solutions specifically designed to tackle these issues. This guide is your roadmap to navigating them.
Your Roadmap to a “Good” Score
This definitive guide will demystify Core Web Vitals for WordPress site owners. We will move beyond the technical jargon and provide a clear, actionable path to achieving “Good” scores across the board. Our journey will be structured into three logical phases:
- Diagnose: We will start by teaching you how to accurately measure your site’s performance using the right tools, moving from a vague feeling of “my site is slow” to a precise understanding of the root causes.
- Optimize: We will then dive deep into dedicated playbooks for LCP, INP, and CLS, providing step-by-step instructions, plugin recommendations, and code snippets tailored for the WordPress environment.
- Maintain: Finally, we will show you how to validate your fixes and establish a long-term maintenance routine to ensure your site stays fast and your rankings remain dominant.
By the end of this guide, you will be equipped with the knowledge and tools to transform your WordPress site from a performance liability into a high-speed asset that delights users, satisfies Google, and drives business growth.
Part 1: The Diagnosis – How to Accurately Test and Understand Your WordPress CWV Scores
Before you can fix a problem, you must first understand it. The goal of this section is to move you from the ambiguous statement “my site is slow” to a precise, data-driven diagnosis like, “my mobile LCP is 3.8 seconds, primarily caused by a high TTFB and an unoptimized hero image from my Elementor header.” This level of clarity is essential for targeted, effective optimization. Without it, you’re just guessing.
Field Data vs. Lab Data: What’s the Difference and Which Matters More?
When you test your Core Web Vitals, you’;ll encounter two types of data: Field Data and Lab Data. Understanding their distinction is crucial for a successful optimization strategy.
- Field Data (Real User Monitoring – RUM): This is data collected from actual Chrome users who visit your website. It’s aggregated over a 28-day period and is what Google uses for its ranking signals. This data is sourced from the Chrome User Experience Report (CrUX) .
- Why it matters: It reflects the real-world experience of your audience, accounting for diverse devices, network conditions, and geographic locations. This is your ultimate source of truth.
- Limitation: The 28-day aggregation period means there’s a significant lag. You won’t see the impact of your fixes immediately.
- Lab Data (Synthetic Monitoring): This is data collected in a controlled, simulated environment using a consistent set of network and device conditions. Tools like Google Lighthouse generate lab data.
- Why it matters: It provides instant, reproducible feedback. It’s perfect for debugging and testing changes in real-time during development.
- Limitation: It may not perfectly represent what your actual users experience. A test from a high-speed server in Virginia might not reflect the experience of a user on a 3G connection in rural India.
Guidance: Your optimization workflow should use both. Use **Lab Data** for immediate, iterative testing as you implement fixes. Run a test, make a change, run another test. Once you’ve confirmed improvements in the lab, your ultimate goal is to see those changes reflected in your **Field Data** over the next 28-day cycle. Google Search Console is the best place to monitor this long-term trend.
Your Essential WordPress CWV Toolkit
Navigating the world of performance testing can be daunting, but for a WordPress site owner, a few key tools provide a comprehensive view of your site’s health. Relying on just one tool is a mistake; using them in concert gives you the full picture.
| Tool | Type | Key Use Case for WordPress | Pros | Cons |
|---|---|---|---|---|
| Google PageSpeed Insights (PSI) | Online (Lab & Field) | The primary starting point. Get a quick overview and actionable diagnostics for any URL. | Combines both data types; identifies the specific LCP element and CLS culprits; provides tailored opportunities. | Caches results for several minutes; can be overwhelming for beginners. |
| Google Search Console | Site-wide (Field) | Monitor site-wide CWV trends and identify groups of problematic URLs (e.g., all blog posts using a specific template). | Shows historical data over months; allows you to validate fixes across many pages at once; directly reflects what Google sees. | Data is delayed by up to 28 days; not for real-time debugging. |
| Chrome DevTools | Browser (Lab) | Deep-dive debugging. Pinpoint exact scripts causing long tasks (for INP) or see a frame-by-frame load in the Performance tab. | Extremely detailed waterfall view; identifies render-blocking resources and long tasks; no caching issues. | Steep learning curve; results can be affected by browser extensions (always test in Incognito mode). |
| WebPageTest | Online (Lab) | Advanced analysis, including testing from different global locations and connection speeds. | Highly configurable; provides filmstrip views and detailed waterfall charts; excellent for diagnosing TTFB issues from various regions. | Can be complex to configure and interpret for beginners. |
How to Read a PageSpeed Insights Report for a WordPress Site
PageSpeed Insights is your frontline diagnostic tool. Let’s break down how to use it effectively for a WordPress site.
-
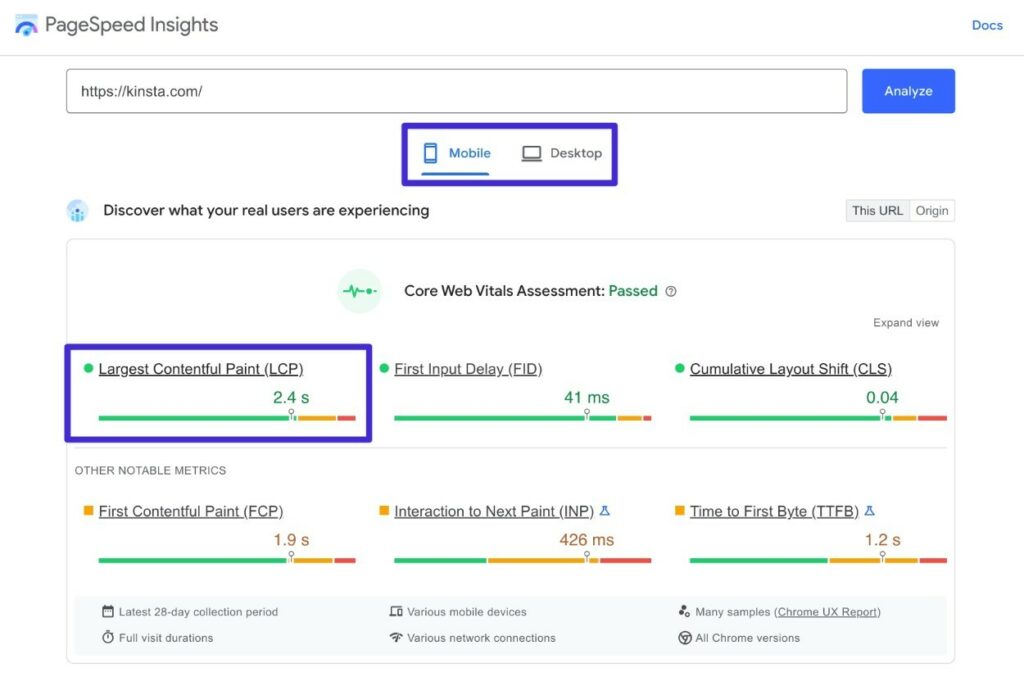
- Run the Test: Go to the PageSpeed Insights website, enter the URL of a key page (like your homepage or a popular blog post), and click ‘Analyze’. Remember to check both the **Mobile** and **Desktop** tabs, as performance and LCP elements often differ. Mobile is typically the priority, as it’s often harder to optimize and more critical for Google’s mobile-first indexing.
- Check the Core Web Vitals Assessment: At the top of the report, you’ll see the “Discover what your real users are experiencing” section. This shows your Field Data. A green checkmark and “Passed” status means you’re meeting Google’s thresholds for all three CWV over the last 28 days. If it says “Failed,” you have work to do.
-
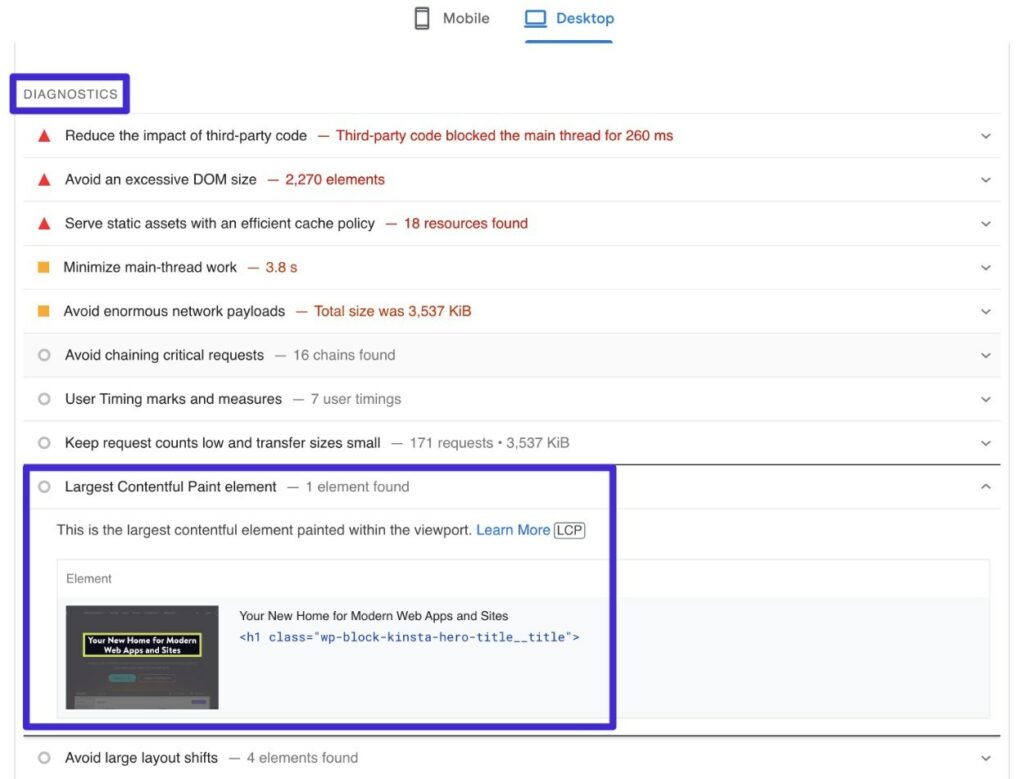
- Identify the LCP Element: This is the most critical step for LCP optimization. Scroll down to the “;Diagnostics”; section and expand the “Largest Contentful Paint element” tab. PSI will show you *exactly* what element it considers the LCP. On a WordPress blog post, this is often the featured image (`
`). On a homepage built with a page builder, it might be a headline (`
`) or a background image. Knowing this tells you precisely where to focus your efforts.
- Identify the LCP Element: This is the most critical step for LCP optimization. Scroll down to the “;Diagnostics”; section and expand the “Largest Contentful Paint element” tab. PSI will show you *exactly* what element it considers the LCP. On a WordPress blog post, this is often the featured image (`
- Find CLS Culprits: In the same “Diagnostics”; section, expand the “Avoid large layout shifts” tab. This will list the specific DOM elements that are moving during the page load and contributing to your CLS score. It might be an ad container, an un-sized image, or a block of text affected by font swapping.
- Spot Render-Blocking Resources: Further down, under “Opportunities,”; you’ll find the “Eliminate render-blocking resources” audit. This lists the specific CSS and JavaScript files that are slowing down the initial render of your page. For WordPress sites, you will almost always see files from your theme (`/wp-content/themes/…`) and plugins (`/wp-content/plugins/…`) here. This list is your hit list for the optimizations we’ll discuss in the next sections.
Key Diagnostic Takeaways
- Start with PageSpeed Insights: It’s your all-in-one tool for an initial diagnosis.
- Prioritize Mobile: Mobile scores are typically lower and more important for SEO. Optimize for mobile first.
- Identify, Don’t Guess: Use the “Diagnostics” section to find the exact LCP element and CLS culprits. Don’t waste time optimizing the wrong things.
- Use Lab Data for Action, Field Data for Validation: Test your fixes with lab data for instant feedback. Monitor your GSC report to confirm those fixes are improving real-user experience over time.
Part 2: The LCP Playbook – Conquering Largest Contentful Paint on WordPress
Largest Contentful Paint (LCP) is the Core Web Vital that users struggle with the most. It measures perceived loading speed, and a poor score makes your site feel slow and unprofessional. The goal is to get your LCP under the 2.5-second “Good” threshold. Anything over 4.0 seconds is considered “Poor” and can significantly harm your user experience and SEO .
Understanding the LCP Breakdown
Optimizing LCP isn’t a single action; it’s about improving a sequence of events. Google breaks down the LCP time into four distinct phases. Understanding which phase is your bottleneck is key to effective optimization. According to analysis, TTFB and Resource Load Time each account for roughly 40% of the LCP time, making them the most critical areas to address .
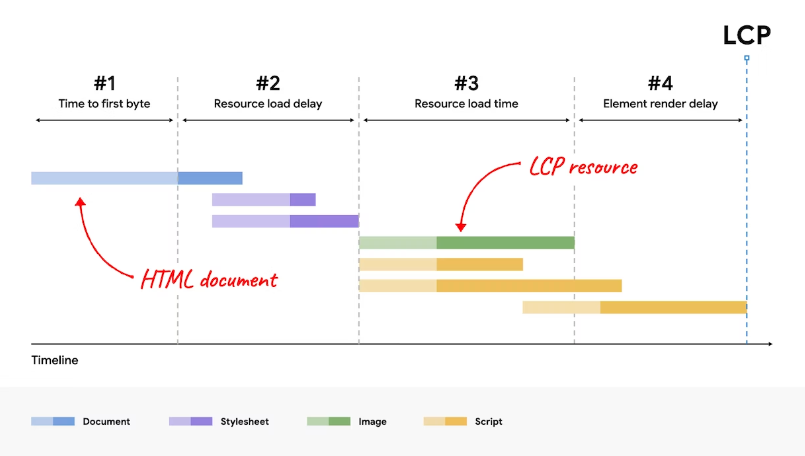
- Time to First Byte (TTFB): The time from when the user initiates the page load until the browser receives the very first byte of the HTML document. This is purely about your server’s response speed.
- Resource Load Delay: The delay before the browser *starts* loading the LCP resource. This is often caused by other resources (like CSS) having a higher priority.
- Resource Load Time: The time it takes to actually download the LCP resource itself (e.g., the image file). This is affected by file size and network conditions.
- Element Render Delay: The time after the LCP resource has finished loading until it is fully rendered on the screen. This can be caused by render-blocking JavaScript or other main-thread work.
Common WordPress LCP Culprits
On a typical WordPress site, LCP issues usually stem from a predictable set of problems:
- Slow Server Response (High TTFB): This is the foundation. If your TTFB is slow, your LCP will be slow. Common causes include cheap shared hosting, not using effective page caching, and lacking a Content Delivery Network (CDN) for a global audience .
- Unoptimized Images: The LCP element is very often a large featured image on a blog post or a hero background image on a homepage, especially those built with page builders. Oversized, uncompressed images are a primary cause of slow LCP.
- Render-Blocking Resources: Bloated themes and an excess of plugins load heavy CSS and JavaScript files in the “ of your site. The browser must download and parse these files before it can render the main content, directly delaying LCP.
- Slow Font Loading: If your LCP element is a block of text that uses a custom web font, a delay in loading that font will directly delay the LCP time.
LCP Optimization Checklist for WordPress
Here is a prioritized checklist of actions to improve your LCP score, along with WordPress-specific tools and their relative difficulty.
| Priority | Action | WordPress Solution (Tools/Plugins) | Difficulty |
|---|---|---|---|
| High | Improve Server Response Time (TTFB) | 1. Upgrade Hosting: Switch to a managed WordPress host like WP Engine, Kinsta, or SiteGround. They use optimized infrastructure (e.g., Google Cloud) and server-level caching. 2. Enable Page Caching: Use a premium plugin like WP Rocket, FlyingPress, or the free LiteSpeed Cache (if on a LiteSpeed server). 3. Use a CDN: Services like Cloudflare, RocketCDN, or BunnyCDN serve your assets from locations closer to your users. |
Medium |
| High | Optimize the LCP Image | 1. Compress Images: Use a plugin like EWWW Image Optimizer, ShortPixel, or Imagify to automatically compress images on upload. 2. Use Next-Gen Formats: Most modern image optimization plugins can automatically convert your images to the much smaller WebP format. 3. Serve Correctly Sized Images: WordPress does this natively with `srcset`, but ensure your theme supports it properly. |
Low |
| High | Prioritize the LCP Image | 1. Exclude from Lazy Load: Most caching plugins (WP Rocket, Perfmatters, FlyingPress) have an option to exclude “above-the-fold” or “leading” images from lazy loading. 2. Preload LCP Image: Use `fetchpriority=”high”`. Plugins like Perfmatters and FlyingPress offer features to “Preload Critical Images” or apply fetchpriority hints automatically. |
Low-Medium |
| Medium | Eliminate Render-Blocking Resources | 1. Optimize CSS Delivery: Use the “Remove Unused CSS” feature in WP Rocket, FlyingPress, or Perfmatters. This is more effective than just minifying. 2. Defer/Delay Non-critical JS: Use WP Rocket’s “Delay JavaScript Execution” or Perfmatters’ script manager to prevent non-essential scripts from blocking the initial render. |
Low |
| Medium | Optimize Font Delivery | 1. Host Fonts Locally: Avoid requests to `fonts.googleapis.com` by hosting fonts on your own server. Perfmatters has a feature for this. 2. Preload Key Fonts: Use WP Rocket or Perfmatters to preload your main font files. 3. Use `font-display: swap;`: This ensures text is visible while the custom font loads. Most performance plugins add this rule automatically. |
Low-Medium |
Actionable Step-by-Step: Fixing a Slow LCP Image
Let’s walk through the most common WordPress LCP problem: an unoptimized featured image on a blog post.
- Identify: Run your blog post through PageSpeed Insights. Scroll to the “Largest Contentful Paint element” diagnostic. It will likely point to your `
` tag for the featured image. Note the LCP time.
- Optimize: Before you even upload an image to WordPress, you can compress it using an online tool like TinyPNG. For images already in your Media Library, install an image optimization plugin like EWWW Image Optimizer. Configure it to automatically compress new uploads, bulk optimize existing images, and convert them to the WebP format.
- Prioritize: The LCP image should never be lazy-loaded. It needs to load immediately. The best way to ensure this is to use a feature that both excludes it from lazy loading and prioritizes its download.
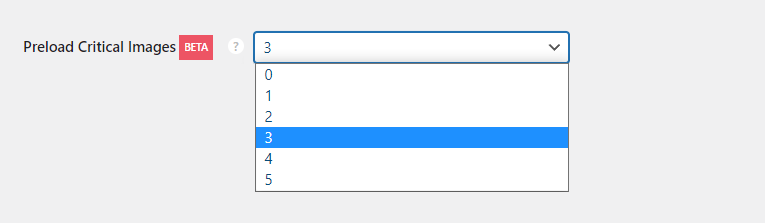
- Install a plugin like Perfmatters.
- Navigate to the `Perfmatters` settings -> `Lazy Loading` -> `Preload`.
- Enable “Preload Critical Images” and set the number to `1` or `2` (depending on how many images typically appear above the fold on your posts). This single setting tells the plugin to automatically identify the first 1-2 images in the content, exclude them from lazy loading, and add a `preload` hint to the browser.
- Verify: Clear all your caches (plugin cache, server cache, CDN cache). Open a new Incognito browser window and re-run the PageSpeed Insights test. You should see a significant improvement in your LCP score.
Part 3: The INP Playbook – Mastering Interaction to Next Paint on WordPress
Interaction to Next Paint (INP) is Google’;s metric for measuring the overall responsiveness of your page. It answers the question: “When I click, tap, or type, does the site provide visual feedback quickly?”; A slow response makes a site feel sluggish, broken, or unresponsive. Your goal is to keep INP under the 200-millisecond “Good” threshold. An INP over 500ms is considered “Poor” .
INP measures the time from when a user interaction starts (like a click) until the next frame is painted on the screen. This entire process can be delayed if the browser’s “main thread” is busy doing other work.
Common WordPress INP Culprits
High INP on WordPress is almost always caused by one thing: **excessive or inefficient JavaScript**.
- Heavy JavaScript from Themes and Page Builders: Complex themes and page builders like Elementor or Divi often rely on large amounts of JavaScript to power their features (animations, sliders, dynamic widgets). This code can clog up the main thread, delaying the browser’s ability to respond to user input .
- Plugin-Added Scripts: Many plugins add their own scripts to your site. A live chat widget, a complex form plugin, or a social sharing button can all contribute to main-thread work and increase INP.
- Third-Party Scripts: Code from external sources, such as Google Analytics, Facebook Pixel, or advertising networks, is a major source of poor INP. These scripts run on the main thread and compete for resources, often without you having direct control over their efficiency.
- Large DOM Size: A Document Object Model (DOM) is the tree-like structure of your page’s HTML. Page builders can create very large and complex DOMs. The larger the DOM, the more work the browser has to do to process changes, which can slow down interactivity.
- Long-Running Tasks: This is the technical term for a single piece of JavaScript that monopolizes the main thread for an extended period (over 50ms). During this time, the browser cannot respond to any user interactions, leading directly to high INP.
INP Optimization Checklist for WordPress
Since INP is primarily a JavaScript problem, the solutions focus on managing how and when scripts are loaded and executed.
| Priority | Action | WordPress Solution (Tools/Plugins) | Difficulty |
|---|---|---|---|
| High | Delay/Defer JavaScript Execution | 1. Delay JS: Use WP Rocket‘s “Delay JavaScript Execution” or Perfmatters‘ “Delay JS”. This prevents scripts from loading until the user interacts with the page (e.g., scrolls or clicks). 2. Defer JS: Use the free Autoptimize + Async JavaScript plugins to defer scripts, making them load after the HTML has been parsed. |
Low |
| High | Reduce Unused JavaScript | 1. Use a Script Manager: Plugins like Perfmatters or Asset CleanUp allow you to selectively disable specific JS files on pages where they aren’t needed (e.g., disable a contact form script on your homepage). 2. Remove Unused CSS/JS: The “Remove Unused CSS/JS” feature in WP Rocket or FlyingPress also helps by stripping out code that isn’t being used on the current page. |
Medium |
| Medium | Minimize Main-Thread Work | This is largely a result of the actions above. Additionally, you can break up long tasks by choosing lighter plugins and avoiding complex animations that are not hardware-accelerated. | High |
| Low | Reduce DOM Size | 1. Choose a Lightweight Theme: Start with a fast theme like GeneratePress, Kadence, or Blocksy. 2. Be Mindful with Page Builders: Avoid excessive nesting of sections, columns, and widgets. 3. Lazy-render HTML Elements: An advanced technique offered by FlyingPress to lazy load entire sections like the footer or comments area. |
Medium |
Actionable Step-by-Step: Taming Third-Party Scripts with a Plugin
Third-party scripts for analytics and ads are notorious for causing high INP. Delaying their execution until the user starts interacting with the page is one of the most impactful optimizations you can make.
- Identify: Use PageSpeed Insights. Look under the “;Diagnostics” for “Reduce the impact of third-party code” or in the “Performance” tab of Chrome DevTools for long tasks associated with domains like `googletagmanager.com`, `connect.facebook.net`, or `google-analytics.com`.
- Delay with a Plugin: The easiest and safest way to handle this is with a premium plugin like Perfmatters or WP Rocket. Let’s use Perfmatters as an example.
- Configure Perfmatters:
- Install and activate the Perfmatters plugin.
- Navigate to `Settings` → `Perfmatters` → `Assets` → `JavaScript`.
- Toggle on “Delay JavaScript”.
- In the “Delayed Scripts” box, add keywords for the scripts you want to delay. A good starting list includes:
analytics.js
/gtm.js
/gtag/js
gtag(
fbevents.js
adsbygoogle.js
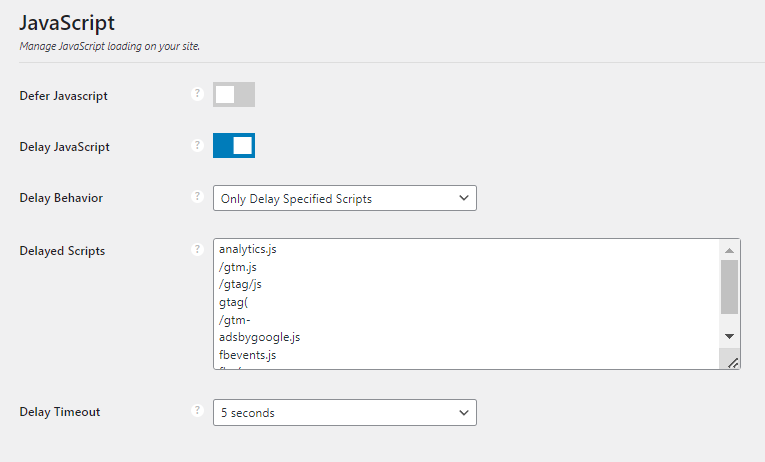
- Test Thoroughly: Save your changes and clear all caches. Now, visit your site in an incognito window and test all interactive functionality. Make sure your analytics are still tracking, your ads are loading, and your forms can be submitted. Delaying scripts can sometimes cause issues, so thorough testing is non-negotiable. If something breaks, you may need to remove that specific script from the delay list.
Key INP Optimization Takeaways
- INP is a JavaScript Problem: Your primary focus should be on optimizing how and when JavaScript loads and executes.
- Delay, Don’t Just Defer: Delaying JavaScript until user interaction is the single most powerful technique for improving INP, especially for third-party scripts.
- Audit Your Plugins: Use a script manager like Perfmatters to identify which plugins are loading heavy scripts on every page and disable them where they’re not needed.
- Functionality vs. Performance: Every interactive feature comes with a potential performance cost. Be critical about whether that fancy slider or live chat widget is truly worth the potential hit to your INP score.
Part 4: The CLS Playbook – Eliminating Layout Shifts on WordPress
Cumulative Layout Shift (CLS) measures the visual stability of your page. It quantifies how much your content “;jumps around” unexpectedly as the page loads. A high CLS score is frustrating for users—they might try to click a button, only to have an ad load above it and push the button down, causing them to click the ad instead. Google takes this metric seriously, and your goal is to achieve a CLS score of 0.1 or less. A score above 0.25 is considered “Poor” .
Common WordPress CLS Culprits
Layout shifts in WordPress are typically caused by elements that are loaded after the initial page render without having space reserved for them.
- Images, Videos, and iFrames without Dimensions: If you don’t specify the `width` and `height` attributes for media elements, the browser doesn’t know how much space to allocate. When the media finally loads, it pushes other content down or aside, causing a layout shift. While WordPress core has automatically added these dimensions since version 5.5, content added via page builders, custom HTML, or migrated from older sites may still be missing them .
- Ads and Dynamic Embeds: Third-party ads are a notorious cause of CLS. They often load into a container that has no predefined size, causing a significant shift when the ad creative appears. The same applies to social media embeds or other dynamic content.
- Web Fonts (FOIT/FOUT): When a browser loads a custom font, it might temporarily show a system font (Flash of Unstyled Text – FOUT) or nothing at all (Flash of Invisible Text – FOIT). When the custom font finally loads, the text may change size, causing the entire block of text and surrounding elements to reflow.
- Dynamically Injected Content: Cookie consent banners, “subscribe to our newsletter” pop-ups, or related post widgets that are injected at the top of the page after the initial render are common culprits for pushing visible content down.
CLS Optimization Checklist for WordPress
Fixing CLS is all about making your layout predictable for the browser before all assets have loaded.
| Priority | Action | WordPress Solution | Difficulty |
|---|---|---|---|
| High | Add `width` and `height` to Images/Videos | WordPress does this by default for new uploads. For existing or problematic content, plugins like Perfmatters have a “Add Missing Image Dimensions” feature. For background images in CSS, you must ensure the container has a fixed aspect ratio. | Low |
| High | Reserve Space for Ads and Embeds | This is a more manual process. Before the ad script runs, use CSS to set a specific `min-height` on the container `div` that will hold the ad or iframe. This holds the space open, preventing a collapse and subsequent shift. | Medium |
| Medium | Optimize Font Loading | 1. Preload Key Fonts: Use WP Rocket or Perfmatters to tell the browser to fetch critical font files early. 2. Use `font-display: swap;`: This ensures text is always visible using a fallback font, reducing the impact of the shift. Most performance plugins handle this automatically. 3. Host Fonts Locally: Reduces external requests and DNS lookups, speeding up font delivery. |
Low-Medium |
| Medium | Handle Dynamic Content with Care | Avoid inserting content above existing content unless it’s in response to a user interaction. For banners or notices, try to use overlays that don’t disrupt the document flow, or ensure space is reserved for them from the start. | Medium |
Actionable Step-by-Step: Fixing Font-Induced Layout Shifts
A common and frustrating source of CLS is the “flash” of text as custom fonts load. Here’s how to tame it using a plugin.
- Identify: Watch your page load carefully. Do you see the text style change moments after it first appears? If so, you likely have a font-swapping issue. PageSpeed Insights may also flag “Ensure text remains visible during webfont load” if `font-display` is not set correctly.
- Solution (Easy – Using WP Rocket): A comprehensive caching plugin like WP Rocket can solve this in a few clicks.
- Install and activate WP Rocket.
- Go to the `File Optimization` tab. The plugin automatically applies many best practices, including adding `font-display: swap` to fonts.
- Navigate to the `Preload` tab. In the “Preload Fonts” box, you need to add the URLs of your most important font files (usually the `.woff2` files for your main body and heading fonts). You can find these URLs by looking at the “Network” tab in Chrome DevTools when you load your page.

- Alternative Solution (Manual CSS): If you are comfortable with code and are not using a performance plugin, you can edit your theme’s CSS file. Find the `@font-face` declarations and ensure each one includes the `font-display: swap;` property.
@font-face { font-family: 'YourFont'; src: url('/path/to/yourfont.woff2') format('woff2'); font-weight: 400; font-style: normal; font-display: swap; /* This is the crucial line */ } - Verify: Clear all caches and re-run a PageSpeed Insights test. The layout shift from fonts should be significantly reduced or eliminated, and the “Ensure text remains visible during webfont load” audit should now be passed.
Part 5: The Foundation – Choosing the Right WordPress Hosting, Theme, and Plugins
Individual fixes for LCP, INP, and CLS are crucial, but they are like patching holes in a leaky bucket if the bucket itself is flawed. A truly high-performing WordPress site is built on a solid foundation. Optimizing Core Web Vitals is not just about front-end tweaks; it’s a holistic strategy that starts with your server, is defined by your theme, and is impacted by every plugin you install. Some experts argue that your web host accounts for 50-60% of your site’s performance potential .
Why Your Host is 50% of the Battle
Your hosting provider is the single most significant factor in your website’;s performance. No amount of on-site optimization can fully compensate for a slow, under-resourced server. A slow host directly leads to high Time to First Byte (TTFB), which, as we’;ve learned, is the starting point for LCP. If your server takes a full second to even begin sending the page, achieving a 2.5-second LCP is nearly impossible.
Recommendation: Move away from cheap, overcrowded shared hosting. Invest in a performance-focused Managed WordPress Host. These providers optimize their entire server stack specifically for WordPress, offering critical features that directly improve Core Web Vitals.
| Host | Key Performance Features | Ideal For |
|---|---|---|
| WP Engine | Google Cloud C2 infrastructure, proprietary EverCache® technology, integrated global CDN with image optimization, built-in performance monitoring tools. | Businesses, enterprises, and high-traffic sites that need reliability, scalability, and expert support. Their infrastructure is proven to deliver fast TTFB . |
| Kinsta | Exclusive use of Google Cloud Platform’s Premium Tier network and C2 machines, server-level caching, free Kinsta APM for performance monitoring, and integrated Edge Caching via Cloudflare. | Developers and businesses who value a cutting-edge technology stack and a highly intuitive user interface for site management. |
| SiteGround | Runs on Google Cloud infrastructure, offers its own powerful SG Optimizer plugin for caching and front-end optimizations, and provides a free CDN. | Beginners and small to medium-sized businesses looking for an excellent balance of performance, features, and affordability. It’;s officially recommended by WordPress.org . |
Your Theme is Your Site’s Blueprint
Your WordPress theme forms the foundation of your site’;s design and functionality. A bloated, “multi-purpose” theme packed with every conceivable feature—sliders, custom post types, dozens of font options—is a primary source of large CSS and JavaScript files and a complex DOM. These directly harm all three Core Web Vitals. Each unused feature still loads unnecessary code, eating up valuable resources and slowing down your site .
Recommendation: Start with a lightweight, performance-optimized theme built with a “less is more” philosophy. These themes provide a clean, efficient base that you can extend with plugins as needed, rather than trying to disable features you don’t want.
| Theme | Key Performance Benefits |
|---|---|
| GeneratePress | Famously lightweight (less than 10KB fresh install), modular, built for speed and accessibility, uses clean code, and integrates perfectly with the native block editor. |
| Kadence | Offers deep integration with the block editor, providing powerful design features without the bloat of traditional page builders. Known for its speed and flexibility. |
| Blocksy | Another block-based theme focused on speed and customization. It includes advanced features like local Google Fonts hosting and is highly praised for its CLS optimization . |
| Neve | Designed for speed with a mobile-first approach. It’s lightweight and compatible with popular page builders while remaining performance-focused. |
The Plugin Dilemma: Less is More, Quality is Everything
Plugins are what make WordPress so powerful, but they are also the most common cause of performance degradation. Every active plugin can add CSS, JS, and database queries to your site. A single poorly coded plugin can bring your site to a crawl. The key is not to avoid plugins, but to be highly selective.
Recommendation: Regularly audit your plugins. Deactivate and delete anything you don’t absolutely need. For the functionality you do need, choose well-coded, lightweight options. When it comes to performance optimization, you generally have two strategic choices:
- The “All-in-One” Strategy: Use a single, comprehensive plugin that handles caching, file optimization, media optimization, and more.
- Pros: Simplicity, one dashboard to manage, less chance of plugin conflicts.
- Cons: May offer less granular control than specialized tools.
- Top Choices: NitroPack (known for its aggressive, automated optimizations), FlyingPress (praised for its innovative features and speed).
- The “Best-in-Class” Strategy: Combine several specialized plugins to get the best features for each task.
- Pros: Maximum control and flexibility, can choose the absolute best tool for each specific job (e.g., script management, image optimization).
- Cons: More complex to configure and manage, higher potential for conflicts.
- A Powerful Combination: Perfmatters (for script management, bloat removal, and preloading) + a dedicated caching plugin (like WP Rocket) + an image optimization plugin (like EWWW Image Optimizer).
Data from large-scale tests can help inform this decision. A 2021 study by Jetpack that analyzed 6,000 real-world sites showed measurable differences in LCP and FCP scores between popular plugins. While the data is from a few years ago, the principle remains: plugin choice has a direct, measurable impact on performance.
A comparison of popular WordPress speed plugins based on their real-world impact on LCP and FCP, adapted from a Jetpack study
Part 6: Validation and Long-Term Maintenance
Optimizing your Core Web Vitals is not a one-time task; it’s an ongoing process of improvement and vigilance. After you’ve implemented fixes, you need to validate that they worked. And to prevent future performance regressions, you must integrate performance monitoring into your regular website maintenance workflow.
Validating Your Fixes
How do you know if your efforts paid off? Follow this two-step validation process:
- Immediate Lab Data Check:
- Clear All Caches: This is the most critical and often forgotten step. You must clear your WordPress plugin cache (e.g., WP Rocket), any server-level cache (e.g., from WP Engine or Kinsta), and your CDN cache (e.g., Cloudflare).
- Test in Incognito: Open a new incognito or private browser window. This ensures your test isn’t affected by your browser’s cache or extensions.
- Re-run PageSpeed Insights: Run your optimized URL through PSI again. Look at the **Lab Data** section. You should see immediate improvements in the specific metrics you targeted. For example, if you optimized your LCP image, the lab LCP score should be lower. This confirms your fix is working technically.
- Long-Term Field Data Validation:
- Use Google Search Console: After confirming your fix in the lab, go to your Google Search Console account.
- Navigate to the `Core Web Vitals` report.
- Find the issue you addressed (e.g., “LCP issue: longer than 2.5s (mobile)”).
- Click the **”Validate Fix”** button. This signals to Google that you believe you have resolved the issue. Google will then begin monitoring the affected URLs. Over the next 28 days, it will collect new field data from real users.
- You will receive an email from GSC once the validation process is complete, hopefully confirming that the issue is resolved across your site.
Creating a Performance Culture: Ongoing Monitoring
A fast site today can become a slow site tomorrow. A new plugin, a theme update, or a new marketing script can undo all your hard work. The key to long-term success is proactive monitoring.
- Schedule Regular Audits: Don’t wait for problems to arise. Set a recurring monthly calendar reminder to run your key pages (homepage, a typical blog post, a product page) through PageSpeed Insights. This 15-minute check can catch issues before they impact your rankings.
- Keep an Eye on Search Console: Your GSC Core Web Vitals report is your long-term health monitor. Check it periodically to see if any new URLs are falling into the “;Needs Improvement” or “Poor” categories. This can alert you to site-wide issues you may have missed.
- Test Before You Deploy: This is the most important practice for preventing regressions. Before installing a new plugin or applying a major theme update on your live site, test it on a **staging environment**. Most quality managed hosts (like WP Engine and Kinsta) provide one-click staging sites. Install the update on the staging site, run it through PageSpeed Insights, and compare the performance to your live site. If it causes a significant performance drop, you can investigate the issue without affecting your users or SEO.
- Keep Everything Updated: Outdated software is a common source of both security vulnerabilities and performance bottlenecks. Regularly update your WordPress core, themes, and plugins. Developers often release performance improvements in their updates .
Conclusion: From Technical Metrics to Business Growth
We’ve journeyed deep into the world of Core Web Vitals, moving from high-level concepts to the granular, WordPress-specific tactics needed to achieve “Good” scores. We’;ve seen how to diagnose issues with precision using tools like PageSpeed Insights, how to systematically conquer LCP by optimizing servers and images, how to master INP by taming JavaScript, and how to eliminate CLS by creating stable layouts. We’ve also established that true, sustainable performance is built on a solid foundation of quality hosting, a lightweight theme, and a curated set of efficient plugins.
But it’s crucial to remember that this effort is not merely about chasing green scores on a report or placating a search engine algorithm. Optimizing Core Web Vitals is about fundamentally improving the experience for the real people who visit your website. It’s about respecting their time, removing frustration, and building trust. A fast, stable, and responsive site is perceived as more professional, more reliable, and more worthy of their business.
The business impact is direct and measurable. As the data shows, improvements in site speed and user experience lead to lower bounce rates, longer session durations, higher engagement, and most importantly, increased conversions and revenue. The case of Yahoo! JAPAN, which saw a **15.1% increase in page views per session** and a **13.3% longer session duration** after fixing a major CLS issue, is a powerful testament to this connection . Your investment in performance is a direct investment in your business’s growth.
The journey to a perfect CWV score is a marathon, not a sprint. It requires a methodical approach, ongoing vigilance, and a commitment to putting the user experience first. But it is a journey with a clear and valuable destination.
Don’t wait for your rankings to drop or your users to complain. Your first step is simple. Open PageSpeed Insights right now, test your most important page, and use Part 2 of this guide to tackle your single biggest LCP opportunity. Your users (and your bottom line) will thank you.
Appendix
A. People Also Ask (For Your FAQ Section)
- How do I improve my LCP score in WordPress?
- What is the best plugin for Core Web Vitals in WordPress?
- How do I fix CLS (Cumulative Layout Shift) issues in WordPress?
- How do I eliminate render-blocking resources in WordPress?
- Does my WordPress theme affect Core Web Vitals?
- Is WP Rocket or Perfmatters better for Core Web Vitals?
- How do I check my Core Web Vitals score for free?
- Why is my INP score so high on WordPress?
B. Article Schema Markup (JSON-LD)
{
  "@context": "https://schema.org",
  "@type": "TechArticle",
  "headline": "WordPress Core Web Vitals 2025: The Definitive Guide to LCP, INP & CLS",
  "description": "Dominate search rankings with our 2025 guide to WordPress Core Web Vitals. Learn actionable, step-by-step strategies to fix LCP, INP, and CLS issues using data-driven techniques and the best plugins.",
  "image": "https://example.com/path/to/featured-image.jpg",
  "datePublished": "2025-09-19T09:00:00+00:00",
  "dateModified": "2025-09-19T09:00:00+00:00",
  "author": {
    "@type": "Organization",
    "name": "Your Brand Name"
  },
  "publisher": {
    "@type": "Organization",
    "name": "Your Website Name",
    "logo": {
      "@type": "ImageObject",
      "url": "https://example.com/path/to/logo.png"
    }
  },
  "mainEntityOfPage": {
    "@type": "WebPage",
    "@id": "https://example.com/blog/wordpress-core-web-vitals-guide"
  },
  "faqPage": {
    "@type": "FAQPage",
    "mainEntity": [
      {
        "@type": "Question",
        "name": "How do I improve my LCP score in WordPress?",
        "acceptedAnswer": {
          "@type": "Answer",
          "text": "To improve LCP in WordPress, focus on three areas: 1) Reduce server response time (TTFB) with better hosting, caching, and a CDN. 2) Optimize your LCP element, usually an image, by compressing it, using WebP format, and ensuring it's not lazy-loaded. 3) Eliminate render-blocking resources like CSS and JS using a performance plugin like WP Rocket or Perfmatters to prioritize critical content."
        }
      },
      {
        "@type": "Question",
        "name": "What is the best plugin for Core Web Vitals in WordPress?",
        "acceptedAnswer": {
          "@type": "Answer",
          "text": "There is no single 'best' plugin, but top contenders include all-in-one solutions like WP Rocket and FlyingPress, or a combination of specialized plugins like Perfmatters (for script optimization) and a caching plugin. The best choice depends on your technical comfort and specific needs. Lightweight themes and quality hosting are equally important."
        }
      },
      {
        "@type": "Question",
        "name": "How do I fix CLS (Cumulative Layout Shift) issues in WordPress?",
        "acceptedAnswer": {
          "@type": "Answer",
          "text": "To fix CLS, you must ensure visual stability. The most common fixes are: 1) Add explicit width and height attributes to all images and videos. 2) Reserve space for dynamic content like ads or embeds using CSS. 3) Optimize font loading with `font-display: swap` and preloading to prevent text from shifting."
        }
      },
      {
        "@type": "Question",
        "name": "How do I eliminate render-blocking resources in WordPress?",
        "acceptedAnswer": {
          "@type": "Answer",
          "text": "The easiest way is to use a performance plugin. Plugins like WP Rocket, Perfmatters, or FlyingPress have features to 'Optimize CSS Delivery' (which creates critical CSS) and 'Delay/Defer JavaScript'. This ensures that only essential code loads initially, allowing the page to render faster, while non-critical scripts load later."
        }
      }
    ]
  }
}
With over 27 years of hands-on SEO expertise, starting from my early days as a CFO. Quitting that job to build a top-ranked web hosting business in 1995, I’ve mastered WordPress optimization as a precise engineering discipline. Through extensive research, high-level consulting, and developing a WordPress site that achieved over a thousand organic Google rankings—culminating in a six-figure sale—I’ve decoded Google’s algorithm over 27 years to develop wordpress engineering that transforms underperforming WordPress sites into authoritative powerhouses. Business owners frustrated by stagnant traffic, low visibility, and missed opportunities find relief as I help them deliver measurable ROI through higher rankings, increased leads, and sustainable growth. As owner of dominant city-based SEO platforms in major U.S. markets, I outperform industry gurus, empowering entrepreneurs, local businesses, agencies, and marketers via my WordPress Optimization services at wordpressoptimization.com to unlock their site’s full potential.