
Mastering WordPress Object Caching: 2025 Guide to Redis vs. Memcached for Peak Performance
TL;DR Implementing object caching with Redis or Memcached in WordPress significantly enhances performance by reducing database load. This approach stores the results of common database queries in memory, allowing for faster retrieval and improved site responsiveness. The comprehensive guide on WordPress Optimization provides detailed instructions for setting up both Redis and Memcached, including installation, configuration, and integration with WordPress. Additionally, it offers benchmarks, troubleshooting tips, and best practices to ensure optimal implementation. By adopting object caching, WordPress sites can achieve faster load times, better scalability, and a more efficient user experience.
Table of Contents
- Part 1: The “Why” – Your WordPress Site’s Hidden Performance Killer
- Part 2: The Core Decision – Redis vs. Memcached for WordPress
- Part 3: Implementation Guide – Setting Up Redis with WordPress
- Part 4: Implementation Guide – Setting Up Memcached with WordPress
- Part 5: The Impact – Performance Benchmarks & Real-World Data
- Part 6: Best Practices & Troubleshooting
- Part 7: Actionable Summary & Next Steps
- Part 8: Appendix – Technical Resources
What is Object Caching with Redis & Memcached on WordPress?
Website performance is paramount, even a one-second delay in page load time can lead to significant drops in conversions, especially among mobile users. For WordPress sites, the hidden culprit behind sluggish performance often lies in excessive database queries. Persistent object caching with Redis or Memcached offers a powerful solution by storing frequently accessed data in memory, reducing the load on your database and accelerating page load times. This comprehensive guide delves into the intricacies of implementing object caching on WordPress, comparing Redis and Memcached, and providing step-by-step instructions for setup and optimization.
Key Benefits of Choosing the Best WordPress Hosting Providers for Performance and Support
Selecting a high-quality WordPress hosting provider is crucial for ensuring optimal performance and reliable support. Here are the key benefits:
-
Enhanced Site Speed: Top-tier hosts offer optimized servers and caching mechanisms, leading to faster load times.
-
Scalability: As your site grows, premium hosts provide resources to handle increased traffic without compromising performance.
-
Security: Leading providers implement robust security measures, including firewalls and regular backups, to protect your site.
-
Expert Support: Access to knowledgeable support teams who understand WordPress intricacies ensures timely assistance.
-
Reliability: High uptime guarantees minimize the risk of site downtime, keeping your site accessible to users.
By partnering with reputable hosting providers like WP Engine, Kinsta, and SiteGround, you can leverage these benefits to enhance your WordPress site’s performance and user experience.
Website performance is not a luxury; it is a fundamental requirement for success. Studies consistently show that even a one-second delay in page load time can lead to a significant drop in conversions, with mobile users being particularly unforgiving—53% abandon sites that take longer than three seconds to load. For the millions of websites powered by WordPress, this presents a critical challenge. While themes, plugins, and page builders offer incredible flexibility, they often contribute to a hidden performance killer: excessive database load.
This guide is the definitive resource for understanding and conquering that bottleneck. We will delve deep into the world of persistent object caching, a server-side optimization that represents one of the highest-impact changes you can make to a dynamic WordPress site. We will meticulously compare the two leading technologies, Redis and Memcached, providing not just theory but exhaustive, step-by-step implementation guides, real-world performance data, and troubleshooting strategies to ensure your success. By the end of this document, you will have a complete blueprint to dramatically reduce your server’s workload, slash page load times, and build a WordPress site capable of handling traffic spikes with ease.
Part 1: The “Why” – Your WordPress Site’s Hidden Performance Killer
Before diving into the technical intricacies of Redis and Memcached, it’s crucial to understand the fundamental problem they solve. Many site owners invest heavily in front-end optimizations like image compression and page caching, only to find their site still struggles under load. The culprit often lies deeper, at the very core of how WordPress functions: its constant, repetitive communication with the database.
The Anatomy of a Slowdown: A Real-World Scenario
Let’s consider a relatable story. Sarah, a client running a burgeoning handmade jewelry store on WooCommerce, called in a panic. Her site was about to be featured on a major lifestyle blog, and she was terrified it would crash. Her fears were well-founded; with just 50 daily visitors, her product pages were already taking over four seconds to load, and the site would become unresponsive during small weekend sales. The site was beautifully designed, but it was buckling under the slightest pressure.
An initial diagnosis revealed the core issue: her WordPress installation was hammering the database with the same queries, over and over again. For every single visitor loading a product page, WordPress was executing over 60 separate database requests. The server was spending all its time re-answering questions it had answered moments before. This is the “database query nightmare,” and it’s a story that plays out on countless WordPress sites every day.
The solution was not a bigger server, but a smarter one. By implementing a persistent object cache, we transformed her site’s performance. Fast forward to the day of the feature: Sarah’;s site handled over 2,000 visitors in a single hour without a hiccup. Page load times dropped to under one second. This wasn’t magic; it was the direct result of eliminating redundant database work, a transformation made possible by object caching.
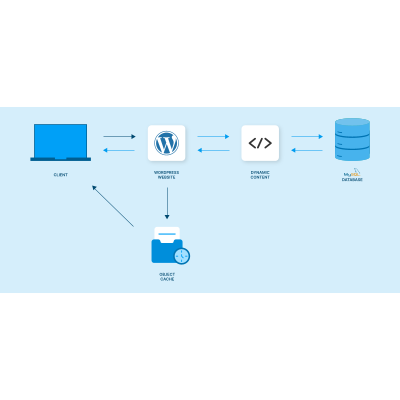
The Database Bottleneck Explained: WordPress’s Repetitive Strain
WordPress is a dynamic content management system, which means it builds every page on-the-fly by querying its MySQL database. When a user visits your homepage, WordPress doesn’t just serve a static file. Instead, as detailed in multiple technical analyses, it initiates a complex sequence of PHP executions and database queries to assemble the page Scientyfic World, . For every single page load, it asks the database a series of questions, such as:
- “What are my site’s general settings from the
wp_optionstable?” - “What are the items in my primary navigation menu?”
- “What are the latest posts to display on the homepage?”
- “What widgets should be shown in the sidebar?”
- For a logged-in user: “Show me this user’s cart contents.”
The problem is that WordPress asks these same questions for every single visitor, even though the answers (like the navigation menu or site settings) rarely change from one minute to the next. This constant, repetitive querying creates a significant performance bottleneck. As traffic increases, the database becomes overwhelmed, server response times skyrocket, and the user experience degrades rapidly. For complex sites, like e-commerce stores or real estate directories with many custom fields, a single page load can trigger hundreds of queries, bringing even powerful servers to their knees .
Understanding Caching Layers: Page Cache vs. Object Cache
To address performance issues, WordPress utilizes several types of server-side caching. It’s essential to distinguish between the two most important ones: page caching and object caching.
- Page Caching: This is the most common form of caching. It works by storing the final, fully-rendered HTML of a page. When the next visitor requests that same page, the server can deliver the static HTML file instantly, completely bypassing PHP processing and database queries. This is incredibly effective for content that is the same for all users (e.g., a blog post for anonymous visitors). Plugins like WP Rocket and W3 Total Cache excel at this .
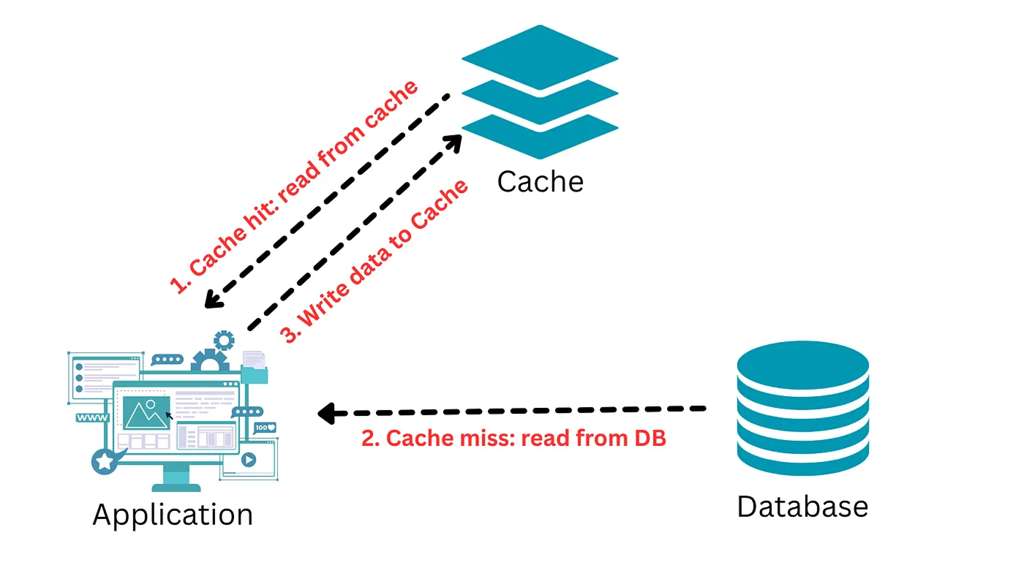
- Object Caching: This operates at a deeper level. Instead of caching the entire page, it caches the results of individual database queries. It creates a “;short-term memory” for the database. When a piece of data is needed, WordPress first checks the object cache. If the data is there (a “;cache hit”), it’s retrieved from fast memory, avoiding a slow database query. If it’s not there (a “cache miss”), WordPress queries the database as normal and then stores the result in the object cache for future requests .
These two caching methods are not mutually exclusive; they are complementary and work best together. Page caching is the first line of defense for static content, while object caching accelerates the creation of dynamic content that cannot be page-cached, such as for logged-in users, e-commerce checkouts, or personalized dashboards.
The Solution: Persistent Object Caching
WordPress comes with a built-in object caching mechanism, implemented through the WP_Object_Cache class . This system automatically stores query results in PHP memory to avoid redundant queries *within a single page load*. However, it has one critical flaw: **it is non-persistent.**
This means that as soon as the page has finished generating and is sent to the user’s browser, the entire cache is wiped clean. The next visitor, or even the same visitor reloading the page, will trigger the entire database query process all over again. As one expert aptly described it, it’s like having a notepad that erases itself after every use . While helpful, it does nothing to reduce server load across multiple page views or users.
This is where external, **persistent object caching** solutions like Redis and Memcached become game-changers. These are dedicated, in-memory data stores that integrate with WordPress to replace its default, temporary cache. When you use Redis or Memcached, the query results are stored in a separate, persistent memory pool that lives outside the individual PHP process. This cache survives between page loads, allowing WordPress to “remember” the answers to its database questions for minutes, hours, or even days. Instead of asking the database the same question 500 times per hour, WordPress asks once and then retrieves the answer from lightning-fast RAM for the next 499 requests.
This is why the WordPress Site Health tool often recommends using a “persistent object cache” for sites experiencing performance issues—it is the key to unlocking true database efficiency and scalability .
Part 2: The Core Decision – Redis vs. Memcached for WordPress
Once you’ve decided to implement a persistent object cache, the next critical choice is which technology to use. The two dominant players in the web development world, and specifically for WordPress, are Redis and Memcached. Both are open-source, high-performance, in-memory key-value stores designed to reduce latency and server load. However, they are built on different philosophies and offer distinct feature sets. Choosing the right one depends entirely on your website’s specific needs, complexity, and future growth plans.
Introduction to the Contenders
On the surface, Redis and Memcached appear similar. They both store data in RAM for rapid access and are widely supported by hosting providers and the developer community. Their primary goal in a WordPress context is to intercept database queries and serve results from memory.

Memcached, first released in 2003, is the veteran of the two. It was designed with one purpose in mind: to be a simple, fast, and distributed memory object caching system. Its philosophy is to do one thing and do it exceptionally well. It is renowned for its simplicity and low overhead, making it a popular choice for caching static data like API call results or rendered page fragments . Giants like Facebook, Twitter, and YouTube have historically relied on Memcached for its raw speed in high-traffic scenarios.
Redis (Remote Dictionary Server), created in 2009, is considerably newer but has gained immense popularity due to its rich feature set. While it functions as an excellent cache, it is more accurately described as an “;in-memory data structure store.” Redis goes beyond simple key-value pairs, supporting complex data types like lists, sets, hashes, and sorted sets. This versatility allows it to be used not just as a cache, but also as a database, message broker, and more . Its feature set includes data persistence, replication, and transactions, making it a more robust and durable solution.
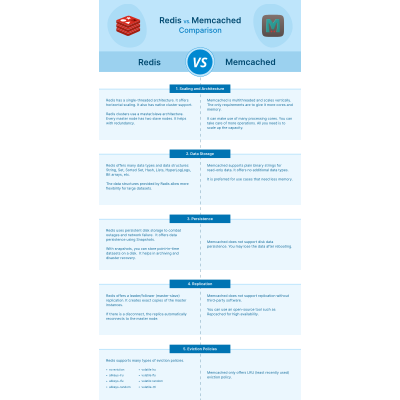
Head-to-Head Comparison: Redis vs. Memcached
To make an informed decision, it’s essential to compare these two systems across several critical dimensions. The following table provides a comprehensive overview of their key characteristics and how they differ.
| Feature | Redis | Memcached |
|---|---|---|
| Primary Role | Multi-purpose data store, cache, message broker, queue. Often called a “data structure server.” | Pure in-memory caching system. Designed for speed and simplicity in caching objects. |
| Data Persistence | Yes. Offers two persistence modes: RDB (point-in-time snapshots) and AOF (logs every write operation). Data can survive server reboots. | No (by default). Data is volatile and stored exclusively in RAM. All cached data is lost upon server restart or crash. |
| Data Structures | Rich and Complex. Supports Strings, Lists, Sets, Sorted Sets, Hashes, Bitmaps, HyperLogLogs, and Streams. | Simple. Supports basic key-value pairs where the value is a binary-safe string (up to 1MB by default). |
| Architecture | Primarily single-threaded for command execution, but uses highly efficient non-blocking I/O. This simplifies development and avoids race conditions. | Multi-threaded. Can utilize multiple CPU cores to handle a high volume of concurrent requests, which can be an advantage for high-throughput, simple operations. |
| Scalability | Supports native clustering (Redis Cluster) for automated sharding and high availability. Also supports master-replica replication for read scaling. | Scales horizontally by adding more nodes. Sharding logic is handled on the client-side, making the server architecture simpler. |
| Memory Management | More advanced eviction policies, including LRU (Least Recently Used), LFU (Least Frequently Used), random, and TTL-based eviction. | Simpler LRU (Least Recently Used) eviction policy is the standard. |
| Advanced Features | Built-in Pub/Sub messaging, Lua scripting for server-side atomic operations, Transactions (MULTI/EXEC), and Geospatial indexing. | None. Focused exclusively on fast get/set caching operations. |
| WordPress Integration | Excellent, with dedicated plugins like “Redis Object Cache” that offer detailed stats and easy configuration. | Good, typically integrated via a generic caching plugin (e.g., W3 Total Cache) or by placing an `object-cache.php` drop-in file in `wp-content`. |
Deep Dive into Key Differences & WordPress Implications
The table above gives a high-level overview, but the real decision lies in understanding how these differences impact a WordPress website in practice.
Persistence: The Game-Changer for Stability
This is arguably the most significant difference for WordPress site owners. Memcached is volatile; if your server reboots for maintenance, or if the Memcached service crashes, your entire cache is gone. When the server comes back online, every single page request will result in a “cache miss,” forcing WordPress to rebuild every query from the database. This can create a “;thundering herd” problem, where a sudden influx of traffic overwhelms the database, potentially causing the very crash you were trying to prevent. You must wait for the cache to “warm up” again as users visit pages.
Redis, on the other hand, offers persistence. By configuring RDB snapshots or AOF logging, Redis can save its in-memory data to disk. After a reboot, it can reload this data, meaning your cache is immediately “warm.”; This prevents the post-reboot performance slump and provides a much more stable and predictable experience, especially for sites with consistently high traffic or critical functions . For a WooCommerce store, this means user sessions and cart data stored in the cache can survive a restart, which is a massive reliability win.
Data Structures: Simplicity vs. Flexibility
Memcached’s simplicity is its strength. It treats all data as simple strings. This makes it incredibly fast for its intended purpose: storing and retrieving chunks of data like the result of a database query or an API call. It doesn’t waste resources on interpreting data types.
Redis’;s support for advanced data structures opens up more sophisticated caching possibilities. For example, a plugin could use a Redis Hash to store all the fields of a WordPress user object in a single, structured key, allowing for atomic updates of individual fields. A Sorted Set could be used to manage a real-time leaderboard or a list of popular posts without complex database queries. While many WordPress caching plugins may not leverage these advanced features out of the box, they provide a powerful foundation for custom development and for complex plugins that are Redis-aware . This makes Redis more future-proof as your site’s complexity grows.
Performance: Debunking the “Faster” Myth
The question of “which is faster?” is nuanced. Benchmarks often show Memcached having a slight edge in raw throughput (operations per second) and lower latency for simple get/set operations, especially on multi-core systems, due to its multi-threaded architecture . It can process multiple requests simultaneously across different cores.
Redis is primarily single-threaded for command execution, meaning it processes one command at a time. However, it uses advanced I/O multiplexing and is extremely efficient, so this is rarely a bottleneck for typical WordPress workloads. Its performance is exceptionally high for small data objects and complex operations (like adding an item to a set). For the vast majority of WordPress sites, the performance difference between the two for standard object caching is negligible and will not be the deciding factor. The stability and features of Redis often outweigh the marginal speed advantage Memcached might have in specific, high-throughput scenarios.
Use Case Scenarios: Matching the Tool to the Task
The best way to decide is to look at your specific type of WordPress site.
Choose Redis if:
- You run a WooCommerce store, membership site, or LMS (Learning Management System). The persistence of user sessions, cart data, and user-specific content is critical. Losing this data on a reboot would lead to a poor user experience and lost sales or progress .
- Data integrity and stability are your top priorities. You want to avoid performance degradation after server maintenance and ensure a consistently fast experience.
- Your site uses complex plugins or custom functionality that could benefit from Redis’s advanced data structures for more efficient caching.
- You are building a platform that may need features like real-time notifications (Pub/Sub) or job queues in the future. Redis provides this extensibility out of the box.
Real-world Example: An online course platform with user-specific dashboards, complex product catalogs, and subscription management. Redis’s data persistence means students don’t experience slowdowns or lose their session data even after server maintenance.
Choose Memcached if:
- You run a high-traffic but relatively simple blog, news site, or corporate brochure site where most content is the same for all users.
- Your primary goal is to reduce database load for anonymous traffic, and the occasional cache rebuild after a restart is an acceptable trade-off.
- Simplicity and minimal resource overhead are your main concerns. Memcached is lightweight and has a smaller memory footprint for the same dataset .
- Your hosting environment provides Memcached as a simple, one-click option and you prefer not to manage a more complex service.
Real-world Example: A popular news blog that serves thousands of concurrent readers. The content is largely static for each article. Memcached’s multi-threaded speed and simplicity provide excellent performance for reducing the database load from these repetitive article views.
The Verdict & Recommendation for 2025
While both technologies are excellent, the landscape of the web and WordPress has evolved. Websites are more dynamic and transactional than ever before. Given this trend, a clear recommendation emerges for 2025:
For the vast majority of WordPress sites, especially those with any dynamic functionality, e-commerce, or plans for future growth, Redis is the superior and safer choice.
The reasoning is straightforward: the benefits of Redis’;s data persistence and richer feature set far outweigh the marginal performance differences for typical WordPress use cases. The stability it provides by surviving reboots is a critical operational advantage that prevents performance crises and ensures a consistent user experience. While Memcached remains a viable and fast option for simple, high-read scenarios, Redis offers a more robust, flexible, and future-proof foundation for almost any modern WordPress project. As one expert recommends, “Start with Redis. The performance difference is negligible for most sites, but Redis’s data persistence can save you headaches down the road” .
Part 3: Implementation Guide – Setting Up Redis with WordPress
This section provides a detailed, step-by-step guide for installing and configuring Redis on a typical Linux server (Ubuntu 22.04) and integrating it with a WordPress installation. This guide assumes you are comfortable working with the command line. If not, consider using a managed hosting provider that offers one-click Redis activation .
Prerequisites for a DIY Redis Setup
- Server Access: You need a VPS (Virtual Private Server) or a Dedicated Server. Object caching cannot be installed on most shared hosting environments.
- Root or Sudo Privileges: You must have administrative access to install software packages.
- SSH Client: A tool like PuTTY (for Windows) or the built-in Terminal (for macOS/Linux) to connect to your server.
- Operating System: This guide uses Ubuntu 22.04, but the commands are similar for other Debian-based systems.
Step 1: Install Redis Server on Ubuntu 22.04
First, connect to your server via SSH. Then, update your package list and install the Redis server package.
# Update the package repository list
sudo apt update

# Install the Redis server package
sudo apt install redis-server -y
Once the installation is complete, it’s a best practice to enable the Redis service to start automatically on server boot.
# Enable Redis to start on boot
sudo systemctl enable redis-server
You can verify that the Redis service is running correctly with the following command:
# Check the status of the Redis service
sudo systemctl status redis-server
You should see an output indicating that the service is `active (running)`.
Step 2: Secure and Configure Redis (Recommended Best Practice)
By default, Redis is accessible without a password, which is a security risk if not properly firewalled. It’s highly recommended to configure it for better security and resource management. The main configuration file is located at `/etc/redis/redis.conf`.
Open the file with a text editor like `nano`:
sudo nano /etc/redis/redis.confMake the following changes inside the file:
- Bind to localhost: This is the most important security step. It ensures Redis only listens for connections from the server itself, preventing external access. Find the line `bind 127.0.0.1 ::1` and ensure it is not commented out. If you only see `bind 127.0.0.1`, that is also sufficient.
- Set a Password: For an extra layer of security, require a password for all connections. Find the line `# requirepass foobared`, uncomment it (remove the `#`), and replace `foobared` with a very strong, unique password.
- Set a Memory Limit: To prevent Redis from consuming all your server’s RAM, it’s crucial to set a memory limit. Find the line `# maxmemory ` and change it to something reasonable for your server, for example `maxmemory 256mb`. A good starting point is 128-512MB for most WordPress sites.
- Set an Eviction Policy: This tells Redis what to do when the `maxmemory` limit is reached. A good general-purpose policy is `allkeys-lru`, which removes the least recently used keys. Find `# maxmemory-policy noeviction` and change it to `maxmemory-policy allkeys-lru`.
Your configuration changes should look like this:
# Bind to localhost to prevent external access
bind 127.0.0.1

# Set a password for an extra layer of security
requirepass YOUR_STRONG_PASSWORD

# Set a memory limit to prevent Redis from consuming all RAM
maxmemory 256mb

# Choose a memory eviction policy when the limit is reached
maxmemory-policy allkeys-lru
Save the file (Ctrl+X, then Y, then Enter in nano) and restart the Redis service to apply the changes:
sudo systemctl restart redis-serverStep 3: Install the PHP Redis Extension
Your web server’;s PHP process needs a way to communicate with the Redis server. This is done via a PHP extension. You need to install the extension that matches your server’s PHP version.
First, check your PHP version with `php -v`. If you are using PHP 8.2, for example, you would run:
# Install the PHP extension for Redis (adjust version number as needed)
sudo apt install php8.2-redis -y
After installing the extension, you must restart your web server (Apache or Nginx) and the PHP-FPM service for the changes to take effect.
# For Apache
sudo systemctl restart apache2

# For Nginx with PHP-FPM (common setup)
sudo systemctl restart php8.2-fpm
sudo systemctl restart nginx
Step 4: Integrate Redis with WordPress
The final step is to tell WordPress to use your newly installed Redis server. This is done with a plugin and some configuration constants.
- Install the Plugin: In your WordPress admin dashboard, go to `Plugins > Add New` and search for “Redis Object Cache” by Till Krüss. Install and activate it . Do not enable it yet.
- Configure `wp-config.php`: Connect to your server via FTP or SSH and open the `wp-config.php` file located in your WordPress root directory. Add the following lines just before the `/* That’s all, stop editing! Happy publishing. */` line.
define('WP_REDIS_HOST', '127.0.0.1');
define('WP_REDIS_PORT', 6379);
define('WP_REDIS_PASSWORD', 'YOUR_STRONG_PASSWORD'); // Use the password you set in redis.conf
define('WP_CACHE_KEY_SALT', 'your_unique_site_prefix_'); // CRITICAL for security and multi-site setups
define('WP_REDIS_MAXTTL', 86400); // Optional: sets cache expiration to 24 hours
The `WP_CACHE_KEY_SALT` is extremely important. It adds a unique prefix to all your site’s cache keys, preventing “cache collisions” if you ever run multiple WordPress sites on the same Redis instance .
Step 5: Enable and Verify the Redis Object Cache
Now, go back to your WordPress dashboard and navigate to `Settings > Redis`. You should see the connection details you defined in `wp-config.php` pre-filled.
Click the “Enable Object Cache” button. If everything is configured correctly, the page will reload, and you will see a “Connected” status with live metrics from your Redis server, such as Ping, Memory usage, and Hit Rate.
You can also verify the connection from the command line using WP-CLI:
# Navigate to your WordPress root directory
cd /var/www/html

# Check the Redis status via WP-CLI
wp redis status
A successful connection will return a status of `Connected` and show server details. Your WordPress site is now using Redis for persistent object caching!
Part 4: Implementation Guide – Setting Up Memcached with WordPress
This section provides the parallel guide for installing and configuring Memcached. This path is often chosen for its simplicity, especially on servers where it’s offered as a standard feature. As with the Redis guide, this assumes you have administrative access to your server.
Prerequisites for a DIY Memcached Setup
- Server Access: VPS or Dedicated Server with root/sudo privileges.
- SSH Client: To connect to your server.
- Operating System: This guide uses Ubuntu 22.04.
Step 1: Install Memcached Server on Ubuntu 22.04
Connect to your server via SSH. The installation process for Memcached is very straightforward. We also install `libmemcached-tools`, which provides helpful command-line utilities for interacting with the Memcached server.
# Update the package repository list
sudo apt update

# Install Memcached and its command-line tools
sudo apt install memcached libmemcached-tools -y
Once installed, the Memcached service should start automatically. You can verify its status:
# Check the status of the Memcached service
sudo systemctl status memcached
You should see an `active (running)` status in the output.
Step 2: Configure Memcached Server Settings
Basic configuration for Memcached is handled in the `/etc/memcached.conf` file. The two most common settings to adjust are the memory allocation and the listening address for security.
Open the file for editing:
sudo nano /etc/memcached.confInside the file, you can adjust the following parameters:
-m 64: This sets the memory allocation. The default is 64MB. You can increase this based on your server’;s available RAM. For example, ` -m 128` for 128MB.-l 127.0.0.1: This is the listen address. By default, it should be set to `127.0.0.1` (localhost), which is crucial for security as it prevents external connections. Ensure this line is present and not commented out.
After making any changes, save the file and restart the Memcached service:
sudo systemctl restart memcachedStep 3: Install the PHP Memcached Extension
Just like with Redis, PHP needs an extension to communicate with the Memcached server. There are two PHP extensions available: `memcache` and `memcached`. The `memcached` extension (with a ‘d’) is newer, more feature-rich, and generally recommended.
Install the `memcached` extension, matching your PHP version:
# Install the PHP extension for Memcached (adjust version number as needed)
sudo apt install php8.2-memcached -y
After the installation, restart your web server and PHP-FPM service to load the new extension.
# For Apache
sudo systemctl restart apache2

# For Nginx with PHP-FPM
sudo systemctl restart php8.2-fpm
sudo systemctl restart nginx
Step 4: Integrate Memcached with WordPress
Integrating Memcached with WordPress works differently than the Redis plugin. It requires a special PHP script called a “;drop-in.”
WordPress is designed to look for a file named `object-cache.php` in the `/wp-content/` directory. If this file exists, WordPress will use it for object caching instead of its built-in non-persistent cache. There are two primary ways to set this up:
Method 1: Using a Caching Plugin (Recommended for Simplicity)
The easiest method is to use a full-featured caching plugin that supports Memcached. **W3 Total Cache** is a popular choice for this.
- Install and activate the **W3 Total Cache** plugin from the WordPress repository.
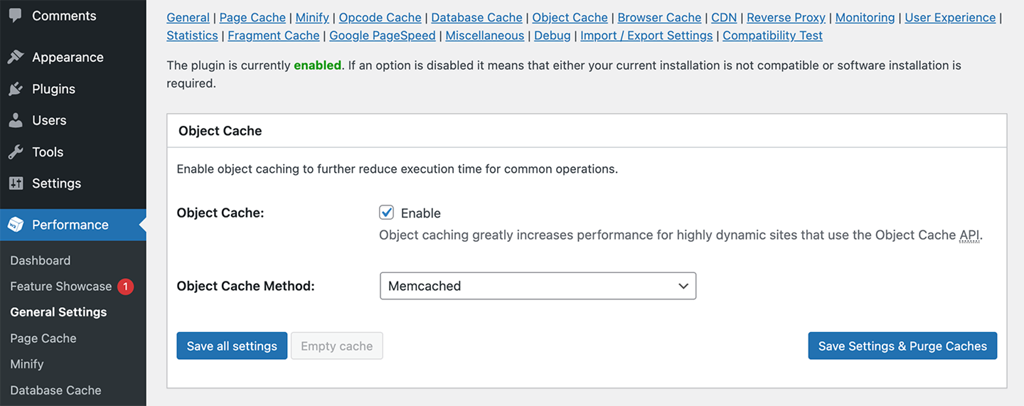
- In your WordPress dashboard, navigate to `Performance > General Settings`.
- Scroll down to the **Object Cache** section.
- Check the “Enable” box for Object Cache.
- From the “Object Cache Method” dropdown, select **Memcached**.
- Click “Save Settings & Purge Caches”.
W3 Total Cache will handle placing the necessary `object-cache.php` file in your `wp-content` directory and configuring the connection.
Method 2: Manual Drop-in Installation
If you prefer not to use a large caching plugin, you can use a standalone Memcached drop-in.
- Download the `object-cache.php` file from the official WordPress repository for the Memcached backend. You can find it here: Memcached Object Cache.
- Unzip the downloaded file and locate `object-cache.php`.
- Using an FTP client or SSH, upload this single `object-cache.php` file to your `/wp-content/` directory.
- As soon as the file is in place, WordPress will automatically start using it to connect to Memcached on the default `127.0.0.1:11211`.
Regardless of the method, it is still highly recommended to define a unique salt key in your `wp-config.php` file to prevent cache collisions on shared servers.
define('WP_CACHE_KEY_SALT', 'your_other_unique_prefix_');Step 5: Verify the Memcached Connection
Verifying Memcached is slightly less direct than with the dedicated Redis plugin, but it can be done easily from the command line.
Use the `memcstat` tool (from `libmemcached-tools`) or `netcat` to query the Memcached server for its statistics.
# Query Memcached for its stats
echo "stats" | nc 127.0.0.1 11211
This command will output a list of statistics. Browse your website for a few minutes and run the command again. You should look for these key metrics:
- `get_hits`: The number of times data was successfully retrieved from the cache. This number should be increasing as you use your site.
- `get_misses`: The number of times data was not found in the cache.
- `curr_items`: The total number of items currently stored in the cache.
A steadily increasing `get_hits` value is a clear sign that WordPress is successfully using Memcached. A high ratio of hits to misses indicates an effective cache.
Part 5: The Impact – Performance Benchmarks & Real-World Data
Theoretical benefits are one thing, but the true value of object caching is revealed through tangible performance data. By offloading repetitive database queries to high-speed memory, Redis and Memcached can produce dramatic improvements in server response time, database load, and a site’;s ability to handle concurrent users. This section quantifies those gains using real-world data and visualizations.
Setting the Baseline: The Uncached Reality
Let’s revisit the case of “Sarah’s jewelry store” from Part 1. Before implementing object caching, the site’s performance metrics were alarming for a small business:
- Average Page Load Time: 4.2 seconds
- Database Queries per Product Page: 58
- Concurrent User Capacity: Crashed at ~80 simultaneous users
- Business Impact: 32% cart abandonment rate, likely influenced by slow performance.
These numbers are typical for many dynamic WordPress sites, especially those using WooCommerce or other complex plugins. Each visitor adds incremental load to the database, and this load scales linearly, quickly reaching a breaking point.
After implementing Redis, the transformation was immediate and profound :
- Average Page Load Time: 0.8 seconds (an 81% improvement)
- Database Queries per Product Page: 12 (a 79% reduction)
- Concurrent User Capacity: Handled 400+ users smoothly
- Business Impact: Cart abandonment rate dropped to 19%.
This pattern is not an anomaly. Another case study of a regional news outlet showed that implementing a Redis object cache was a key part of a strategy that reduced average page load times from 5.1 seconds to 1.8 seconds and more than doubled their pages per session . The evidence is clear: object caching directly translates to a faster, more scalable website.
Visualizing the Gains: From Database Strain to Instantaneous Recall
Numbers are powerful, but charts make the impact visceral. The following visualizations illustrate the core benefits of implementing a persistent object cache.
Chart 1: Database Query Reduction
The primary function of an object cache is to reduce the number of queries sent to the MySQL database. This chart shows a typical “before and after” scenario for a dynamic WordPress page.
As the chart demonstrates, object caching can eliminate over 75-80% of database queries for a given page load. This frees up the database to handle essential write operations (like processing an order or publishing a post) and dramatically reduces overall server CPU and memory usage.
Chart 2: Server Response Time Under Load
Reducing queries directly improves Time to First Byte (TTFB), a key metric for both user experience and SEO. This improvement is most noticeable under load. This chart simulates how a server responds as the number of concurrent users increases.
The uncached site’s response time degrades exponentially as traffic grows, quickly becoming unusable. The cached site, however, maintains a low and stable response time, demonstrating its ability to scale efficiently and handle traffic spikes that would crash an uncached equivalent.
Monitoring Success: The Importance of Cache Hit Rate
After implementation, how do you know if your cache is working effectively? The single most important metric to monitor is the **Object Cache Hit Rate**. This percentage represents the proportion of requests that are successfully served from the fast in-memory cache versus those that have to go to the slow database (a “cache miss”).
A high hit rate is the goal. According to WordPress VIP documentation and industry best practices, a healthy object cache hit rate should be consistently **above 90%**, and ideally closer to 95-99% WordPress VIP Documentation, . A rate below 80% often indicates a problem, such as insufficient memory allocated to the cache (leading to frequent evictions) or an inefficient cache invalidation strategy.
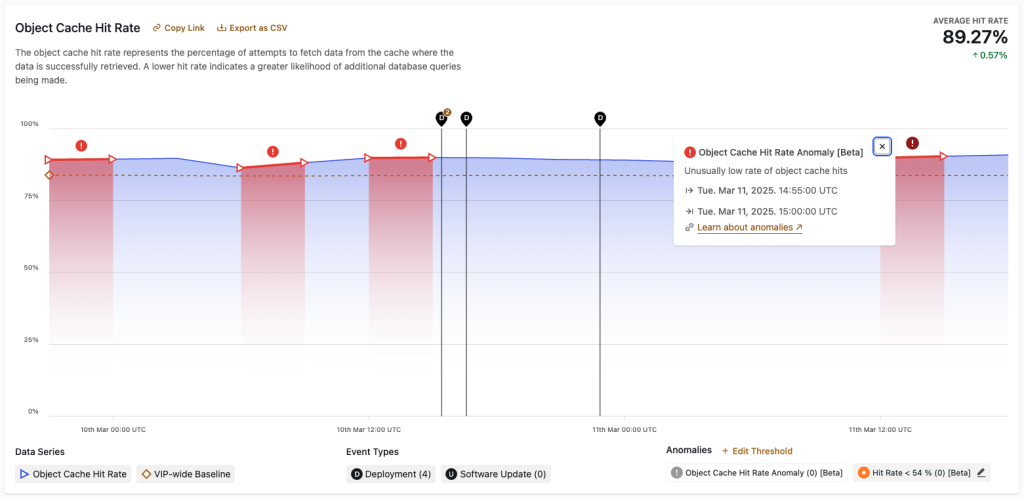
Tools like the Redis Object Cache plugin, New Relic, or hosting-specific dashboards (like the one shown above) provide visibility into this crucial metric. Monitoring your hit rate allows you to fine-tune your configuration and ensure you are getting the maximum performance benefit from your caching layer.
Part 6: Best Practices & Troubleshooting
Implementing an object cache is a huge step, but maintaining its stability and performance requires ongoing attention and adherence to best practices. A misconfigured cache can, in some cases, introduce new problems or even slow down your site. This section covers the essential strategies for long-term success and provides a guide to diagnosing and fixing the most common issues.
Proactive Best Practices for Long-Term Stability
Following these principles from the outset will help you avoid common pitfalls and ensure your caching layer is a reliable asset, not a liability.
1. Always Use a Unique Cache Key Salt
This cannot be overstated. The `WP_CACHE_KEY_SALT` constant in your `wp-config.php` file is critical, especially in any environment where the Redis or Memcached server might be shared. This includes multi-site WordPress installations or a VPS hosting multiple client sites. Without a unique salt, all sites will write to the same global cache pool. This can lead to “cache collisions,” where one site’s data overwrites another’;s, causing unpredictable behavior, data leakage, and chaos. A flush command from one site could wipe the cache for all sites .
// In wp-config.php - Make this unique for every site!
define('WP_CACHE_KEY_SALT', 'my_awesome_site_2025_');
2. Allocate Memory Wisely
Allocating the right amount of memory is a balancing act.
- Too Little Memory: If the cache is too small, it will fill up quickly. The caching engine will then be forced to constantly “evict” older items to make room for new ones. This leads to a low cache hit rate and a high number of evictions, defeating the purpose of the cache.
- Too Much Memory: Allocating an excessive amount of RAM to your cache can starve other critical services on your server, like MySQL or PHP-FPM, leading to overall system instability.
A good starting point for most small to medium-sized WordPress sites is **128MB to 256MB**. For larger WooCommerce stores or high-traffic sites, **512MB to 1GB** might be necessary. Monitor your memory usage and eviction rate. If evictions are high, you need more memory. If usage is consistently low, you can likely reduce the allocation.
3. Monitor Your Cache Hit Rate
As discussed in Part 5, your cache hit rate is your primary health metric. Aim for >90%. A consistently low hit rate is a signal that something is wrong. It could mean your cache is too small, but it could also point to a plugin or theme that is generating highly unique, un-cacheable queries on every page load. Use tools like Query Monitor to investigate which objects are being set and retrieved from the cache on a given page. If you see many objects being added on every single page refresh, it could indicate a cache logic issue where data isn’t being effectively reused .
4. Implement a Smart Cache Invalidation Strategy
Cache invalidation—deciding when to delete cached data—has been called one of the hardest problems in computer science . If you don’t invalidate the cache when content changes, users will see stale data. If you invalidate too aggressively, you reduce the effectiveness of the cache.
Fortunately, WordPress and good caching plugins handle most of this for you. When you update a post, a well-behaved system will automatically purge the cache for that specific post and related archives. However, be aware of:
- WooCommerce Inventory: Ensure that when a product’s stock level changes, the cache for that product page is invalidated immediately to prevent customers from seeing incorrect availability.
- Custom Development: If you have custom code that updates the database, you may need to manually trigger cache flushing using WordPress functions like `wp_cache_delete(‘key’, ‘group’)` or `wp_cache_flush()` to ensure data consistency.
Thoroughly test content updates, product changes, and form submissions to ensure the cache is being purged correctly .
5. Don’t Cache Everything (Fix Root Problems First)
Object caching is a powerful optimization, but it is not a silver bullet for a fundamentally broken site. It will not fix slow queries, only hide them. It will not fix issues caused by bloated plugins or an unoptimized theme. Before implementing object caching, it’s best to address foundational issues first: optimize your images, clean up unused plugins, and use a lightweight, well-coded theme. Caching should be a layer you add to an already optimized site, not a band-aid for poor architecture .
Common Issues and How to Fix Them (Troubleshooting Guide)
Even with a perfect setup, issues can arise. Here’s a checklist for troubleshooting the most common problems.
Issue: “Error Establishing a Redis Connection” or “Memcached connection failed”
This is the most common setup error. It means WordPress cannot communicate with the caching server.
- Is the service running? Use `sudo systemctl status redis-server` or `sudo systemctl status memcached` to check. If it’s inactive, start it and enable it.
- Is a firewall blocking the port? Ensure your server’;s firewall (like UFW or firewalld) allows connections on the correct port (default: 6379 for Redis, 11211 for Memcached) from localhost (`127.0.0.1`).
- Are your `wp-config.php` settings correct? Double-check the `WP_REDIS_HOST`, `WP_REDIS_PORT`, and especially the `WP_REDIS_PASSWORD`. A typo here is a frequent cause of failure .
- Is the PHP extension installed and active? Ensure you installed the correct `php-redis` or `php-memcached` extension for your PHP version and that the web server was restarted afterward.
Issue: Site Crashes (500 Error or White Screen) After Enabling
This is often a scary but fixable problem. It usually means the `object-cache.php` drop-in is causing a fatal PHP error.
- Immediate Fix: Connect to your server via FTP or SSH and navigate to the `/wp-content/` directory. Rename the `object-cache.php` file to `object-cache.php.disabled`. This will immediately disable the persistent object cache and revert WordPress to its default, allowing your site to come back online .
- Diagnose the Cause: Check your server’s PHP error logs. The most common cause is a missing or incompatible PHP extension. For example, the Redis Object Cache plugin will cause a fatal error if the `php-redis` extension is not loaded. Another cause could be a permissions issue with the Redis socket file.
Issue: Content, Menus, or Widgets Not Updating on the Site
This is a classic stale cache problem. The cache is serving old data because it wasn’t properly invalidated after a change was made.
- Manual Flush: The quickest solution is to manually clear the cache. Most caching plugins (including Redis Object Cache and W3 Total Cache) add a “;Flush Cache” or “Purge Cache” button to the WordPress admin bar or their settings page. Use it.
- Check for Plugin Conflicts: Some plugins, especially complex page builders or menu plugins, may not use standard WordPress functions to save data, and thus fail to trigger the automatic cache invalidation hooks. This can lead to things like menus “breaking” or not updating after enabling an object cache . You may need to disable caching on specific pages or manually flush the cache after making changes with those plugins.
Issue: High Cache Evictions or Low Hit Rate
This indicates your cache is not performing optimally.
- Increase Cache Memory: As mentioned in the best practices, a high number of evictions means your cache is constantly running out of space. Edit your `redis.conf` or `memcached.conf` to increase the memory allocation (`maxmemory` or `-m`).
- Investigate “Cache Churn”: Use a tool like Query Monitor to see what’;s being cached. Some poorly coded plugins might store large amounts of transient data with very short lifespans, or generate unique cache keys for every page load. This “churn” fills up the cache with useless data. Identifying and addressing the source plugin is the only long-term solution.
Part 7: Actionable Summary & Next Steps
You have now journeyed through the core principles, critical decisions, and practical steps of implementing persistent object caching in WordPress. We’ve demystified the database bottleneck, compared the leading technologies, and provided a detailed blueprint for both installation and maintenance. Now, it’s time to consolidate this knowledge into a clear verdict and an actionable plan to transform your website’s performance.
The Final Verdict: Your Path to a Faster WordPress Site
Let’s be unequivocal: for any serious WordPress site in 2025—whether it’s an e-commerce store, a membership portal, a high-traffic blog, or a dynamic business site—implementing a persistent object cache is not an optional tweak. It is a foundational requirement for scalability, stability, and a superior user experience. It directly addresses the most common performance bottleneck in the WordPress ecosystem: the database.
While both Redis and Memcached are powerful tools, the choice for the modern web is clear. **For 2025 and beyond, Redis is the recommended default choice for the vast majority of WordPress installations.** Its combination of high performance, data persistence, advanced data structures, and a mature ecosystem of tools makes it the more robust, reliable, and future-proof solution. The stability gained from surviving server reboots alone is a decisive advantage over Memcached’s volatile nature, preventing performance slumps and ensuring a consistent experience for your users.
Memcached remains a valid choice for simpler, high-read websites where absolute simplicity is the highest priority, but Redis provides a more complete and resilient platform for growth.
Your 3-Week Action Plan for Object Caching Success
Knowledge without action is powerless. Follow this structured, three-week plan to methodically and safely implement object caching and measure its impact.
Week 1: Benchmark and Diagnose
Before you make any changes, you must understand your starting point. This baseline is crucial for celebrating your success later.
- Test Site Speed: Use tools like GTmetrix or Google PageSpeed Insights to run several tests on your key pages (homepage, a product page, a blog post). Document your average Fully Loaded Time, Time to First Byte (TTFB), and Core Web Vitals scores.
- Measure Database Queries: Install the Query Monitor plugin. On the same key pages, note the “Total Database Queries” number shown in the admin bar. This is your primary target for reduction.
- Document Everything: Create a simple spreadsheet with these baseline numbers. You’ll be glad you did.
Week 2: Implement and Test
This is the week for action. Choose your implementation path and get your hands dirty.
- Choose Your Path: Based on the analysis in this guide, decide between Redis (recommended) and Memcached.
- Follow the Guide: Meticulously follow the step-by-step instructions in Part 3 (for Redis) or Part 4 (for Memcached). If you’re using managed hosting, follow their documentation to enable the feature.
- Verify Installation: Use the verification steps (e.g., `wp redis status` or checking the plugin dashboard) to confirm that WordPress is successfully connected to the cache.
- Thoroughly Test Your Site: Browse your site extensively. Test user registration, login/logout, contact forms, and especially the checkout process if you run a WooCommerce store. Ensure everything functions as expected.
Week 3: Monitor and Fine-Tune
With object caching active, the final step is to monitor its performance and make adjustments as needed.
- Re-run Benchmarks: Use the same tools from Week 1 to measure your new performance metrics. Compare the “after” numbers to your “before” baseline and quantify your improvements.
- Monitor Cache Hit Rate: Check your hit rate in your plugin or hosting dashboard. If it’s below 90%, investigate. The most common cause is insufficient memory.
- Adjust Memory Allocation: If you see a high number of evictions or a low hit rate, consider increasing the memory allocated to your cache service (e.g., from 128MB to 256MB) and monitor the impact.
A Final Word
The reality is that object caching represents one of the highest-impact optimizations you can implement. Sites with proper caching handle traffic spikes that would crash uncached sites, support more complex functionality without performance penalties, and provide consistently fast experiences regardless of visitor load . Whether you go the managed route or roll up your sleeves for a DIY implementation, the investment pays for itself quickly through improved user experience, better search rankings, and reduced server costs.
Don’t let a slow database hold your website back. You now have the complete blueprint for a massive performance win. Implement object caching today and watch your site fly.
Ready to unlock your site’s true potential but need an expert hand? Our team of WordPress performance specialists can implement, configure, and fine-tune the perfect caching strategy for your website. Contact Us Today for a Performance Audit!
Part 8: Appendix – Technical Resources
This appendix provides supplementary information to round out your understanding, including answers to frequently asked questions and the complete schema markup to help search engines understand this article’s content.
People Also Ask (FAQ Section)
What is the difference between object cache and page cache?
Object caching and page caching are two different layers of optimization. Object Caching stores the results of individual database queries in fast memory. This speeds up the process of PHP dynamically generating a page. Page Caching stores the entire final HTML of a page after it has been generated. They work together: object caching helps the server build pages faster, and page caching serves those pre-built pages instantly to subsequent visitors without involving WordPress at all. For dynamic content (like for a logged-in user), page caching is often bypassed, making object caching the primary performance tool.
Do I need object caching for a small blog?
For a very small, low-traffic blog with mostly static content, you may not notice a dramatic improvement from object caching alone. In this case, a good page caching plugin and image optimization should be your first priorities . However, as your site grows or if you start experiencing traffic spikes, object caching becomes increasingly important to maintain performance and stability.
Which is better for WooCommerce: Redis or Memcached?
Redis is strongly recommended for WooCommerce.** The key reason is its data persistence. Redis can be configured to save its data to disk, meaning critical e-commerce data like customer sessions and shopping cart contents are not lost if the server reboots. With Memcached, which is volatile, a server restart would wipe all session data, potentially logging out customers and emptying their carts—a disastrous user experience for an online store .
How do I clear the WordPress object cache?
You can clear or “flush” the object cache in several ways:
- Via a Plugin: Most caching plugins, including Redis Object Cache and W3 Total Cache, add a “;Flush Cache” or “Purge Cache” button to the WordPress admin bar or within their settings pages. This is the safest and easiest method.
- Via WP-CLI: If you have command-line access, you can use the command `wp cache flush`.
- Directly on the Server: For Redis, you can run `redis-cli FLUSHALL`. For Memcached, you can restart the service with `sudo systemctl restart memcached`, which will wipe its memory. Use these with caution, especially on shared servers.
Can object caching slow down my site?
Yes, although it’s rare and usually due to misconfiguration. If an object cache is implemented on a site with very few database queries, the overhead of connecting to the external caching service (Redis/Memcached) could theoretically be slower than the direct database call. More commonly, a slowdown can occur if the cache is too small, leading to constant evictions, or if there’s a network issue between the web server and the cache server. However, for a typical, database-driven WordPress site, a properly configured object cache will almost always result in a significant speed improvement .
What is a good object cache hit rate?
A good object cache hit rate should consistently be **above 90%**. A high hit rate signifies that the vast majority of data requests are being served from the fast in-memory cache instead of the slower database. A consistently low rate (e.g., below 80%) suggests a problem, such as insufficient memory allocated to the cache (causing frequent data eviction) or an inefficient caching strategy by a plugin .
Complete Schema Markup (JSON-LD) for SEO
The following JSON-LD structured data helps search engines like Google understand the content and context of this article, making it eligible for rich results and enhancing its visibility in search.
<script type="application/ld+json">
{
  "@context": "https://schema.org",
  "@type": "TechArticle",
  "headline": "Mastering WordPress Object Caching: A 2025 Guide to Redis vs. Memcached for Peak Performance",
  "datePublished": "2025-09-19T09:00:00-05:00",
  "dateModified": "2025-09-19T09:00:00-05:00",
  "author": {
    "@type": "Organization",
    "name": "Academic HTML Content Architecture Experts"
  },
  "publisher": {
    "@type": "Organization",
    "name": "Academic HTML Content Architecture Experts",
    "logo": {
      "@type": "ImageObject",
      "url": "https://example.com/logo.png"
    }
  },
  "description": "Is your WordPress site slow? This definitive guide compares Redis and Memcached, providing step-by-step installation, configuration, and troubleshooting. Boost speed and slash database load with our expert insights, performance benchmarks, and code examples.",
  "mainEntityOfPage": {
    "@type": "WebPage",
    "@id": "https://example.com/blog/wordpress-object-caching-redis-memcached/"
  },
  "image": [
    "https://example.com/path/to/20d5ec52918982944ac6ea0220713158.jpg",
    "https://example.com/path/to/queryChart.png",
    "https://example.com/path/to/ttfbChart.png"
  ],
  "mainEntity": {
    "@type": "FAQPage",
    "mainEntity": [
      {
        "@type": "Question",
        "name": "What is the difference between object cache and page cache?",
        "acceptedAnswer": {
          "@type": "Answer",
          "text": "Object caching stores the results of database queries in memory to speed up dynamic page generation. Page caching stores the entire static HTML of a page. They work together: object caching makes the server build pages faster, and page caching serves those pre-built pages instantly to subsequent visitors."
        }
      },
      {
        "@type": "Question",
        "name": "Which is better for WooCommerce: Redis or Memcached?",
        "acceptedAnswer": {
          "@type": "Answer",
          "text": "Redis is strongly recommended for WooCommerce. Its data persistence ensures that customer session and cart data are not lost during server reboots, which is a critical feature for e-commerce. Its advanced data structures are also better suited for handling complex store data."
        }
      },
      {
        "@type": "Question",
        "name": "How do I clear the WordPress object cache?",
        "acceptedAnswer": {
          "@type": "Answer",
          "text": "You can clear the object cache in several ways: 1) Through your caching plugin's admin interface (e.g., a 'Flush Cache' or 'Purge Cache' button). 2) Using the WP-CLI command 'wp cache flush'. 3) Directly via the command line with 'redis-cli FLUSHALL' for Redis or by restarting the Memcached service."
        }
      },
      {
        "@type": "Question",
        "name": "What is a good object cache hit rate?",
        "acceptedAnswer": {
          "@type": "Answer",
          "text": "A good object cache hit rate should ideally be above 90%. A high hit rate means the vast majority of requests are being served from the fast in-memory cache instead of the slower database. A consistently low hit rate (e.g., below 80%) suggests a problem, such as insufficient memory allocated to the cache or an inefficient caching strategy."
        }
      },
      {
        "@type": "Question",
        "name": "Do I need object caching for a small blog?",
        "acceptedAnswer": {
          "@type": "Answer",
          "text": "For a very small, low-traffic blog, you may not notice a dramatic improvement from object caching alone. In this case, a good page caching plugin and image optimization should be your first priorities. However, as your site grows, object caching becomes increasingly important to maintain performance."
        }
      },
      {
        "@type": "Question",
        "name": "Can object caching slow down my site?",
        "acceptedAnswer": {
          "@type": "Answer",
          "text": "Yes, in rare cases of misconfiguration. If the overhead of connecting to the cache server is greater than the time saved from a database query, or if the cache memory is too small causing constant evictions, it can negatively impact performance. However, for a typical WordPress site, a properly configured object cache almost always provides a significant speed boost."
        }
      }
    ]
  }
}
</script>
With over 27 years of hands-on SEO expertise, starting from my early days as a CFO. Quitting that job to build a top-ranked web hosting business in 1995, I’ve mastered WordPress optimization as a precise engineering discipline. Through extensive research, high-level consulting, and developing a WordPress site that achieved over a thousand organic Google rankings—culminating in a six-figure sale—I’ve decoded Google’s algorithm over 27 years to develop wordpress engineering that transforms underperforming WordPress sites into authoritative powerhouses. Business owners frustrated by stagnant traffic, low visibility, and missed opportunities find relief as I help them deliver measurable ROI through higher rankings, increased leads, and sustainable growth. As owner of dominant city-based SEO platforms in major U.S. markets, I outperform industry gurus, empowering entrepreneurs, local businesses, agencies, and marketers via my WordPress Optimization services at wordpressoptimization.com to unlock their site’s full potential.