
WordPress Performance: Mastering Third-Party Script Optimization (2025 Guide)
The Hidden Performance Drain in Your WordPress Site
In the digital ecosystem of 2025, WordPress stands as a titan, powering an astonishing 43.3% of all websites on the internet . Its flexibility and vast plugin library have democratized web publishing, allowing anyone to build feature-rich, dynamic websites. Yet, within this ecosystem lies a paradox: the very tools meant to enhance and monetize these sites are often their greatest performance liability. We’re talking about third-party scripts.
Consider this stark reality: a mere one-second delay in your page load time can slash conversions by 7% and increase bounce rates by 32% Oddjar, 2025; . In an era where user attention is fleeting, speed is not just a feature; it’s the foundation of user experience and a critical SEO ranking factor. Many WordPress site owners invest heavily in fast hosting and image optimization, only to find their sites still feel sluggish. The culprit is often hiding in plain sight, embedded in the code that pulls in external functionality.
What Are Third-Party Scripts?
In the context of WordPress, a third-party script is any piece of code, typically JavaScript, that is loaded from a server you don’t own or control. When you add a YouTube video, a Facebook “Like” button, or Google Analytics tracking, you are embedding a third-party script. These scripts are ubiquitous, with data from HTTPArchive showing that a staggering 93.59% of web pages include at least one third-party resource .
Common examples you’re likely using on your WordPress site include:
- Analytics & Tracking: Google Analytics, Google Tag Manager, Facebook Pixel, Hotjar, Crazy Egg.
- Advertising: Google AdSense, Media.net, Amazon Associates.
- Customer Support & Chat: Intercom, Drift, Tawk.to, HubSpot Chat.
- Social Media: Facebook page plugins, Twitter feeds, Instagram embeds, social sharing buttons.
- Video Players: YouTube and Vimeo embeds.
- Comment Systems: Disqus, Jetpack Comments, Facebook Comments.
- Marketing & A/B Testing: Optimizely, VWO, Unbounce.

The Core Problem: Performance Bottlenecks and Core Web Vitals
The convenience of these scripts masks a significant performance cost. Each external script introduces a chain of potential bottlenecks that can cripple your site’;s speed and user experience. The primary issues are:
- Increased Network Requests: Every script is another HTTP request your visitor’s browser must make to an external server. The median website already makes 20 external script requests . These requests add up, each with its own DNS lookup, connection time, and download time, creating a traffic jam of data transfer.
- Main-Thread Blocking: This is the most severe issue. JavaScript is “render-blocking” by default. When a browser encounters a script tag, it must pause parsing the HTML, download the script, execute it, and only then continue building the rest of the page. If a third-party server is slow to respond, your page will simply show a blank screen, waiting. This directly harms your Largest Contentful Paint (LCP) and can lead to a high Interaction to Next Paint (INP), as the main thread is too busy to respond to user clicks or taps.
- Added Page Weight: Third-party scripts can be heavy. The median total size of external scripts is around 449 KB . This is data that your users, especially on mobile, have to download, consuming their data plans and slowing down the initial load.
- Lack of Control & Intermittent Issues: Since you don’t control the third-party server, you are at the mercy of its performance and uptime. A script that is fast today might be slow tomorrow, making these issues notoriously difficult to debug .
These problems directly impact Google’s Core Web Vitals, the user-centric metrics that are a confirmed ranking signal:
- Largest Contentful Paint (LCP): Delayed by render-blocking scripts that prevent the main content (like a hero image or headline) from appearing.
- Interaction to Next Paint (INP): Worsened by long-running scripts that occupy the main thread, making the page unresponsive to user interactions.
- Cumulative Layout Shift (CLS): Affected by ads or embeds that load late and without reserved space, causing the content to jump around.
The Promise of This Guide
The situation is not hopeless. You do not have to choose between a functional website and a fast one. This guide is designed to be the most comprehensive, actionable framework available for WordPress site owners in 2025. We will move beyond generic advice and provide a systematic approach to:
- Diagnose: Pinpoint exactly which third-party scripts are harming your site’s performance using free, powerful tools.
- Strategize: Understand the core optimization techniques—defer, delay, conditional loading, and local hosting—and when to use each.
- Implement: Follow step-by-step instructions using both user-friendly WordPress plugins and, for those comfortable with code, direct implementation methods.
- Verify: Measure the impact of your changes and confirm your success.
By the end of this article, you will be equipped to transform your site from a victim of third-party bloat into a lean, fast, and high-performing asset that delights users and ranks higher in search results.
Visualizing the dramatic performance gains from effective script management. Scores inspired by real-world case studies.
Part 1: The Diagnosis — Identifying Performance-Killing Scripts
Before you can perform surgery on your site’s performance, you need an accurate diagnosis. Blindly disabling scripts or installing optimization plugins without understanding the specific problems is a recipe for breaking your site or, at best, achieving minimal gains. The objective of this phase is to become a performance detective, using powerful, free tools to create a “hit list” of the exact third-party scripts that are causing the most damage.
This process is not about guesswork; it’s about data. We will focus on two primary tools that provide complementary views of your site’s performance: Google PageSpeed Insights for a high-level, user-centric audit, and WebPageTest for a granular, network-level analysis.
Method 1: Google PageSpeed Insights for a Quick Audit
Google PageSpeed Insights (PSI) is the ideal starting point. It analyzes your page using Lighthouse, Google’s open-source auditing tool, and combines it with real-world user data from the Chrome User Experience Report (CrUX). Its primary strength is directly telling you which third-party scripts are blocking the main thread and for how long.
Step-by-Step Guide:
- Navigate to PageSpeed Insights: Open your browser and go to Google PageSpeed Insights.
- Enter Your URL: Input the full URL of a representative page on your WordPress site (e.g., your homepage, a blog post, or a product page) and click “Analyze”.
- Review the Top-Level Scores: Pay attention to your overall Performance score and the individual Core Web Vitals metrics (LCP, INP, CLS). Poor scores here are a strong indicator of underlying issues.
- Locate the “Diagnostics” Section: Scroll down past the initial recommendations to the “Diagnostics” area. This is where the most valuable data for our purpose resides.
- Find the “Reduce the impact of third-party code” Audit: This is your goldmine. Click the dropdown to expand it. PSI will present a table listing every third-party domain found on your page.
- Analyze the Data: The table provides three crucial columns: “Third-Party”, “Transfer Size”, and “;Main-Thread Blocking Time”. While transfer size is important, **your primary focus should be on “Main-Thread Blocking Time”**. This metric quantifies how long a script monopolized the browser’s main thread, preventing it from rendering the page or responding to user input. Any script with a blocking time of more than 250ms is a significant problem.
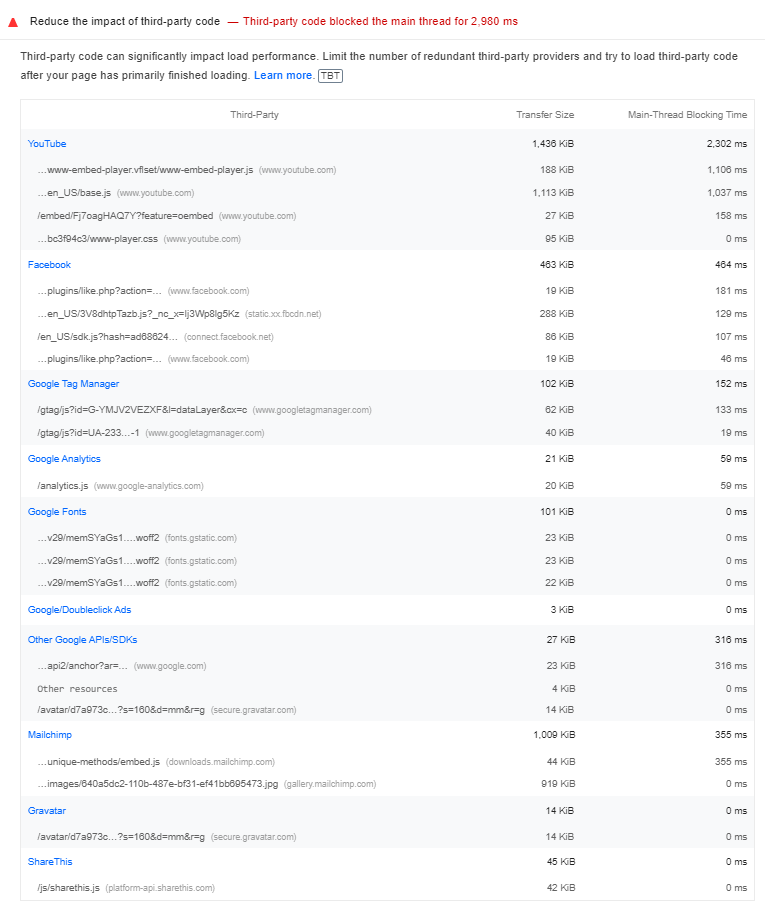
In the example above, you can see that YouTube scripts blocked the main thread for a staggering 2,302 ms, and Facebook scripts for 464 ms. These are your prime suspects and should be at the top of your optimization list.
Method 2: WebPageTest for In-Depth Waterfall Analysis
If PageSpeed Insights is the X-ray, WebPageTest is the MRI. It provides an incredibly detailed, request-by-request visualization of how your page loads over time. This “waterfall chart” is indispensable for understanding dependencies and identifying render-blocking resources that PSI might not explicitly flag.
Step-by-Step Guide:
- Navigate to WebPageTest: Go to WebPageTest.org.
- Configure Your Test: Enter your URL. For a more realistic test, go to “Advanced Settings”. Choose a “Test Location” that is relevant to your audience and a “Connection” type like “Cable” or “4G” to simulate real-world conditions. Set “Number of Tests to Run” to 3 to get a more stable median result.
- Run the Test: Click “Start Test”. This may take a few minutes as it runs multiple tests from a real browser.
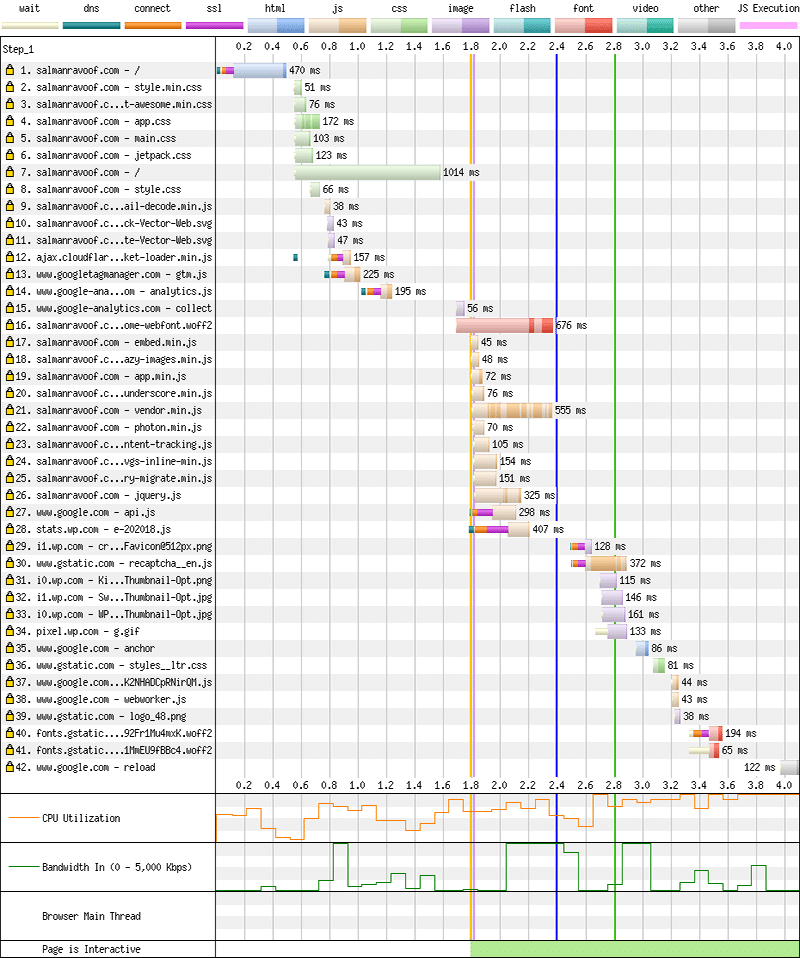
- Analyze the Waterfall View: Once the test is complete, you’ll be taken to the summary page. Click on the “Waterfall” image to go to the detailed view. Here’s what to look for:
- Long Bars: Look for any horizontal bars that are significantly longer than others. Hover over them to see the breakdown of time spent on DNS, connecting, SSL, and downloading. A long green or teal bar for a JavaScript file from a third-party domain is a major red flag.
- Blocking Behavior: Look for a “stair-step” pattern where many requests only start *after* a specific script (often a JS file) has finished loading. This script is a render-blocking bottleneck.
- Request Origin: The “Host” column tells you the domain of each request. Any domain that isn’t your own is a third-party resource.
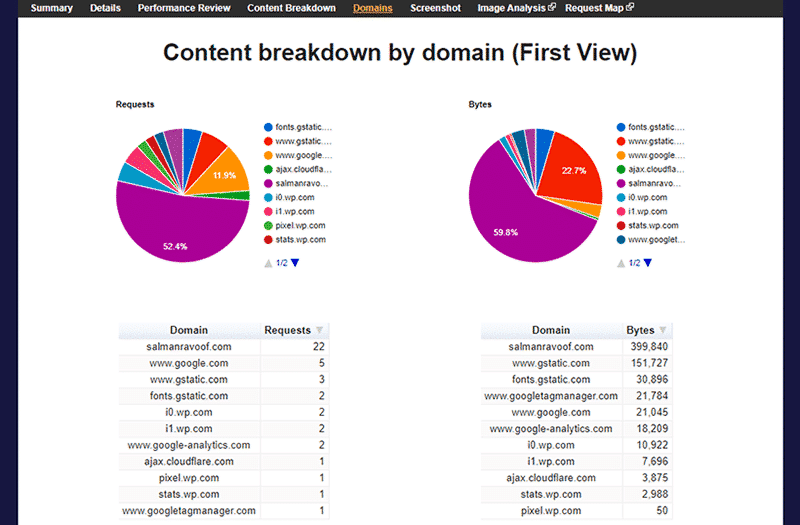
- Switch to the Domains View: From the top navigation of the results page, click “Domains”. This gives you a pie-chart and table breakdown of requests and bytes transferred per domain. It’s a quick way to see which third parties are the “noisiest” on your site, making the most requests or sending the most data.
Your Script Hit List
After completing your analysis with both tools, you should consolidate your findings into an actionable plan. Don’t just keep the data in your head. Create a simple table—your “Script Hit List”—to prioritize your optimization efforts. This act of documentation transforms abstract data into a concrete project plan.
Use the following template to organize your findings:
| Script Source (Domain) | Script Keyword/URL | Main-Thread Blocking Time (ms) | Key Issue | Optimization Priority |
|---|---|---|---|---|
youtube.com |
www-embed-player.js |
~1,106 ms | Extremely high execution time, blocks main thread. | High |
connect.facebook.net |
sdk.js |
~107 ms | Render-blocking, adds to network requests. | High |
pagead2.googlesyndication.com |
adsbygoogle.js |
Varies, often >500ms | High execution time, multiple subsequent requests. | High |
googletagmanager.com |
gtm.js |
~152 ms | Container script that can load other heavy scripts. | Medium |
fonts.gstatic.com |
*.woff2 |
0 ms | Multiple DNS lookups and requests. Can be hosted locally. | Medium |
secure.gravatar.com |
avatar/* |
0 ms | Generates many requests on pages with comments. | Low |
With this hit list in hand, you are no longer flying blind. You know exactly which scripts are causing the most harm and can proceed to Part 2 with a clear, data-driven strategy for neutralizing their impact.
Part 2: The Core Strategies — A WordPress-Centric Optimization Toolkit
Having diagnosed the problem scripts, it’s time to apply the cure. This section forms the core of our guide, detailing the most effective optimization strategies tailored specifically for the WordPress environment. For each technique, we will explore the “what,” the “why,” and the “how,” providing both user-friendly plugin solutions for immediate results and more advanced code-based methods for developers seeking maximum control.
The strategies are presented in order of increasing impact and implementation complexity, starting with foundational techniques and moving to the most powerful solutions.
Strategy 1: Defer and Async — Non-Blocking Script Loading
By default, JavaScript is “render-blocking.” This means the browser must halt everything to download and execute a script before it can continue building the page. The `defer` and `async` attributes are simple HTML commands that change this behavior, telling the browser to load scripts in the background without stopping the initial page render.
Understanding the Difference:
–async: Downloads the script in the background while the HTML parsing continues. Once downloaded, it pauses the HTML parser to execute the script. The order of execution isn’t guaranteed. This is best for independent scripts that don’t rely on other scripts, like some analytics trackers.
–defer: Downloads the script in the background and waits to execute it until after the entire HTML document has been parsed. Scripts with `defer` also execute in the order they appear in the document. This is the safest and most recommended option for the majority of scripts.
Plugin Method (Recommended for Most Users)
The easiest and safest way to apply these attributes is through a performance plugin. These tools handle the logic for you and provide easy exclusion options if a script breaks.
Recommended Tools: WP Rocket, Perfmatters, Autoptimize.
Step-by-Step with Perfmatters:
- Install and activate the Perfmatters plugin.
- Navigate to Settings → Perfmatters in your WordPress dashboard.
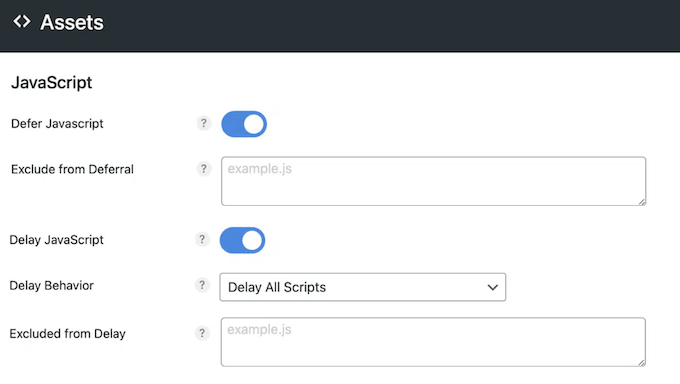
- Click on the Assets tab.
- Under the “JavaScript” section, toggle on “Defer JavaScript”. This will apply the `defer` attribute to all possible JavaScript files.
- Crucial Step – Testing: After saving, open your website in an incognito window and test its functionality thoroughly. Pay close attention to sliders, mobile menus, and any interactive elements.
- If you find a broken feature, it’;s likely caused by a script (often `jquery.js`) that needs to load earlier. In the Perfmatters settings, add the script’s keyword (e.g., `jquery.js`) to the “Exclude from Deferral” box. This will prevent Perfmatters from deferring that specific file.
Code Method (For Advanced Users)
For those who prefer a code-based approach or are developing a custom theme, you can use a WordPress filter to add these attributes. Since WordPress 6.3, there is native support for adding these attributes when registering a script . However, for scripts enqueued by themes and plugins, the `script_loader_tag` filter is still the most reliable way to modify the output.
Add the following code to your child theme’s `functions.php` file:
// Function to add 'defer' attribute to specific scripts
function my_theme_add_defer_attribute( $tag, $handle, $src ) {
    // Create an array of script handles to defer.
    // You can find script handles using plugins like Query Monitor or by inspecting the source.
    $scripts_to_defer = array(
        'contact-form-7',
        'another-plugin-script-handle',
        'my-custom-script'
    );

    if ( in_array( $handle, $scripts_to_defer ) ) {
        // Add the defer attribute to the script tag
        return str_replace( ' src', ' defer src', $tag );
    }

    return $tag;
}
add_filter( 'script_loader_tag', 'my_theme_add_defer_attribute', 10, 3 );
This code snippet targets specific script “handles” (the unique name WordPress uses for each script) and adds the `defer` attribute to their `

With over 27 years of hands-on SEO expertise, starting from my early days as a CFO. Quitting that job to build a top-ranked web hosting business in 1995, I’ve mastered WordPress optimization as a precise engineering discipline. Through extensive research, high-level consulting, and developing a WordPress site that achieved over a thousand organic Google rankings—culminating in a six-figure sale—I’ve decoded Google’s algorithm over 27 years to develop wordpress engineering that transforms underperforming WordPress sites into authoritative powerhouses. Business owners frustrated by stagnant traffic, low visibility, and missed opportunities find relief as I help them deliver measurable ROI through higher rankings, increased leads, and sustainable growth. As owner of dominant city-based SEO platforms in major U.S. markets, I outperform industry gurus, empowering entrepreneurs, local businesses, agencies, and marketers via my WordPress Optimization services at wordpressoptimization.com to unlock their site’s full potential.