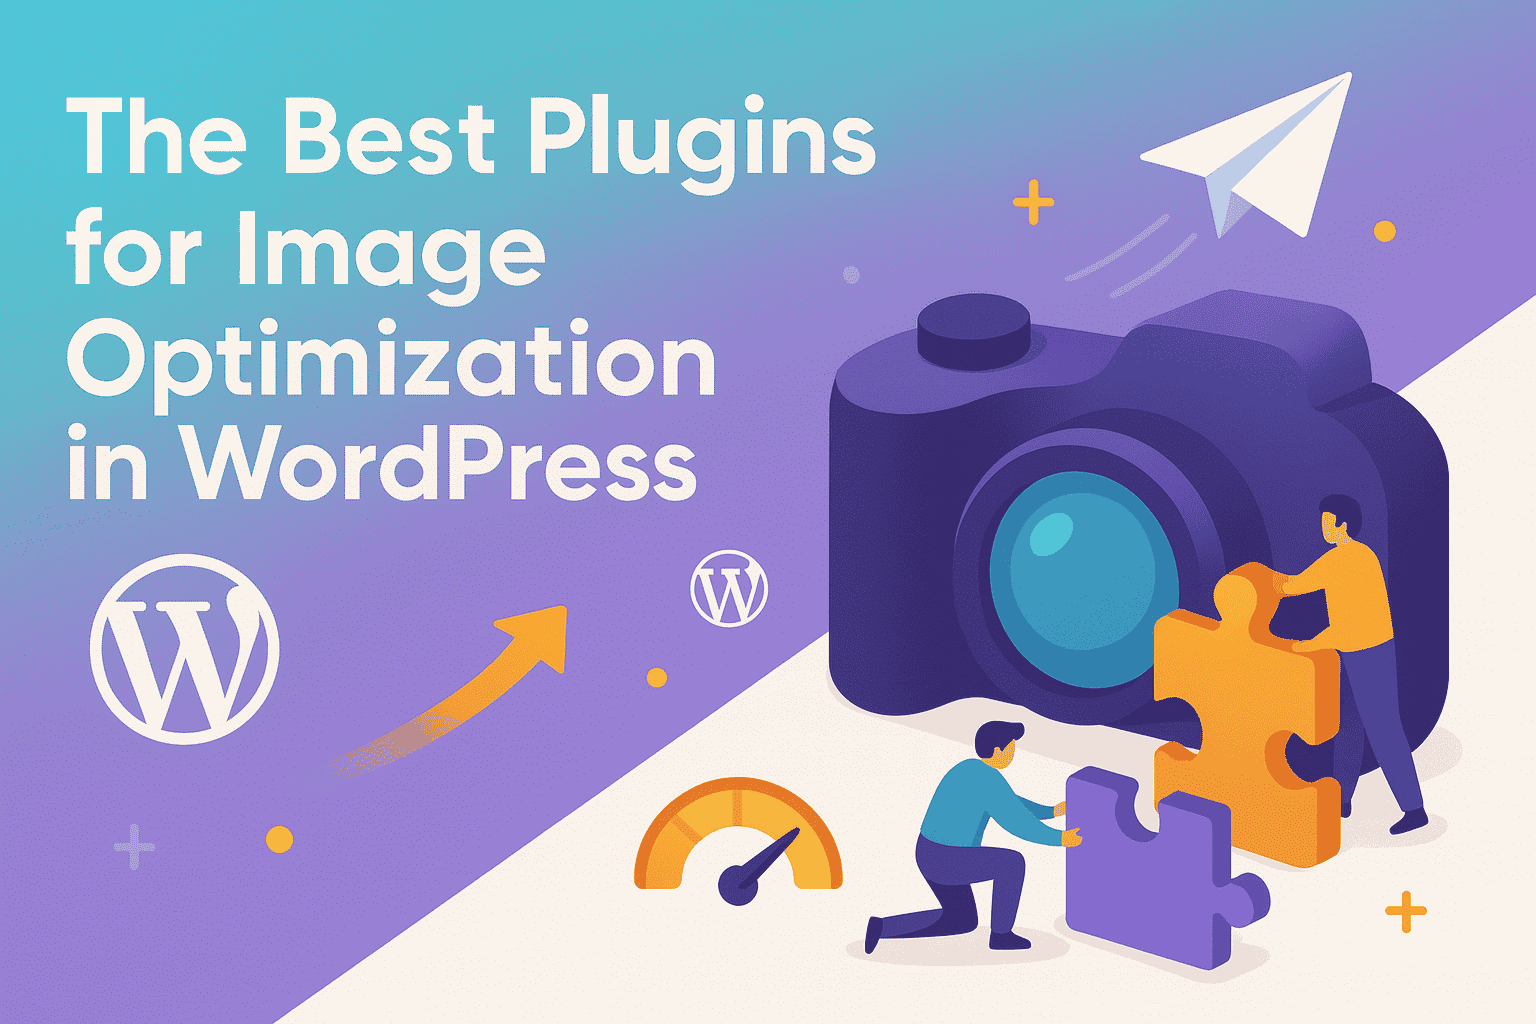
WordPress Image Optimization 2025
TL;DR: WordPress image optimization in 2025 is crucial for site speed, SEO, and conversions, as images often account for over 50% of page weight. Optimize by choosing WebP/AVIF formats, resizing before upload, and using plugins like Imagify or ShortPixel for automated compression and lazy loading. Benefits include improved Core Web Vitals, reduced bounce rates, and higher rankings. Regular audits with tools like PageSpeed Insights ensure lasting performance gains.
Table of Contents
Introduction: Why Image Optimization is Non-Negotiable in 2025
The High Cost of Heavy Images: Performance, SEO, and Conversion Impact
Core Web Vitals Explained: The Metrics Google Cares About
The Business Impact: How Slow Images Cost You Money
Foundational Optimization: Mastering the Basics Before You Upload
Choose the Right File Format: JPEG vs. PNG vs. WebP vs. AVIF
Get Image Dimensions Right: Resize Before Uploading
Compress for Performance: Lossy vs. Lossless Explained
Automated Power: The Best WordPress Image Optimization Plugins of 2025
Why Use a Plugin? The Case for Automation
In-Depth Plugin Comparison: The Top Contenders
Summary Comparison Table
Advanced Strategies: CDN, Lazy Loading, and Server-Side Tweaks
Leveraging an Image CDN for Global Speed
Mastering Lazy Loading in WordPress
Optimizing Responsive Images with `srcset`
The Audit: How to Test Your Site’s Image Performance
Your Toolkit for Analysis
Step-by-Step Audit Process
Conclusion: Your Action Plan for a Faster WordPress Site
Frequently Asked Questions (People Also Ask)
Complete Schema Markup for This Article
What Is WordPress Image Optimization?
The wordpress image optimization is the process of reducing image files and enhancing their delivery on a WordPress site to improve performance, user experience, and search engine rankings. This is achieved through techniques such as resizing, image compression, next-generation formats (WebP/AVIF), and lazy loading. In 2025, with images accounting for over 50% of a webpage’s weight, optimization is critical to meet Google’s Core Web Vitals and user expectations for fast-loading sites. The benefits of WordPress image optimizer include:
- Boosting page speed to achieve Largest Contentful Paint (LCP) under 2.5 seconds, enhancing SEO rankings.
- Reducing bounce rates by ensuring quick load times, as 53% of mobile users abandon sites that take over 3 seconds.
- Improving visual stability (CLS) by defining image dimensions to prevent layout shifts.
- Increasing conversions, with a 0.1-second speed improvement, potentially boosting retail conversions by 8.4%.
- Enhancing mobile performance for over 62.5% of global web traffic; and 6. Saving server resources and bandwidth through efficient formats and CDNs, lowering hosting costs, and improving scalability.
Why WordPress Image Optimization is Important
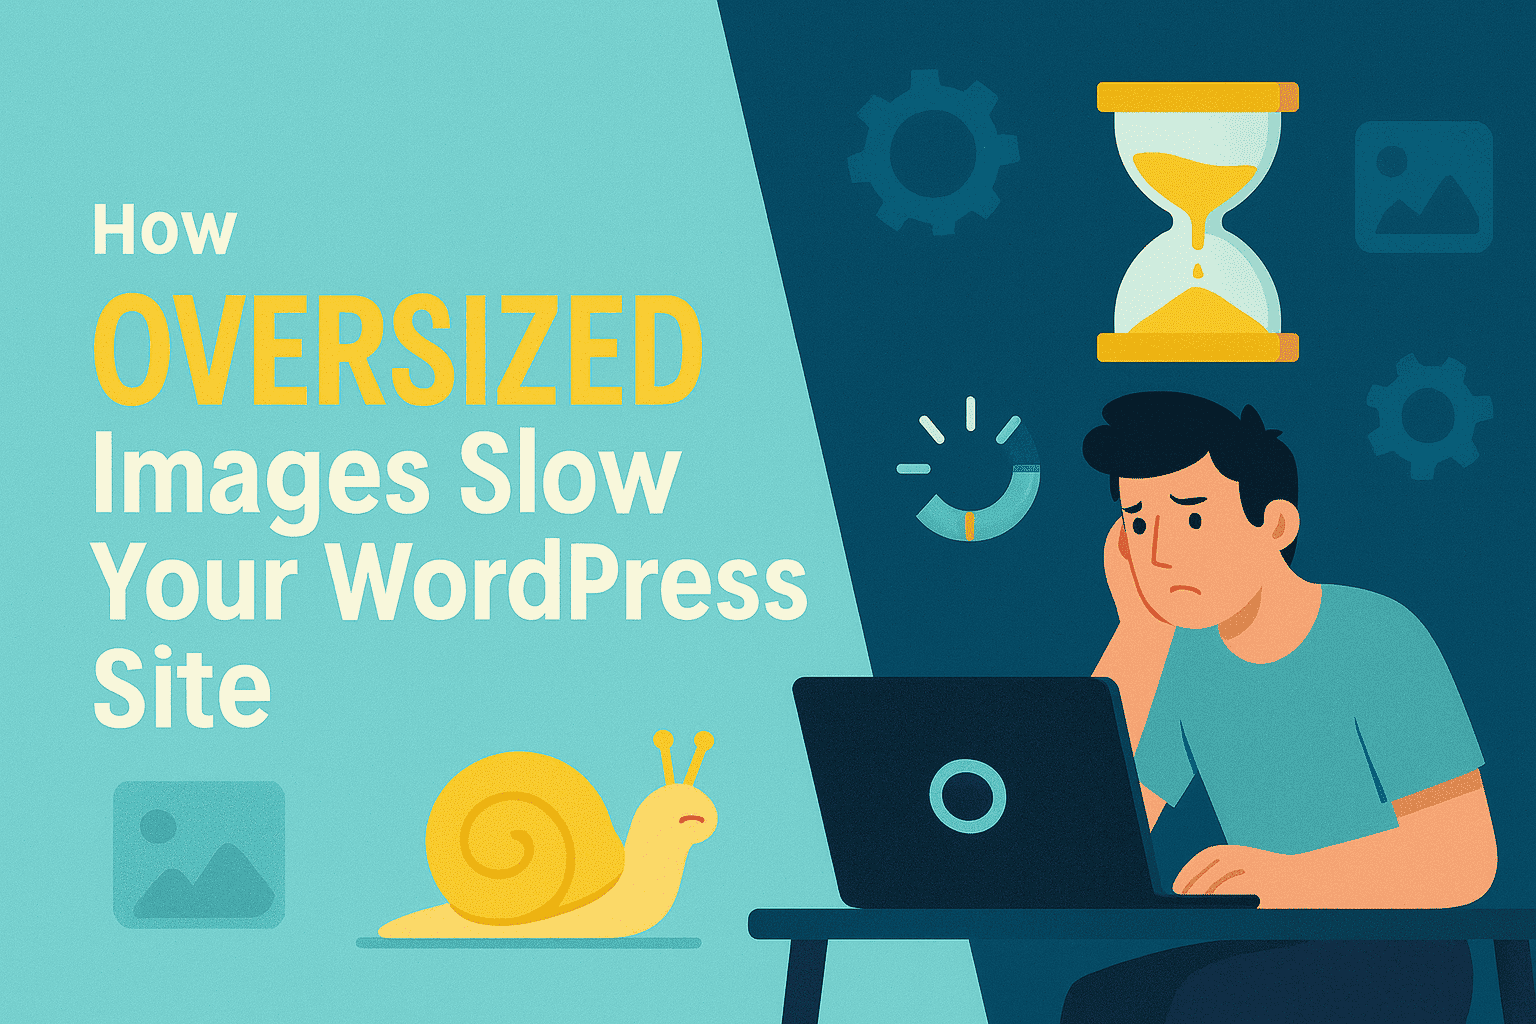
According to data from the HTTP Archive, images consistently account for the most significant portion of a webpage’s total weight, often exceeding 50%. If your WordPress site feels sluggish, if visitors are leaving before your content has a chance to engage them, the culprit is almost certainly your images. This isn’t a minor technical issue; it’s a critical business problem with far-reaching consequences.
The problem is stark: unoptimized images directly harm user experience, inflate bounce rates, and critically, diminish your search engine rankings. Google’s relentless focus on user-centric metrics, crystallized in its Core Web Vitals, has placed page performance at the forefront of its ranking algorithm. A slow-loading site is now unequivocally considered a low-quality site by Google. As studies from Google itself have shown, the probability of a user bouncing increases by 32% when page load time increases from 1 second to 3 seconds. For mobile users, the tolerance is even lower, with 53% abandoning sites that take longer than three seconds to load.
This guide provides a comprehensive, step-by-step framework for mastering WordPress image optimization in 2025. We will move beyond simplistic advice and delve into a structured methodology that addresses every facet of the process. You will learn not just the “hat” but the “why” behind each technique, empowering you to make informed decisions that yield measurable results. We will cover foundational pre-upload methods, compare the best automated image optimization plugin solutions, explore advanced strategies like Content Delivery Networks (CDNs) and lazy loading, and finally, teach you how to audit your own site to quantify your success. By the end of this guide, you will have the knowledge and tools to transform your website’s performance, enhance user satisfaction, and achieve the dominant search engine visibility your content deserves.
The High Cost of Bulk Image Optimization: Performance, SEO, and Conversion Impact
The weight of your images translates directly to the weight on your bottom line. In the modern digital economy, every kilobyte and every millisecond matters. Failing to optimize images is no longer a minor oversight; it’s a strategic failure that actively erodes revenue, damages brand perception, and cedes ground to faster, more agile competitors. This section will quantify the cost of inaction by connecting image performance to the metrics that define success: Google’s Core Web Vitals and your business’s conversion rates.
Core Web Vitals Explained: The Metrics Google Cares About
Google’s Core Web Vitals (CWV) are a specific set of metrics designed to measure the real-world user experience of a webpage, focusing on loading performance, interactivity, and visual stability. These are not abstract technical goals; they are direct ranking factors. Two of the three core vitals are profoundly impacted by image optimization.
Largest Contentful Paint (LCP)
LCP measures the time it takes for the most significant content element—typically a hero image, banner, or large block of text—to become visible within the viewport. It’s Google’s way of measuring perceived load speed. To provide a good user experience, Google recommends an LCP of 2.5 seconds or less. Images are, by far, the most common LCP element on most websites. A large, uncompressed hero image can single-handedly push your LCP into the “Poor” category (over 4 seconds), sending a strong negative signal to Google’s ranking algorithm. Optimizing this single element is often the most impactful speed improvement you can make.
Cumulative Layout Shift (CLS)
CLS measures the visual stability of a page. It quantifies the amount of unexpected layout shift that occurs as the page loads. Have you ever tried to click a button, only for an ad or image to load above it, pushing the button down and causing you to misclick? That’s a layout shift, and it’s a deeply frustrating user experience. The primary cause of poor CLS on WordPress sites is images loading without predefined dimensions. When the browser doesn’t know how much space to reserve for an image, it renders the text first. Then it reflows the entire layout once the image has finally loaded. To pass the CLS assessment, a page should maintain a score of **0.1 or less**. Properly defining image dimensions in your HTML is the fundamental fix for this issue.
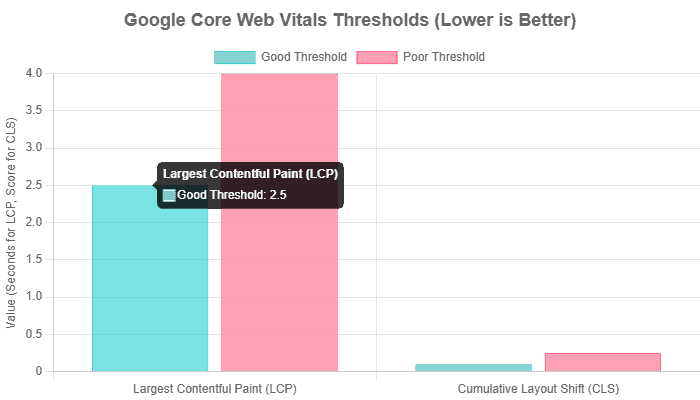
Core Web Vitals thresholds for a “Good” user experience. Failing these metrics, often due to unoptimized images, directly impacts SEO rankings.
The Business Impact: How Slow Images Cost You Money
Poor Core Web Vitals scores are not just abstract technical demerits; they have a direct, measurable, and often severe impact on business outcomes. The correlation between website speed and conversion rates is one of the most well-documented phenomena in digital marketing.
Conversion Rates
The data is unequivocal: speed equals revenue. A study by Deloitte revealed that a mere 0.1-second improvement in loading speed can increase conversions for retail brands by 8.4%. Walmart famously found that for every 1-second improvement in page load time, they saw 2% increase in conversions. Conversely, slow-loading websites result in an estimated annual loss of $2.6 billion in sales for businesses. When your product images or landing page banners take a long time to load, you are actively discouraging purchases.
Bounce Rate & User Experience
First impressions are formed in milliseconds. As mentioned, 53% of mobile users will abandon a website if it takes more than three seconds to load. This isn’t just lost traffic; it’s a lost opportunity to build a relationship with a potential customer. A high bounce rate signals to Google that your page is not satisfying user intent, which can further harm your rankings. A fast, seamless experience, powered by optimized images, keeps users engaged, encourages them to explore more pages, and builds trust in your brand.
SEO Rankings
The connection is direct. Google has explicitly stated that page speed is a ranking factor for both desktop and mobile search. By optimizing your images, you improve your Core Web Vitals, which in turn improves your page experience signals. This is a foundational aspect of modern SEO. In a competitive search landscape, a faster site has a distinct advantage. As one expert from Making 8 Inc. noted, optimizing themes for speed resulted in a 26% increase in overall views and a record year for their client, simply because users respond better to fast sites.
Foundational Optimization: Mastering the Basics Before You Upload
The most effective image optimization strategy begins before a single file is uploaded to your WordPress Media Library. While plugins and automated tools are indispensable for maintenance, mastering these foundational, pre-upload techniques gives you ultimate control over quality and performance. This is the professional workflow that separates high-performance websites from the rest. Getting these three pillars—format, dimensions, and unlimited image compression—properly in place will solve the vast majority of image-related performance issues.
Choose the Right File Format: JPEG vs. PNG vs. WebP vs. AVIF
The file format you choose is a critical decision that balances size, image quality, and browser compatibility. In 2025, the choice extends beyond the traditional JPEG and PNG images to include a powerful next-generation WordPress format fix.
JPEG (Joint Photographic Experts Group): The workhorse of the web, ideal for photographs and images with complex color gradients. JPEGs use lossy image compression, which intelligently discards some image data to achieve significantly smaller file sizes. For most photographic content, this quality reduction is imperceptible to the human eye, making it the best choice for striking a balance between quality and performance.
PNG (Portable Network Graphics): The go-to format for graphics that require transparency, such as logos, icons, and illustrations with sharp lines. PNGs use lossless image compression, meaning no data is lost, which preserves perfect quality but results in larger file sizes compared to JPEGs. Use PNGs only when transparency is essential.
WebP, developed by Google, has become the modern standard. It supports both lossy and lossless image compression, consistently producing files that are 25-35% smaller than equivalent JPEGs and PNGs, with no noticeable quality difference. With universal support across all modern browsers, WebP is an excellent default choice for nearly all web images.
AVIF (AV1 Image File Format): The newest contender, AVIF, offers even more impressive image compression, with file sizes up to 50% smaller than those of JPEG. As of WordPress 6.5 (released in March 2024), AVIF is natively supported, allowing you to upload AVIF files directly to the Media Library. While browser support for AVIF is slightly less widespread than for WebP, it is growing rapidly, making AVIF a future-proof choice for performance-focused websites.
| Format | Best For | Compression | Transparency | Key Advantage |
|---|---|---|---|---|
| JPEG | Photographs, complex images | Lossy | No | Universal compatibility and a good balance of size and quality. |
| PNG | Logos, icons, graphics with sharp lines | Lossless | Yes | Perfect quality and transparency support. |
| WebP | General web use (replaces JPEG & PNG) | Lossy & Lossless | Yes | Excellent image compression with wide browser support. |
| AVIF | High-quality images where performance is critical | Lossy & Lossless | Yes | Superior image compression, resulting in the smallest file image sizes. |
Comparison of standard image formats for the web in 2025.
Get Image Dimensions Right: Resize Before Uploading
One of the most common and damaging mistakes is uploading images directly from a camera or stock photo site. These images can be enormous—often 4000px wide or more—while the container they are displayed in on your website might only be 800px wide. The browser is forced to download the massive file and then scale it down, wasting bandwidth and processing power. This is a primary cause of slow LCP scores.
The best practice is to resize your images to the maximum dimensions at which they will be displayed on your site. While there’s no single perfect size, here is a reliable checklist based on everyday use cases:
- Full-Width Banners / Hero Images: 1920px to 2560px wide. A common standard is 1920x1080px.
- Standard Blog Post / Content Images: 1200px wide. This provides enough detail for most layouts without being excessively large.
- Inline Content Images: Around 800px wide, matching the typical width of a content column.
- WooCommerce Product Images: Check your theme’s documentation, but a good starting point is 800-1000px square.
You can resize images using desktop software like Adobe Photoshop or GIMP, or with free online tools like TinyPNG or Canva, before you upload them to WordPress. This single step can reduce file sizes by 80-90% before you even begin compression.
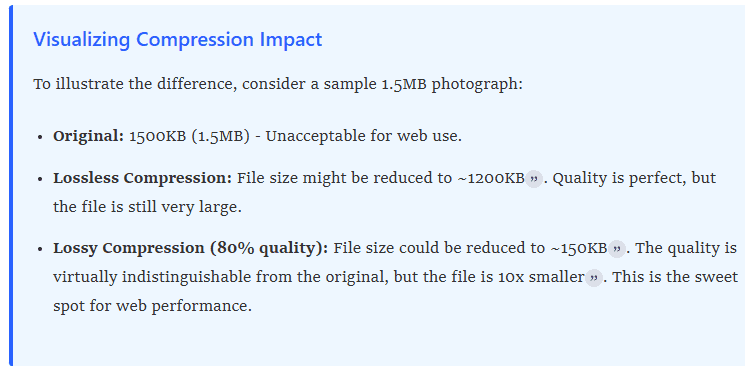
Compress Images for Performance: Lossy vs. Lossless Explained
After resizing, the final manual step is compression. Compression algorithms further reduce file size by removing redundant or unnecessary data. The choice between lossy and compressed images is a trade-off between file size and quality.
Lossy Compression: This method achieves the most significant file size reduction by permanently discarding some image data. For most web applications, a moderate level of lossy compression is the best choice, as the quality degradation is often imperceptible, while the performance gains are substantial. Tools like Imagify offer different levels (e.g., “Aggressive,” “Ultra”) to control the amount of compression. This is the recommended approach for JPEGs and WebP/AVIF photos.
Lossless Compression: This method reduces file size without compromising image quality. It works by reorganizing the image data more efficiently. The file size reduction is less dramatic than with lossy compression. Still, it’s the ideal choice when preserving every detail is critical, such as for technical diagrams, logos, or medical images. PNG images or files use lossless compression by default.
By mastering these three foundational steps—choosing the correct format, resizing to appropriate dimensions, and applying intelligent compression—you lay the groundwork for a lightning-fast website. The following section will explore how to automate this process using powerful WordPress image optimization plugins.
Automated Power: The Best Image Optimization Plugins of 2025
While manual optimization provides the most control, it’s not always practical for websites with large media libraries or multiple content contributors. This is where WordPress image optimization plugins become essential. These tools automate the entire process, working silently in the background to optimize image compression, apply compression enhancements, optimize existing libraries, and convert images to next-generation formats. In 2025, a high-quality optimization plugin is a core component of any serious WordPress performance stack.
Why Use the Best WordPress Image Plugin? The Case for Automation
Relying on manual optimization alone has several drawbacks. It’s time-consuming, prone to human error, and doesn’t address the images already in your Media Library. A dedicated image optimization plugin solves these issues by providing:
- Automatic Optimization on Upload: Automatic image resizing option-Every new image is compressed and optimized the moment it’s uploaded, ensuring consistent performance without any extra effort.
- Bulk Image Optimization: With a single click, you can process your entire existing media library, applying modern compression techniques to years of content.
- Next-Gen Format Conversion: The best plugins automatically convert your JPEGs and PNGs to WebP or AVIF and serve them to compatible browsers. This task is complex to implement manually.
- Off-Server Processing: Top-tier plugins, such as Imagify and EWWW Image Optimizer, utilize their own servers to handle the resource-intensive compression process, thereby preventing any slowdown in your own hosting environment.
In-Depth Plugin Comparison: The Top Contenders
The market is crowded, but a few plugins consistently stand out based on their features, performance, and user reviews. Here’s a detailed look at the best options for 2025.
1. Imagify
Developed by the team behind the popular caching plugin WP Rocket, Imagify is renowned for its simplicity and powerful “Smart Compression” mode. It aims to provide the best balance between quality and file size automatically.
- Key Features: Three compression levels (Normal, Aggressive, Ultra), automatic WebP and AVIF conversion, bulk optimization, and image resizing. It processes images on its own servers, so it won’t slow down your site.
- Ease of Use: The interface is exceptionally user-friendly. After a quick API key setup, it works almost entirely on autopilot.
- Pricing: A free plan allows for 20MB of optimizations per month (approx. 200 images). Paid plans start at $5.99/month for 500MB or $9.99/month for unlimited usage.
- Best For: Users who want a powerful, “set-and-forget” solution that delivers excellent results with minimal configuration.
2. ShortPixel Image Optimizer
ShortPixel is a highly flexible and popular plugin that offers granular control over compression settings. It’s a favorite among developers and power users who want to fine-tune their optimization strategy.
- Key Features: Supports lossy, glossy, and image compression plugins. It can convert to WebP and AVIF, optimize thumbnails, and remove EXIF data. It also offers a separate “Adaptive Images” plugin that acts as a CDN.
- Ease of Use: The interface is clean and straightforward. It requires an API key, but the setup is quick. and straightforward
- Pricing: The free plan offers 100 image credits per month. Paid plans are flexible, with monthly subscriptions starting at $3.99/month for 7,000 credits or one-time credit packs starting at $9.99 for 10,000 credits that never expire.
- Best for: Users who need flexibility, especially those who prefer purchasing one-time credits over a monthly subscription.
3. EWWW Image Optimizer
EWWW Image Optimizer (Exactly WWW) is a veteran in the space. EWWW Image Optimizer is offering a comprehensive suite of tools that go beyond simple compression. It’s an accurate all-in-one performance tool.
- Key Features: Offers both on-server (free) and cloud-based (premium) optimization. The premium service includes a CDN, automatic WebP/AVIF conversion, and even JS/CSS minification.
- Ease of Use: The free version works without an API key, which is a plus for privacy-conscious users. However, the settings panel can be overwhelming for beginners due to the sheer number of options.
- Pricing: The free version allows unlimited images using your own server’s resources (lossless only). Premium plans with cloud processing and CDN start at $7/ 7/month
- Best For: Users who want an all-in-one performance solution or those who prefer to process images on their own server for free.
4. Smush
Developed by WPMU DEV, Smush is one of the most popular plugins in the WordPress repository, boasting over 1 million installs. Its main draw is the generous free plan.
- Key Features: The free version offers unlimited compressed images for images up to 5MB in size. It also includes lazy loading, incorrect image size detection, or image resize detection. The Pro version adds lossy compression, bulk image optimization for all images, and a CDN.
- Ease of Use: Smush has a very polished and user-friendly interface that guides you through the optimization process.
- Pricing: The free version is competent for basic needs. Smush Pro is part of the WPMU DEV membership, which starts at $7.50/month and includes a suite of other plugins and services.
- Best for: Users on a budget who need to optimize a large number of images with lossless compression and are willing to accept the 5MB file size limit.
Summary Comparison Table
To help you decide, here is a side-by-side comparison of the key features of the top WordPress image optimization plugins in 2025.
| Plugin | Best For | Key Feature | Free Plan | Starting Price |
|---|---|---|---|---|
| Imagify | Ease of Use & Smart Compression | Smart Compression, WebP/AVIF | 20MB/month | $5.99/month |
| ShortPixel | Flexibility & Credit Options | 3 compression levels, one-time credits | 100 images/month | $3.99/month |
| EWWW Image Optimizer | All-in-One Image Optimization | Includes CDN & JS/CSS minification | Unlimited (local server, lossless) | $7/month |
| Smush | Unlimited Free Optimizations | Unlimited images (5MB limit) | Yes, with limits | $7.50/month |
Advanced Strategies: CDN, Lazy Loading, and Server-Side Tweaks
Once you have foundational and automated optimizations in place, you can unlock further site performance gains with advanced techniques. These strategies focus on how images are *delivered* to the user, not just how they are stored. Implementing a Content Delivery Network (CDN), mastering lazy loading, and understanding responsive images are the final steps to achieving an enterprise-grade, high-performance WordPress site.
Leveraging an Image CDN for Global Speed
A Content Delivery Network (CDN) is a globally distributed network of servers that caches your website’s static content, including images. When a user visits your site, the CDN delivers the images from a server that is geographically closest to them, dramatically reducing latency and load times.
The benefits of using a CDN for images are immense:
- Faster Global Delivery: A user in Sydney will download images from a server in Australia, rather than your primary server in Texas, resulting in a significantly faster experience.
- Reduced Server Load: By offloading image delivery to the CDN, you reduce the bandwidth and processing load on your origin server, making your site more resilient during traffic spikes.
- On-the-Fly Optimization: Many modern CDNs, sometimes called Image CDNs, can automatically resize, compress, and convert images to next-gen formats like WebP or AVIF in real-time, tailored to the specific device and browser making the request
Popular CDN services that integrate well with WordPress include Bunny.net, which is highly regarded for its affordability and performance, and Cloudflare, which offers a robust free tier with excellent security features. Many performance plugins, like WP Rocket, and managed hosting providers, like Kinsta and WP Engine, offer seamless CDN integration.
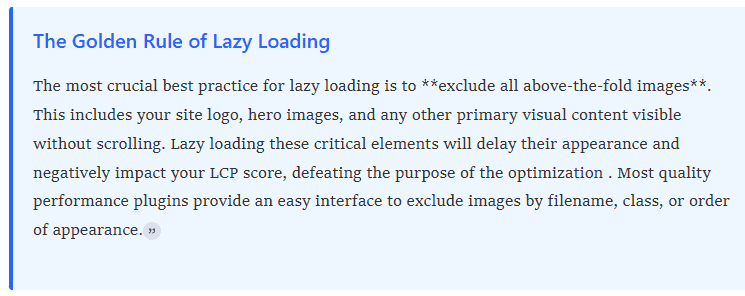
Mastering Lazy Loading in WordPress
Lazy loading is a technique that defers the loading of off-screen images and iframes until a user scrolls into view. Instead of loading every image on a page at once, only the images visible in the initial viewport are loaded. This significantly improves the initial page load time and is a crucial optimization for meeting the Largest Contentful Paint (LCP) metric.
Since WordPress 5.5, native lazy loading is a default feature. It automatically adds the `loading=”; lazy”` attribute to images with defined `width` and `height` attributes. While this is a great starting point, it has limitations. Dedicated site performance plugins like **WP Rocket** or **Perfmatters** offer more granular control, allowing you to lazy-load background images, videos, and iframes.
Optimizing Responsive Images with `srcset`
Responsive design is non-negotiable, and this extends to images. Serving a massive 1920px-wide desktop image to a user on a small mobile screen is a colossal waste of bandwidth. WordPress addresses this natively through the `srcset` and `sizes` attributes.
When you upload an image, WordPress automatically creates several smaller versions (e.g., thumbnail, medium, large). The `srcset` attribute provides the browser with a list of these available image sizes, and the `sizes` attribute gives it hints about how the image will be displayed at different screen widths. The browser then intelligently selects and downloads the most appropriate, smallest possible image file for the user’s device.
As a user, you don’t need to do anything to enable this feature—it’s built into WordPress core. However, its effectiveness depends entirely on the foundational principles we’ve already discussed: you must upload a reasonably sized original image and ensure your theme is coded correctly to support responsive image attributes. This feature doesn’t absolve you from the need to resize and compress; rather, it enhances the delivery of your already-optimized images across all devices.
The Audit: How to Test Your Site’s Image Performance
Optimization without measurement is just guesswork. To truly understand the impact of your efforts and identify remaining bottlenecks, you must conduct a thorough site performance audit. This process involves using standardized tools to analyze your site’s speed and pinpoint specific image-related issues. A regular audit is a critical part of any ongoing performance strategy.
Your Toolkit for Analysis
While numerous tools exist, the industry standard for performance analysis revolves around a few key free services. Consistency is key; use the same tool for before-and-after tests to get comparable results.
- Google PageSpeed Insights (PSI): The definitive tool for measuring Core Web Vitals. It provides both “Lab Data” (a controlled test) and “Field Data” (real-world user data from the Chrome User Experience Report). Its “Opportunities” and “Diagnostics” sections are invaluable for identifying specific issues.
- GTmetrix: A popular tool that provides a detailed performance report, including a “Waterfall” chart that visualizes the loading sequence of every asset on your page. This is excellent for identifying large, slow-loading image files.
- Pingdom: Similar to GTmetrix, Pingdom offers speed testing from multiple geographic locations, which is helpful in assessing the effectiveness of your CDN. It provides a performance grade and breaks down page size and requests by content type.
Step-by-Step Audit Process
Step 1: Run a Baseline Performance Test
Before making any changes, run your key pages (homepage, a typical blog post, a product page) through PageSpeed Insights. Save the report or take a screenshot. Pay close attention to your LCP and CLS scores and look at the “Opportunities” section for image-related recommendations like:
- Serve images in next-gen formats: This indicates you are not using WebP or AVIF.
- Properly size images: This means you are uploading images with dimensions much larger than their display size.
- Efficiently encode images: This suggests your photos are not sufficiently compressed.
A PageSpeed Insights report highlighting image-related optimization opportunities.
Step 2: Identify Large Images with a Waterfall Chart
Next, run the same page URL through GTmetrix. Navigate to the “Waterfall” tab. This chart lists every single request made to load your page. Sort the list by “Size” to immediately see the largest files. In most cases, these will be your images. This is the quickest way to identify the exact files that are contributing the most to your page weight and need immediate attention .
The GTmetrix Waterfall chart is essential for spotting oversized image files.
Step 3: Check for Layout Shifts (CLS)
Return to your PageSpeed Insights report and look at the “Diagnostics” section for the “Avoid large layout shifts” audit. If this audit is flagged, it will list the specific page elements that are shifting during load. Often, these will be “ elements that are missing explicit `width` and `height` attributes. This tells you exactly which images need to have their dimensions defined in the HTML to improve your CLS score.

The “Avoid large layout shifts” diagnostic pinpoints images causing CLS issues.
Step 4: Manual Inspection with Developer Tools
For a more granular check, you can use your browser’s built-in developer tools. Right-click on an image on your site and select “Inspect.” In the Elements panel, you can see the “ tag and its attributes. Hovering over the image source link will often show you the image’s “intrinsic size” (its original dimensions) versus its “rendered size” (how it’s being displayed). A large discrepancy between these two numbers is a clear sign that the image needs to be resized.d
By following this four-step audit process, you can move from abstract performance goals to a concrete, actionable list of tasks. After implementing the optimizations detailed in this guide, rerun these tests to measure your improvement and celebrate your faster, more efficient website.
Frequently Asked Questions (People Also Ask)
Does WordPress automatically optimize images?
Yes, to a limited extent. Since version 4.5, WordPress automatically applies a default compression level (around 82-90% image quality) to JPEG images upon upload and creates several smaller image sizes (thumbnail, medium, large) for responsive use with `srcset`.However, this is often insufficient for optimal performance. The original, large file is still stored, and the compression is not as aggressive as what dedicated plugins can achieve. For significant speed gains, manual pre-optimization and specialized plugins are necessary.
What is the best image size for WordPress?
There is no single “best”; size, as it depends on your theme’;s layout and the image’s purpose. However, a strong best practice is to resize images to the maximum dimensions they will be displayed at. Common recommendations from experts are:
- Blog/Content Images: ~1200px wide
- Full-Width Hero Images: 1920px to 2560px wide
More importantly, always aim to keep the final compressed file size under 200KB, and ideally under 100KB, for fast loading.
Should I optimize images before uploading them to WordPress?
For the best results, you should do both. This creates a two-stage optimization workflow.
1. Pre-Upload Optimization: Manually resizing images to correct dimensions and choosing the proper format (e.g., saving a photo as a high-quality JPEG) before uploading gives you the most control and prevents oversized original files from consuming server storage.
2. Post-Upload Optimization: Using a plugin to automatically compress images and convert them to WebP/AVIF upon upload ensures consistency and handles ongoing maintenance, especially if multiple people contribute content to your site.
How do I fix blurry images after compression?
Blurriness or pixelation is almost always caused by excessive lossy compression. If you are using a plugin, select a less aggressive WordPress image compression level. For example, in Imagify, switch from “Ultra” to “Aggressive” or “Normal” (which is lossless). In ShortPixel, choose “Glossy” or “Lossless” instead of “Lossy”. If you are optimizing manually in a tool like Photoshop, save your JPEGs at a higher quality setting (e.g., 70-85 instead of 50).
Can I optimize images without a plugin?
Yes, you can. The manual process involves using a desktop application like Adobe Photoshop or a free online tool like TinyPNG to resize and compress images before uploading them to the WordPress Media Library. You can also manually enable native lazy loading fix by adding `loading=” lazy”` to your image tags in the HTML editor, but this is far less practical and scalable than using a plugin that handles it automatically.
By following this plan, you are addressing the most significant performance bottlenecks on your site. Image optimization is one of the highest-impact, lowest-effort improvements you can make. It’s a tangible investment in your website’s health that pays dividends in higher rankings, better engagement, and a more professional and satisfying experience for every visitor who lands on your digital doorstep.
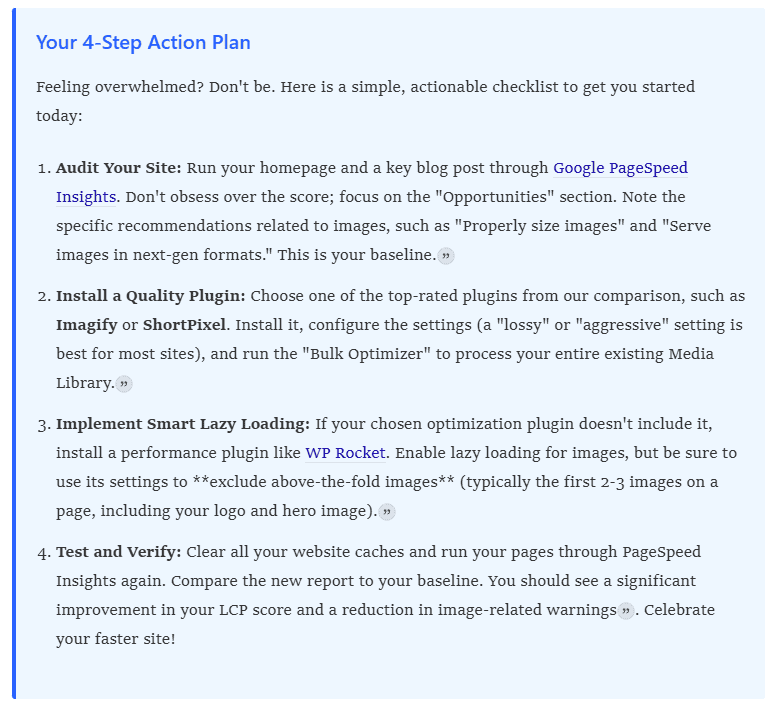
Conclusion: Your Action Plan for a Faster WordPress Site
We’ve journeyed through the critical landscape of WordPress image optimization, from the foundational principles of manual preparation to the automated power of plugins and advanced delivery techniques. The evidence is overwhelming: in 2025, optimizing your images is not a peripheral task but a core pillar of a successful digital strategy. It directly influences your site’s speed, user experience, conversion rates, and, crucially, your visibility on search engines.
The path to a high-performance website is straightforward and achievable. It doesn’t require you to become a web performance guru overnight. It simply requires a systematic approach and the right tools. By internalizing the key takeaways from this guide, you can implement a workflow that yields immediate and lasting results.
Achieving optimal site performance for any WordPress site hinges on thorough WordPress image optimization. As large images and unoptimized background image files negatively impact page load speed, a dual-layer strategy is essential, starting with pre-upload preparation. This foundational step requires users to resize huge images and perform image resizing to appropriate image sizes, addressing issues like cropped images, fixing, and the display of PNG images. This reduces the initial file size of the original images before they enter the WordPress media library.
The next layer involves a dedicated image optimization plugin—the core of automated performance. Among the best image optimization plugins and best image optimizer plugins, tools like ShortPixel Image Optimizer and EWWW Image Optimizer lead the field, offering robust image compression and bulk optimization capabilities. These WordPress image optimization plugins allow you to automatically compress images and provide options for lossless compression (lossless image compression) or more aggressive settings while striving for a remarkable image quality fix. They also offer an automatic image resizing option and handle the transition to modern image formats to convert images (e.g., enabling webp test files fix) and implement the necessary WordPress format fix.
These popular image optimization plugins ensure your media library is efficient, supporting advanced features like background image optimization and addressing multiple background images with options to adjust background image src and apply a background image fix. They also handle the delivery of images inside picture tags and ensure that optimized images are correctly served, even with checks for incorrect image size detection (image resize detection) and the removal of EXIF data.
Key delivery features include lazy loading (native lazy loading fix), ensuring that the browser only needs to load images as they enter the viewport, which dramatically improves the experience on mobile devices. The plugins offer various levels of image optimizer control, including options for unlimited image compression (unlimited images) or a capable free version, though not all the same features are present. They manage complex settings like resize settings change fix, image sizes selector fix, and advanced configurations like customize webp directory fix, and various cleanup options like reset settings fix, reset smush data fix, and handling issues like resize module deletes thumbnail.
Ultimately, relying on a professional image compression plugin is the most effective way to ensure optimal website performance by turning huge images into manageable, compressed files, thereby avoiding common pitfalls like optimized images inaccurately fixed and ensuring compliance with modern standards like WP-scaledd images fix. This structured workflow of pre-optimization and automated post-optimization—including background optimization and bulk image optimization via features like bulk smush page fix and directory smush module fix—is essential for sustained site performance.

With over 27 years of hands-on SEO expertise, starting from my early days as a CFO. Quitting that job to build a top-ranked web hosting business in 1995, I’ve mastered WordPress optimization as a precise engineering discipline. Through extensive research, high-level consulting, and developing a WordPress site that achieved over a thousand organic Google rankings—culminating in a six-figure sale—I’ve decoded Google’s algorithm over 27 years to develop wordpress engineering that transforms underperforming WordPress sites into authoritative powerhouses. Business owners frustrated by stagnant traffic, low visibility, and missed opportunities find relief as I help them deliver measurable ROI through higher rankings, increased leads, and sustainable growth. As owner of dominant city-based SEO platforms in major U.S. markets, I outperform industry gurus, empowering entrepreneurs, local businesses, agencies, and marketers via my WordPress Optimization services at wordpressoptimization.com to unlock their site’s full potential.